Quick Installation Guide DivaBox © Storex 2009 1
Quick Installation Guide DivaBox © Storex 2009 2
TABLES OF CONTENT OPERATION ..................................................................................................................................................5 MAIN FEATURES .........................................................................................................................................5 INSTALLING THE DIVABOX MULTIMEDIA CARTDIDGE .............................................................................. 7 BEFORE STARTING .........................................
Quick Installation Guide DivaBox © Storex 2009 4
INTRODUCTION DivaBox makes it possible to receive the free channels of the DVB-T, including the high-definition channels, to record them. The DVB-T records (direct recording or scheduled record) are done on multimedia cartridge. OPERATION - Connected to the antenna wall socket you can visualize the DVB-T channels as well as the high definition channels. - Connect an USB device (external hard drive or USB stick) to be able to visualize your movies, music and photos. MAIN FEATURES - USB HOST connection.
Quick Installation Guide DivaBox © Storex 2009 6
INSTALLING THE DIVABOX MULTIMEDIA CARTDIDGE If you have got a first multimedia cartridge with your DIVABOX, you should attach the cartridge to the main unit, before turning the unit on, according to below procedure: 1. Remove the fake cartridge and moving the fake cartridge away in direction (1) 1 1 2. Position your DivaBox cartridge on top of the (2) cavity. Move gently in either direction (3) or (4) until the cartridge falls in the rail. 3 2 4 3.
REMOTE CONTROL DETAIL 1 3 2 6 4 5 7 9 8 10 12 11 13 14 15 17 16 18 20 19 21 22 23 24 25 27 26 30 28 29 33 31 32 Quick Installation Guide DivaBox © Storex 2009 8
No.
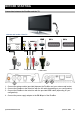
BEFORE STARTING Connection between the DivaBox and the TV Antenna wall socket Rear TV 2 1 Antenna cable Composite cable 3 HDMI cable 3 4 1 2 1. Connect the antenna cable (provided) between the DivaBox and your antenna wall socket 2. Connect the DivaBox to the television with the AV cable (depending on your configuration). 3. Connect the DivaBox to the television with the provided HDMI cable (depending on your configuration). 4. Connect the power supply adapter to the DC IN port of the DivaBox.
Front panel 1 3 2 1. LED "COPY" : Flicker to announce the copy of files LED "HDD" : Flicker to announce an activity on a peripheral LED "STANDBY" : Shows the unit state (Turn on/Turn off) 2. VFD DISPLAY : Shows some information (menu, time…) 3. IR : To receive the remote control signal Rear panel 1 1. 2. 3. 4. 5.
INSTALLING THE DVB-T CHANNELS 1. Connect the cable antenna of your antenna wall socket to the “Antenna IN” DivaBox (see illustration page 10). 2. Check that HDMI cable is well connected between the DivaBox and the TV. 3. Connect the power supply cable of the wall socket to the “DC IN” of the DivaBox (see illustration page 10). Turn on the unit by pressing the “ “ button, once the unit is lit you should have the following screen: 4. Select “HDTV” in order to be able to start the scan of DVB-T channels. 5.
7. The following page is posted with the screen. 7.1 Select your zone by pressing " / " of your remote control 1 8. Select “Search” using the directional keys of your remote control then press “ENTER”. 9. The scanning of the DVB-T channels starts. 9.1 Many channels are found during scanning 9.
10. Once scan finished a window will pop up with the report of the channels scanned. 11. Select “Save” then press “ENTER” to save the channels founded in the database. VISUALIZE AND RECORD THE DVB-T CHANNELS Visualize the DVB-T channels Select “HDTV” Use the keys " / " to change chain TNT. Press " " to show strength of the signal. Press " " to change subtitles. Press " " to show the Electronic Program Guide.
Direct recording 1. Select "HDTV" 2. Select the desired channel for the recording using keys " / " 3. Press " " of your remote control to start the recording. 4. Press " " once again to stop the recording of the current program, a message will appear on the screen, select “YES” to stop the recording. Note: All the records are stored directly in the DivaBox multimedia cartridge, in the folder “Record” placed at the root of the cartridge.
Scheduled recording The scheduled recording is only possible and available from the EPG screen or from the recording list by pressing " " then " ". 1. During the visualization of a chain press on key " " of your remote control. 2. Select the channel on the list then the program which you wish to record using the directional keys of your remote control. 3. Press “ENTER” to post information corresponding to the selected program.
USING A DIVABOX MULTIMEDIA CARTRIDGE NOTE : You must have a DivaBox multimedia cartridge to use this function . You can read various files Video, Music and Photo resulting from the installed DivaBox multimedia cartridge, USB storage or the network. 1. Select one of the icons according to the file type which you want to visualize (Video, Music or Photo). 2. Select “HDDPartition1” then press “ENTER”, select the file which you want to visualize and press on “ENTER”.
USING AN EXTERNAL STORAGE DEVICE DivaBox is equipped with an “USB HOST” port making it possible to connect an USB stick or an external hard disk to the DivaBox, to explore it and play the multimedia contents which are stored there. 1. Select one of the icons according to the type of file which you wish to visualize (Video, Music or Photo). 2. Select your USB storage device then press “ENTER”, select the file which you want to visualize and press “ENTER”.
USING THE NETWORK MODE 1. Please configure your network connection before you use this tool (please refer to page 22 and 23). 2. Install software STOREX DIGITAL Media Server on your PC (available on www.storex.eu) 3. Once the installation is finish, you can lunch the STOREX DIGITAL Media Server 4. Set the files with contents to be share on DivaBox while pressing “add” to reach the Explorer and choose the files. 5. Select the files which you want to share with DivaBox and click on “Confirm” 6.
TAKE ADVANTAGE FROM THE MULTI-MEDIA UNIVERSE 1. Select one of the icons (Video, Music and Photo) of the main page: 2. Select your STOREX Media Server, which is posted in the list, by pressing “ENTER” and select the file that you want to play. 3.
HOW TO CONFIGURE THE DIVABOX Display 1. Turn on the DivaBox 2. Once the DivaBox has boot up, select “SETUP” then press “ENTER” to configure your DivaBox 3. Choose the resolution 4.
Network 1. Select the type of network connection in order to connect the DivaBox at your domestic network. 2. If you choose the wired connection (Wired LAN), the DHCP server will assign automatically an IP address to your DivaBox. If you use a wireless connection, follow these steps. 1. Select “Wireless”. 2. Select “SCAN” function in order to search all the access points available detected by the DivaBox. Then select the access point that you want you to connect.
3. Select your SSID using the keys “Left/Right” 4. Modify your security settings (if necessary). 5. Type your security code (if necessary) using the virtual keyboard. 6. Press “ENTER” to apply all the settings. 7. Select “Connect” then press “ENTER” to validate. Your DivaBox is ready to be used. Hint: The wireless connection is only available with a USB WiFi stick, you can find it in www.storex.
8. Exit setup and save all the settings by selecting “YES” when the following message appears. WEB SITE STOREX You will find on the STOREX web site a heading SUPPORT associated with each STOREX product. Appointment with the http://www.storex.eu address, select “TNT Recorder” then DivaBox. You will be able to download the last complete version of the handbook, the software updates and to consult the frequently asked questions.
REGISTERING THE WARRANTY Please take a moment to register the guarantee for your DivaBox at our website: http://warranty.storex.eu TERMS OF WARRANTY Your DivaBox player carries a limited one year warranty. STOREX guarantees your product against any manufacturing and assembly faults. This warranty only applies to the first purchase of a DivaBox by the end-user, and is not transferable if the unit is subsequently sold.
SAFETY AND ENVIRONMENT Your STOREX unit was tested and is in conformity with the CE standards at the time of its marketing. Your STOREX unit was tested and is in conformity with the environmental standards (RoHS) at the time of its marketing. At the end of the unit lifetime , not to throw it to the dustbin but to bring back it to the distributer which will be given the responsibility to make pass the product in a die of electric waste recycling, electromechanical and electronic (DEEE).
Quick Installation Guide DivaBox © Storex 2009 27
DIVABOX Is a product line of www.storex.eu © STOREX –2009 All trademarks are the property of their respective owners.