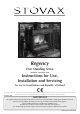
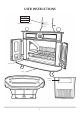
Regency Free Standing Stove Models: 1000/1001/1002 Instructions for Use, Installation and Servicing For use in Great Britain and Republic of Ireland * This appliance has been certified for use in countries other than those stated. To install this appliance in these countries, it is essential to obtain the translated instructions and in some cases the appliance will require modification. Contact Stovax for further information.
COVERING THE FOLLOWING MODELs: 1000/1001/1002 APPLIANCE COMMISSIONING CHECKLIST 3 COMMISSIONING 21 USER INSTRUCTIONS MAINTENANCE & SERVICING 22 General Points Using the appliance for the first time Recommended Fuels Lighting the appliance Running the appliance Burning Tips Ash Removal Over night burning Over-Firing Chimney Fire General Cleaning Chimney Sweeping Care of Appliance Seasonal Use Troubleshooting Tips 4 4 6 6 7 7 7 8 9 9 9 9 9 10 10 10 Annual Service Removal of Baffle & Grate 22 23 BA
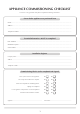
APPLIANCE COMMISSIONING CHECKLIST To assist us in any guarantee claim please complete the following information:- Stovax dealer appliance was purchased from Name:.................................................................................................................................................................. Address:................................................................................................................................................................ . ...............
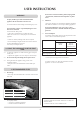
USER INSTRUCTIONS 1. General POINTS 1.1 Before use of this appliance please read these instructions fully. 1.2 All local regulations, including those referring to national and European Standards need to be complied with when installing the appliance. 1.3 Only use for domestic heating in accordance with these operating instructions. 1.4 You must burn only approved fuels. Do not use with liquid fuels or as an incinerator. 1.5 Appliance surfaces become very hot when in use.
USER INSTRUCTIONS Flue Adapter Stovax Part No.
USER INSTRUCTIONS Do not burn construction timber, painted, impregnated / treated wood, manufactured board products or pallet wood. WARNING Properly installed, operated and maintained this appliance will not emit fumes into the room. 3.2 Solid fuel: • Burn only anthracite or manufactured briquette smokeless fuels listed as suitable for use with open heating appliances Occasional fumes from de-ashing and refuelling may occur.
USER INSTRUCTIONS • Open the doors fully for a few minutes before re-fuelling 4. Lighting The appliance 4.1 • Rake the embers evenly over the fire bed For best results: • Burn new logs at high output for a few minutes before adjusting the Air Inlet controls. Refuel little and often for clean, efficient burning.
USER INSTRUCTIONS — Smoke and small flames — Dirty firebricks — Short life span for grate, baffles and internal firebricks 6.3 6.4 Air inlets puffing smoke Combustion gases build up in the firebox and ignite as small explosions, causing smoke to puff out of the air inlets and other openings. This occurs if the air controls are shut soon after adding new fuel to a very hot fire. Stop by opening the air controls to increase combustion air and burning rate.
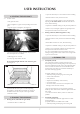
USER INSTRUCTIONS 7.3 Remove Ashpan carefully. Heat can remain long after use, See Diagram 12 11. GENERAL CLEANING 11.1 Allow appliance to cool thoroughly to avoid risk of burns: • Clean regularly, according to the level of use • Give attention to the baffle system, flue ways and removing ash Regular cleaning and maintenance will help give many years of safe use. • Clean matt black appliances using Stovax Collodial black or Stovax Grate Polish To refresh painted finishes use Stovax Thermolac paint.
USER INSTRUCTIONS 13. Care of appliance 14. Seasonal use Stovax has a range of cleaning and maintenance products and accessories to keep your appliance in good working condition. Your Stovax retailer can provide full details but here is a brief list of useful items: 14.
TECHNICAL SPECIFICATION Small Regency Medium Regency *Large Regency REGENCY 1000/1001/1002 Wood kW 5 12 12 Solid Fuel kW 4 5 6 mm 1.25 1.25 1.25 inch Wg 0.05 0.05 0.
TECHNICAL SPECIFICATION Regency DIMENSIONS D G I E A H B C F Description PR7215R Model A B C D E F G H I Small Regency 1000 930mm 760mm 140mm 850mm 740mm 296mm 350mm 650mm 120mm Medium Regency 1001 960mm 800mm 140mm 950mm 840mm 296mm 400mm 690mm 120mm 1002 960mm 800mm 140mm 1050mm 930mm 296mm 400mm 690mm 120mm Large Regency All dimensions in mm. (25.
SITE REQUIREMENTS 1. FLUE OR CHIMNEY 1.1 The flue or chimney system must be in good condition. It must be inspected by a competent person and passed for use with the appliance before installation Products of combustion entering the room can cause serious health risks. 1.2 1.5 You must sweep and inspect the flue when the appliance is installed. 1.6 You must check the flue draught with all windows and doors closed and any extraction fans in this or adjoining rooms running at maximum speed.
SITE REQUIREMENTS 1. FLUE OUTLET POSITIONS Terminal Flue Vertical Measurement Horizontal Measurement 150mm max Insulation Adjacent Building The vertical measurement is the lowest from either the point of discharge or 150mm above insulation.
SITE REQUIREMENTS 3. WALLS NEXT TO A HEARTH Solid, non-combustible material e.g.
PRE-INSTALLATION CHECKS Small Regency Medium Regency Large Regency 1. VENTILATION mm 200 200 200 inch 8 8 8 mm 180 180 180 inch 7 7 7 mm 200 200 200 inch 8 8 8 m 4.5 4.5 4.
PRE-INSTALLATION CHECKS 2. ADDITIONAL VENTILATION Extractor fans or cooker hoods must not be placed in the same room or space as this can cause the appliance to emit fumes into the room. 2.3 If any of these checks reveal problems do not proceed with the fitting of the appliance until they have been rectified. Large Regency 2.2 Medium Regency Additional ventilation will be required to comply with the requirements of the Building Regulations.
INSTALLATION INSTRUCTIONS • Open the doors and remove the carton containing the following items: Flue pipe adaptor 3 Legs Blanking plate Screws • Remove the grate and ash pan • Lay the appliance carefully on it's back • Fit ash lip to front of appliance between bottom of appliance sides and appliance bottom plate • Line up the row of four holes in the lip plate with the corresponding holes in the bottom plate • Secure with 4 flat headed screws • Secure appliance bottom plate to appliance sides w
INSTALLATION INSTRUCTIONS Flue Adapter Size Stovax Part No. 8" 4819 Seal collar with fire cement Self tapping screw Flue Pipe 915mm (3ft) Size Stovax Part No. *5" 4502 6" 4602 Tee Self tappping screw at rear Cap Seal flue collar with Fire Cement Size Stovax Part No. 8" 4817 Flue Adapter Size Stovax Part No. 8" 4819 PR7219R To chimney connection as detailed in building regulations PR7218R Elbow with access cover Size Stovax Part No.
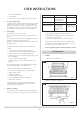
INSTALLATION INSTRUCTIONS 3. FITTING AND REMOVAL OF THE GRATE 3.1 The grate must be fitted for the burning of all fuels. 3.2 To fit the grate place on the runners on the side of the firebox. 3.3 Place ashpan under the grate. 3.4 Removal is the reverse of the above procedure 4. OPTIONAL ADDITIONS The appliance comes with the additional option of a cast iron Bean Pot 4.1 Seasoning Cast Iron Cookware Seasoning cast iron pans makes them nonstick and increases longevity.
COMMISSIONING when children, elderly or infirm persons are near the appliance COMMISSIONING 1.
MAINTENANCE and SERVICING For a complete list of spare parts and accessories contact your Stovax dealer for the Stovax Fireplace, Stove & Hearth Accessories brochure or call 01392 474011 This is a list of the maintenance products you may need to use: 1. ANNUAL SERVICE Task 1.
BASIC SPARE PARTS LIST regency - small Part No. Description Casting No. SR8 Baffle Plate 15123-5 SR9 Grate 10201-5 regency - medium regencY - LARGE Part No. Description Casting No. Part No. Description Casting No.
SERVICE RECORDS 1ST SERVICE 2ND SERVICE Date of Service:........................................................................... Date of Service:........................................................................... Next Service Due:....................................................................... Next Service Due:....................................................................... Signed:........................................................................................
EZ/07/1991/09-10 EZ/07/1991/09-10 25
Stovax Ltd, Falcon Road, Sowton Industrial Estate, Exeter, Devon, England EX2 7LF Tel: (01392) 474011 Fax: (01392) 219932 E-mail: info@stovax.com www.stovax.