Users Guide & Installation Handbook Stoves Freestanding Dual Fuel UK Part No 083138407 Date 03/12/2014
CONTENTS & INTRODUCTION CONTENTS • SAFETY • USING THE PRODUCT • CLEANING • INSTALLATION INSTRUCTIONS • TECHNICAL DATA • CUSTOMER CARE INTRODUCTION Thank you for buying this British-built appliance from us. This guide book is designed to help you through each step of owning your new cooker, from installation to use. Please read it carefully before you start using your product, as we have endeavored to answer as many questions as possible, and provide you with as much support as we can.
CONTENTS & INTRODUCTION Our policy is one of constant development and improvement, therefore we cannot guarantee the strict accuracy of all of our illustrations and specifications - changes may have been made subsequent to publishing. GAS WARNING If you smell gas: Do not try to light any appliance. Do not touch any electrical switch. Call the Gas Emergency Helpline at 0800 111999 3.
SAFETY BEFORE USING THE PRODUCT Make sure that you have removed all packaging and wrapping. Some of the items inside this appliance may have additional wrapping. It is advised that you turn the ovens and/ or grill on for a short while. This will burn off any residues left from manufacturing. There may be a smell which accompanies this process - but this is nothing to worry about and is harmless.
SAFETY WARNING! - The appliance must never be disconnected from the mains supply during use, as this will seriously affect the safety and performance, particularly in relation to surface temperatures becoming hot and gas operated parts not working efficiently. The cooling fan (if fitted) is designed to run on after the control knob has been switched off. WARNING! Do not spray aerosols in the vicinity of this appliance while it is in operation.
SAFETY away. WARNING! - Never place food, or dishes on the base of the main oven, the element is here and it will cause over heating. WARNING! - Do not modify the outer panels of this appliance in any way. WARNING! - This appliance must be earthed. WARNING! - The top element gets extremely hot when in use, so take care to avoid touching it. GAS WARNING! If you smell gas: Do not try to light any appliance. Do not touch any electrical switch. Contact your local gas supplier immediately.
SAFETY GAS HOB Do • Always ensure that pan bases are dry and flat before using them on the hob. • Always position pans over the centre of the heat zone, and turn the handles to a safe position so they cannot be knocked or grabbed. • Always use pans which are no smaller than 100mm (4”), or larger than 250mm (10”). Use a 230 mm (9”) pan above the wok burner, if two or more other hotplate burners are in use at the same time. • • • Never heat a sealed tin of food, as it might explode.
USING THE HOB - GAS • If your hob is supplied with left and right handed pan supports, ensure that they are located over the alignment pins and are sitting flat on the hob. • Use pans which are large enough to avoid overflows onto the hob surface. • Wipe any spillage as soon as possible. • Clean the hob top as regularly as possible, this will prevent any build up of grease which may be a fire hazard.
USING THE HOB - GAS FOLD DOWN LID (IF FITTED) Caution: Glass lids may shatter when heated. Turn off all the burners before shutting the lid. When opening and closing the lid, use the cooler outer sides of the lid glass. The lid must be opened fully, so there is no danger of it closing while the hob is being used. Appliances fitted with glass lids are fitted with a safety system which will automatically turn off the hot plate burners if they are inadvertently left on as the lid is closed.
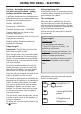
USING THE GRILL - ELECTRIC Caution: Accessible parts may be hot when the grill is used - young children should be kept away. A grill pan handle can be purchased as an optional extra from our spares department quoting the part numbers below: Using aluminium foil Using aluminium foil to cover the grill pan, or putting items wrapped in foil under the grill creates a fire hazard.
USING THE TOP OVEN - ELECTRIC (if fitted) When you are cooking keep children away from the vicinity of the oven. Caution: The top element gets extremely hot when in use, so take extra care to avoid touching it. The top oven is a conventional oven. Note: The top oven is not controlled by the programmer (if fitted). To turn on the top oven Turn the temperature control knob until the required temperature is selected.
USING THE TOP OVEN - ELECTRIC (if fitted) TOP OVEN BAKING GUIDE Cooking temperatures Cooking times The temperature settings and time given in the Baking Guides are based on dishes made with block margarine. If soft tub margarine is used, it may be necessary to reduce the temperature setting. If a recipe gives a different temperature setting to that shown in the guide, the recipe instruction should be followed. These times are based on cooking in a preheated oven.
USING THE MAIN OVEN - ELECTRIC Accessible parts may be hot when the oven is used. Young children should be kept away. To switch on the oven Turn the oven control knob(s) to the required setting. The red thermostat indicator (if fitted) will come on until the selected temperature is reached and then go off; it will turn on and off periodically as the thermostat operates to maintain the selected temperature.
USING THE MAIN OVEN - ELECTRIC Slow cooking ( Setting or 100°C) • Make sure that frozen foods are thoroughly thawed before cooking. • Do not slow cook joints of meat or poultry weighing more than 2¼kg/4½lb. • Preheat the oven to 170°C and cook for 30 minutes, then adjust the oven control to or 100°C (slow cook setting) for the remainder of the cooking time. • Slow cooking times will be about 3 times as long as conventional cooking times.
USING THE MAIN OVEN - ELECTRIC There is no need to interchange dishes onto different shelves part way through cooking, as with a conventional oven. To help the air circulate freely Position the shelves evenly within the oven and maintain a clearance from the oven roof and base. If more than one cooking dish or baking tray is to be used on a shelf, leave a gap of at least 25mm between the items themselves and the oven interior.
USING THE MAIN OVEN - ELECTRIC Note: This is a fanned oven, therefore some adjustment will have to be made to conventional cooking temperatures. The table below shows conventional cooking temperatures, fanned oven temperatures and gas marks. For optimum results, conventional temperatures need to be converted to fanned oven temperatures. For example, an item which would normally cook at a conventional temperature of 180 °C, will now cook at the fanned oven temperature of 160°C.
USING THE MAIN OVEN - ELECTRIC Traditional fruit cakes Roast turkey It should be remembered that ovens can vary over time, therefore cooking times can vary, making it difficult to be precise when baking fruit cakes. Roasting turkey involves cooking two different types of meat - the delicate light breast meat, which must not be allowed to dry out, and the darker leg meat, which takes longer to cook. It is necessary therefore, to test the cake before removal from the oven.
USING THE MAIN OVEN - ELECTRIC Roasting guide Notes: The times given in the roasting guide are only approximate, because the size and age of the bird will influence cooking times as will the shape of a joint and the proportion of the bone. • When cooking stuffed meat or poultry calculate the cooking time from the total weight of the meat plus the stuffing. • For joints cooked in foil or covered roasters, and for lidded casseroles, add 5 minutes per 450g (1lb) to the calculated cooking time.
USING THE CLOCK/PROGRAMMER-ELEC(if fitted) THE ALTERNATIVE PROGRAMMERS There are two types of programmer covered in this section - push button & touch control. Both programmers have the same symbol variants & functions but may vary in their method of operation. The push button programmer Symbol Symbol - Symbols on the LED display. Down/minus This ‘A’ symbol appears when either a semi, or fully automatic program is selected. This symbol will flash while a program is being set.
USING THE CLOCK/PROGRAMMER-ELEC(if fitted) This message and ‘A’ symbol appear when you are asked to enter in an end time, or when you would like the oven to switch itself off. Setting the minute minder To set the time of day • Press the Up and Down buttons together for a few seconds, and release. • The ‘ •’ in between the numbers on the LED Display will begin to flash. • While the ‘ •’ is flashing it is possible to adjust the time using the Up and Down buttons.
USING THE CLOCK/PROGRAMMER-ELEC(if fitted) Semi-automatic cooking There are two types of semi automatic cooking available on this appliance. The oven must be switched on, and in use to use either of these functions successfully. The Duration method allows you to set the oven for a specific length of time. If a dish needed 2 hours to cook, then it would be possible for you to set the oven to turn off 2 hours later.
USING THE CLOCK/PROGRAMMER-ELEC(if fitted) SEMI-AUTOMATIC COOKING The duration method • Press the Function button twice,(1) which will skip past the Minute Minder. • The LED display will flash the word ‘dur’, (2) and the ‘A’ will flash on the left hand side of the display. • Use the Up and Down buttons to set the length of time you want to cook for.(3) This must be done within 5 seconds or the time of day will show again.
USING THE CLOCK/PROGRAMMER-ELEC(if fitted) FULLY AUTOMATIC COOKING (EXAMPLE) This programming method is best suited for when a delayed start time is required. Unlike the semi automatic methods this requires both the duration and the end time to be entered. The timer will work out the start time and begin cooking. • Press the function button twice to select the length of time your food will need. (7) • The ‘A’ on the left hand side will flash and the ‘dur’ message will flash up.
USING THE CLOCK/PROGRAMMER-ELEC(if fitted) The touch control programmer There are three touch control icons for this timer - the table below shows you what the symbols look like, depending on the model type, & their functions. The ‘function’ icon in the centre is used for setting the minute minder & setting up the automatic cooking - see below for details. Note - some functions require you to ‘touch & hold’ an icon for a few seconds, whilst others require you to just ‘touch’ the icon without holding.
USING THE CLOCK/PROGRAMMER-ELEC(if fitted) Setting the time of day Semi-automatic cooking Touch & hold the centre (function) icon for a few seconds until the ● symbol between the numbers on the LED display flashes. Method 1 - duration (switch off after set time period): While the ● symbol is flashing, you can adjust the time of day by touching the plus & minus icons. Please note: the hours & minutes adjust quickly.
USING THE CLOCK/PROGRAMMER-ELEC(if fitted) Use the plus & minus icons to select the time the oven is required to switch off. Once this is done the oven will switch itself off at the pre-selected time. To turn the alarm off, touch any icon. To cancel the automatic programme at any time, touch the plus & minus icons together. To cancel the semi-automatic programme at any time, touch the plus & minus icons together. Fully automatic cooking This function allows the cooker to switch on & off automatically.
CLEANING General • It is important to clean the product regularly as a build up of fat can affect its performance or damage it and may invalidate your guarantee. • Always switch off your appliance and allow it to cool down before you clean any part of it. • Do not use undiluted bleaches, products containing chlorides, wire wool or abrasive cleaners on aluminium, stainless steel, or plastic/ painted parts as they can damage the appliance. Nylon pads can also be unsuitable.
CLEANING REMOVING OVEN PARTS FOR CLEANING Inner Door Glass (glass doors only) • The inner door glass panel can be removed for cleaning but it must be replaced the right way up. If there is any writing on the glass, you must be able to read it clearly when the cavity doors are open. • Always make sure that the glass is pushed fully into the Stop position. • To remove the glass panel, open the door wide, hold the top and bottom edges and slide out. that it is replaced immediately.
CLEANING GAS HOB Cast iron griddle or pan supports (if fitted) Burner caps and heads • The slots in the burner head where the flames burn should be cleared of deposits. • Clean with a nylon brush, rinse and then dry thoroughly. There may be brown coloured markings on your burners; these are carbon deposits or fat stains and can be removed using a soap filled pad. • Do not put burners in the dishwasher or soak them.
INSTALLATION INSTRUCTIONS - DUAL FUEL Before you start: Please read the instructions. Planning your installation will save you time and effort. Prior to installation, ensure that the local distribution conditions (nature of the gas and gas pressure) and the adjustment of the appliance are compatible. The adjustment conditions are stated on the data badge. This appliance is not connected to a combustion evacuation device. It shall be installed and connected in accordance with current installation regulation.
INSTALLATION INSTRUCTIONS - DUAL FUEL Windows and permanent vents should therefore not be blocked or removed without first consulting a GAS SAFE gas installer. In the Republic of Ireland, refer to relevant Irish Standards for correct ventilation requirements. Failure to install appliances correctly is dangerous and could lead to prosecution.
INSTALLATION INSTRUCTIONS - DUAL FUEL LEVELLING YOUR COOKER STABILITY BRACKET Place a spirit level on a baking sheet onto an oven shelf. If the cooker is fitted with a flexible connection, a stability bracket should be fitted to engage in the back of the cooker. A stability bracket can be bought from your local supplier. The cooker is fitted with LEVELLING FEET. Level your cooker to your desired height using the levelling feet at the front and rear of the cooker.
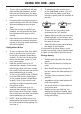
INSTALLATION INSTRUCTIONS - DUAL FUEL PRODUCTS WITH CAST IRON LID (WHERE FITTED) A 55mm clearance is required from the back of the hotplate to the rear wall, to allow the lid to be opened fully. To ensure this clearance is maintained, the infill piece (supplied) should be fitted using the instructions below. Fix the infill piece to the wall - using suitable screws and wall fixings (not supplied) - and ensure it is level with the hotplate as shown. Note: The 55mm clearance dimension should not be reduced.
INSTALLATION INSTRUCTIONS - DUAL FUEL CONNECT TO THE ELECTRICITY SUPPLY Warning: This appliance must be earthed. The appliance must be installed by a competent electrician using a double pole control unit of 32 ampere minimum capacity with 3mm minimum contact separation at all poles. We recommend that the appliance is connected by a qualified electrician who is a member of the N.I.C.E.I.C. and who will comply with the I.E.E. and local regulation. 1.
INSTALLATION INSTRUCTIONS - DUAL FUEL CONNECT TO THE GAS SUPPLY Oven light & convection fan The inlet to the cooker is ½” BSP internal situated at the rear right corner. Fit the bayonet connection. This should be located so as to ensure that the flexible connector hose does not kink. Open the main oven door. Turn the main oven control knob to the defrost setting . , check the oven light and convection fan both come on. Turn control knob back to off position.
TECHNICAL DATA DUAL FUEL PRODUCTS Data badge - Lower part of front frame Type of gas - This cooker must be used with Natural Gas only Countries of Destination: GB - Great Britain, IE - Ireland. Gas category - Natural Gas - I2H, Pressure setting G20 Natural Gas @ 20 mbar Aeration - Fixed Appliance class - Class 1, freestanding Grill - Electric Hob - Burners have burner heads and caps which are removable for cleaning. Concealed electrodes to each burner.
CUSTOMER CARE CUSTOMER CARE WEB SHOP Having purchased a superior cooker, hob or hood from us, you’ll naturally want to keep it looking great. And who better to help you care for it than the manufacturer? We offer an extensive range of accessories, components and cleaning products which, will instantly give your cooker a good as new look. range of Bake ware and Cookware essentials including Roasting Pans, Cake Tins and Non-Stick Cooking Liners. For all enquires, please visit our Web Shop at www.gdhaonline.
CUSTOMER CARE FAQs What parts of the appliance can be washed in a dishwasher? • Any enamelled parts such as the grillpan can be cleaned in a dishwasher, as can oven shelves and shelf guides. What parts must NOT be cleaned in a dishwasher? • Parts such as burner skirts and caps, control knobs and any cast iron items must not be cleaned in a dishwasher, they should be cleaned with hot soapy water and a nylon brush once they are cool enough. There’s been a power failure and the product won’t work.
CUSTOMER CARE CHANGING LIGHT BULBS (where fitted) Warning: There is a risk of electric shock, so always make sure you have turned off and unplugged your appliance before starting. Always allow the product to cool down before you change a bulb. Not all appliances have the same number and type of bulbs. Before replacing your bulb, open the oven door and see which type you have. Then use the table to help you change your bulb correctly.
CUSTOMER CARE To contact Stoves about your appliance, please call Warranty Registration 0844 481 0182 to register your appliance Customer Care Helpline 0844 815 3740 in case of difficulty within the UK Alternatively general, spares and service information is available from our website at www.stoves.co.uk Please ensure that you have the product’s model no and serial no available when you call.