
User's Manual


C
R
2
0
3
2
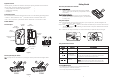
KEY CHAIN
HOLE
USB
RECEIVER
BATTERY
CASE
NEXT
SLIDE
PREVIOUS
SLIDE
LASER
LASER
INDICATOR
LASER
BEAM
Equipment Checklist
Carefully unpack your Presenter, and keep the packing materials for future reference.Mini Power
Check to make sure that the following items are included:
• Honeywell Presenter (with USB receiver) 1Mini Power
• CR2032 lithium cell battery 1
• User Manual 1
System R equirements
It is recommended to install this wireless presenter under one of the following Operating Systems
•
Windows 2000, XP, Windows Vista ; presentation software: PowerPoint 2000 or later
TM
•
Mac OS X (10. ) or later3 ; presentation software: PowerPoint v. X for Mac OS X or later
Product Features
Parts Description
Figure 1
Removing and Storing the Receiver
Note: Improper removal and insertion may damage the receiver, please follow the diagram below.Note:
Figure 2
Getting Started
Initial setup for the PresenterMini Power
Step 1: Battery Storage -
Step 2: Linking the Receiver -
Using the Link Option
Step 1. Press the link key on the receiver (connected to your computer now), and the LED light on the
receiver will come on. (Refer to Figure 1)
Step 2 . Press " " button and " " button on the Presenter simultaneously for more than three seconds.
The LED on the receiver will start flashing to confirm the link is complete. The Mini Power Presenter
is now ready for use.
Note: Whenever you change new battery, it is recommended that you repeat the Link process again.
Using the PresenterMini Power
Buttons
Laser Press to emit the laser beam.
Next
1.Previous
2.Dark Screen
1
2
32
Click to advance to the next slide.
1.Click to return to the previous slide.
2.Press and hold the key for over three seconds the
PowerPoint screen will change to black.
BOTTOM VIEW
FRONT VIEW REAR VIEW
1
2
2
1
Remove the receiver and plug it into an available USB
port on your computer. (Refer to Figure 2) , the Presenter
isreadytouse.
Open the battery cover and insert the battery CR2032
with (+) side up into the battery compartment in back
of Presenter.
How to operateFunctions
+
ID Link
Link the ID with the receiver.
Implement ID change ONLY when serious RF
interference causes the remote control malfunction.
Note:
Care and Maintenance
• For cleaning, you are advised to use a soft, slightly moistened cloth.
• Avoid using solvents or abrasive substances.
• Do not open the presenter for any maintenance.