
Product Manual


Q1
M2
S1
R1
R1 S1 Q1
M1
Q3
S2
R2
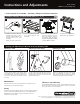
Setting up the Leg Assembly (Fig. 1-6)
Setting up the Leg Assembly (Fig. 1-6)
» Tools required for assembly : wrenches, phillips screwdriver and pliers.
21 43
1. Place the Leg Assembly (B & C)
onto the Joint (D) and fasten
with the 8mm x 50mm Hex
Head Bolts (Q4). Do not
over-tighten and make sure the
leg assembly is free to pivot.
5. Attach the Casters (M1) onto
the brackets using the 6mm x
40mm Pan Head Screws (Q1),
and one 6mm Lock Nut (R1) and
one 6mm Washer (S1).
6. Make sure wheels can spin
freely and repeat on other side.
Position the leg assembly right
side up to attach the Height
Adjustment Posts.
7. Attach Angle Adjustment Plate
(F) to the Height Adjustment
Post (E) using one 8mm x 40mm
Hex Head Bolt (Q3), one 8mm
Washer (S2) and one 8mm Lock
Nut (R2).
8. Attach Locking Handle (G) to
Angle Adjustment Plate (F)
using one Locating Washer (H),
one 8mm Square Nut (J) and
one Square Nut Holder (I).
9. Insert the Height Adjustment
Post through the Joint (D) and
secure with Locking Pin (K) and
the Plastic Knob (L).
3. Position the Leg Assembly on
its side to attach the Casters.
4.
Mount the Casters Brackets
(M2) on Table Leg Assembly (B)
using two 6mm x 40mm Pan
Head Screws (Q1), and two
6mm Lock Nuts (R1).
Repeat on the other side.
2. Slightly open the Table Legs.
Height Adjustment Post (F i g. 7-11)
Height Adjustment Post (F i g. 7-11) Installing Tabletop
5 6 7 8
9 10 11 12
12. Place Table Top upside down.
Install Angle Adjustment Plates
using two 8mm x 20mm Hex
Head Bolts (Q2) and 8mm Hex
Nuts (R3). Tighten screws.
11. Install Crossbar (T) using one
8mm x 55mm Hex Head Bolt
(Q5), 8mm Washer (S2) and
8mm Hex Nut (R3).
Repeat on the other side and
tighten bolts.
10. Repeat on the other side and
tighten all screws. Make sure
both height posts are at the
same height.
Q4
Q4
D
C
B
R2
S2
H
G
I
J
F
E
L
K
R3
T
S2
Q5
R3
S2
Q2
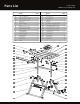
Assembly Instructions
Part No. TS3020
NOMAD™ Economy Welding Table