
Product Manual


7141 Paramount Blvd, Pico Rivera, CA 90660 U.S.A. | www.stronghandtools.com
Toll Free : 800.989.5244 | Tel : 562.949.8625 | sales@stronghandtools.com
Maintenance
Keep the table clean for optimal performance. Wipe away dust
and debris from the tabletop and legs.
Safety
ALWAYS wear safety goggles, gloves, and other appropriate safety
items for protection. Use the table only for it’s intended purpose.
NEVER stand on the table. Do not drop the table, throw it, or
otherwise misuse the table.
Limited 1 Year Warranty
Each STRONG HAND TOOL® product is warranted to be free from
defects in material and workmanship. Return to place of purchase
for a replacement if warranty applies.
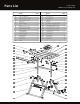
O
N
S1
P
» Tools required for assembly : wrenches, phillips screwdriver and pliers.
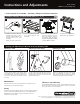
Installing Tabletop and Steel Guide Rails (Fig. 12-15)
13 14 15
Moving the Table Adjusting the Table Height Stabilizing the Table
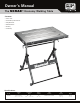
Storing and Adjusting the Nomad Economy Welding Table
Loosen Plastic Knobs (L). Remove Locating
Pins (K). Grasp tabletop and lift (evenly) to
desired height. Re-insert Locating Pins and
tighten Plastic Knobs.
Adjust cam operated Eccentric Leveling Foot
(C1) for stabilizing the table on uneven
surfaces! Turn the wheel clockwise to elevate,
and counterclockwise to lower the table.
Loosen Locking Handle. Fold tabletop down
to completely vertical position. Push legs in
to closed position. Lean the table back on the
two casters, and use the pull handle to move
the table.
13. Carefully turn entire Table Top
assembly right side up. Place
the 6mm Washer (S1) on the
threaded stud of the Lock
Lever (P).
Repeat on all four Lock Levers.
The Nomad Economy Welding
Table now is fully assembled.
15. Insert the Pull Handle (U) into
the holes located on the 30”
side of the tabletop. Fasten to
the tabletop using the Springs
(V), 8mm Washers (S2) and 8mm
Lock Nuts (R2), and tighten.
14. Attach the Guide Rails (N & O)
to the table using the Lock
Levers (P).
V
U
Instructions and Adjustments
Part No. TS3020
NOMAD™ Economy Welding Table