picture similar Digital Terrestrial Receiver SRT 5216 User manual
PART 1 • English 1.0 Instruction 1.1 Safety Instructions 1.2 Storage 1.3 Equipment Set-up 1.4 Accessories 2 2 3 3 3 2.0 Your Receiver 2.1 PIN-CODE DEFAULT: 0000 2.2 Front Panel 2.3 Rear Panel 2.4 Remote Control 3 3 3 4 4 3.0 Connection 3.1 Connecting to a Terrestrial Antenna 3.2 Connecting to TV and DVD/Video Recorder 3.3 Connecting to a Digital Audio Amplifier 3.4 Connecting to RCA (Audio L/R, Video) 3.5 Connecting a USB storage device 4 4 5 5 5 5 5.0 Main Menu 5.1 Channel 5.2 Installation 5.
PART 1 • English 1.0 Instruction 1.1 Safety Instructions The lightning flash with arrowhead symbol within an equilateral triangle is intended to alert the user to the presence of not isolated dangerous voltage with the inside of the product that may be of sufficient magnitude to constitute a risk of electric shock to persons.
Safety Check — Upon completion of servicing or repairs, ask the service technician to perform safety checks to determine that the product is in good working order. Apparatus shall not be exposed to dripping or splashing and no objects filled with liquids, such as vases, shall be placed on the apparatus. Where the mains plug or all — pole mains switch is used as the disconnect device, the disconnect device shall remain readily operable. Remote control transmits a directional infrared beam.
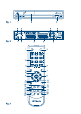
PART 1 • English 2.3 Rear Panel Fig. 2 o connect an antenna for reception of broadcasting signal. T Supports active antennas with 5V DC. TO TV (inc. modulator) To connect to the terrestrial antenna input of your TV set. or e.g. VCR/DVD recorder. This connection will allow you to watch analogue & digital terrestrial broadcasts LOOP IN modulator loop through input. LOOP OUT To connect to the LOOP IN TV SCART To connect your receiver with your TV set using a SCART cable.
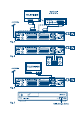
PART 1 • English 3.2 Connecting to TV and DVD/Video Recorder Fig. 4 The TV set should be connected with the receiver through a SCART cable (fig. 1). This terrestrial receiver may also be operated together with a VCR using the loop through function. The loop-through function of this terrestrial receiver is also active when it is in STBY mode*. As soon as the VCR is turned on, its video and audio signals are looped through the terrestrial receiver.
PART 1 • English 5.1.1.1 Edit Use this menu to favour, lock, skip, delete and rename channel list. Press numeric button [1] to enter Edit menu. To select one channel highlight it with pq or press [0] to select all channels. Selected channels will get marked. This way of selection can be executed for each of the edit functions. n Favor: To add selected channel or all channels to a favourite group, press the [1] button. Use the pq to select a desired group and press OK.
PART 1 • English highlight Search and press OK to start scan. After Channels are found, they will be stored and receiver switches to the first one saved in the list. 5.2.3 Antenna Setting English 1. Press MENU to enter main menu. 2. Use the pq buttons to select Installation, press OK to enter the menu. 3. With the pq buttons select Antenna setting and press OK to enter. 4. Press the tu buttons to change setting. If On is selected, the receiver will provide 5 V antenna power (for active antennas). 5.
PART 1 • English Sleep Timer You can set the receiver to switch to Standby in 10, 30, 60, 90 and 120 min automatically. Additionally there is shown the value of remaining time Remains: HH:MM Auto Standby This option allows you to enable or disable Auto Standby. The default setting for Auto Standby is ON. The receiver will switch to standby automatically when it doesn’t receive commands from the remote control for three hours. To avoid the automatic switch off, set Auto Standby to OFF. 5.3.
PART 1 • English Warning: After an update the receiver restarts automatically! During this process NEVER disconnect the receiver from the main or switch power OFF! This can damage your receiver and will void the warranty! Note: his receiver has foreseen an over the air update function, which might not be available at your local T broadcast conditions. For further details visit our website www.strong.tv or contact your local Serviceline. English 5.
PART 1 • English Record There are 3 different ways to record programmes: Instant recording, recording from EPG and recording via timer Instant recording In viewing mode press 4 to instantly start a record on the current channel. Press 3 to stop recording. If you press 4 again, you can adjust the duration for this record. Insert the time with the numeric buttons and press OK to confirm, then press EXIT to remove the message.
PART 1 • English 6.3 Accessing the favourite channels 1. Press OK to enter channel list. 2. Press tu to select the desired favourite group. 3. Press pq to select the favourite channel. English A.1 TroubleShooting There may be various reasons for the abnormal operation of the receiver. Check the receiver according to the procedures shown below. If the receiver does not work properly after checking it, please contact the dealeror the local Service Hotline. Do NOT open the receiver cover.
PART 1 • English General Data Supply Voltage: 100 – 240 V AC (SMPS), 50/60 Hz Power Consumption: 5 W max. Power consumption in Standby: 1.00 W Operating Temperature: 0 ~ 40 °C Storage Temperature: -30 ~ 80 °C Operating Humidity Range: 10 ~ 85%, RH, Non-condensing Size (W x D x H) in mm: 230 x 165 x 43 Net-weight: 0.