
User manual


PART 1 • English
5
English
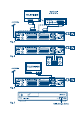
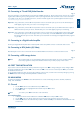
3.2 Connecting to TV and DVD/Video Recorder
Fig. 4
The TV set should be connected with the receiver through a SCART cable (fig. 1). This terrestrial receiver may also be operated
together with a VCR using the loop through function. The loop-through function of this terrestrial receiver is also active when
it is in STBY mode*. As soon as the VCR is turned on, its video and audio signals are looped through the terrestrial receiver.
* Preconditioned the according option is switched on in the receiver menu!
Optional 1: using coaxial cable, connect TO TV output of the receiver to terrestrial input of your TV set. This will allow you to
watch digital programs from your receiver on an analogue TV set.
Optional 2: using coaxial cable, connect TO TV output of the receiver to terrestrial input of your VCR and terrestrial output of
VCR to terrestrial input of your TV set. This will allow you to record the digital program you are watching.
Optional 3: using coaxial cable, connect TO TV output of the receiver to aerial input of your VCR and terrestrial output of VCR
to terrestrial input of your TV set. Using a short loop coaxial cable, connect the LOOP OUT output to the LOOP
IN input at the back of your receiver. This allows you to watch and record analogue and digital terrestrial programs
on your VCR.
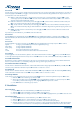
3.3 Connecting to a Digital Audio Amplifier
Fig. 5
Connect your Digital Audio Amplifier with a suitable S/PDIF cable to the S/PDIF connector on the back of the receiver.
3.4 Connecting to RCA (Audio L/R, Video)
Fig. 6
Alternatively the receiver can be connected to the TV set with the RCA cinch connectors on the back of the receiver.
3.5 Connecting a USB storage device
Fig. 7
Note: We recommend the use of a hard disk drive with external power adapter for proper recording and play
back of TV programmes. USB powered hard disk drives may not work properly on this receiver.
4.0 FIRST TIME INSTALLATION
If you use the receiver for the first time, the Easy Install menu appears. Use tu to change settings for setup of Region, OSD
Language and Antenna Power and the pq to select. Then use pq to move focus to Search and press OK to proceed with
the automatic channel scan.
In case the Easy Install menu does not appear after switching on the receiver, reset the receiver to factory settings by pressing
the MENU button and selecting Load Factory Default in submenu Tools.
5.0 MAIN MENU
In viewing mode always press MENU to enter the Main Menu. It consists of following submenus: Channel, Installation,
Setup, Tools and Media+
5.1 Channel
1. Use the pq buttons to select Channel and press OK to enter.
2. Use the pq buttons to highlight the desired item and press OK to select.
3. Press EXIT to exit.
Note: You can also press OK in TV mode to enter channel list.
5.1.1 TV Channel list
1. In Channel submenu select TV Channel List with the pq buttons and press OK to enter.
2. Use the tu buttons to change channel group (assumed you have already set up Favourite groups).
3. With the pq buttons select the channel you want to watch. With OK you can watch the selected channel in full
screen mode.