��������������� ����������������������������� ������ ����������� ������������������� �������������������� �������������� ������������������ ���������������
PART 1 • English 1.0 INSTRUCTION 1.1 Safety Instructions 1.2 Storage 1.3 Equipment Set-up 1.4 Features & Accessories 2 2 3 3 4 2.0 CONNECTION 5 3.0 YOUR RECEIVER 3.1 Remote Control 5 6 4.0 FIRST TIME INSTALLATION 6 5.0 MAIN MENU 5.1 Channel 5.2 Installation 5.3 Setup 5.4 Tools 5.5 Media+ 6 7 8 9 11 12 6.0 OPERATION 6.1 Changing Channels 6.2 Accessing the Electronic Program Guide (EPG) 6.3 Accessing the favourite channels 14 14 15 15 A.1 TROUBLESHOOTING 15 A.
PART 1 • English 1.0 INSTRUCTION 1.1 Safety Instructions This SCART Receiver has been manufactured to satisfy international safety standards. Please read the following recommended safety precautions carefully. The lightning flash with arrowhead symbol within an equilateral triangle is intended to alert the user to the presence of not isolated dangerous voltage with the inside of the product that may be of sufficient magnitude to constitute a risk of electric shock to persons.
GENERAL PRECAUTIONS - SAFETY PRECAUTIONS Lightning - If a lightning storm occurs while using a specified AC adapter, remove it from the wall outlet immediately. To avoid damage from unexpected power surges, always unplug the AC adapter from the power outlet and disconnect it from the receiver when the receiver is not in use. Overloading - Never overload wall outlets, extension cords, power strips, or other power connection points with too many plugs.
PART 1 • English of the antenna are in a good condition and the SCART connections are well shielded This manual provides complete instructions for installing and using this receiver. The following symbols will serve as follow. WARNING Indicates warning information. Tips Indicates any other additional important or helpful information. MENU Represents a button on the remote control. (Bold Character) Move to Represents a menu item within a window. (Italic Character) 1.
PART 1 • English n n n n Power on with last viewed channel User-friendly remote control NTSC/PAL converting automatically and manually 3 Games (Tetris, Snake, Othello) Support of active antenna by 5 V output English n * Depending on local signal conditions ** Availability depending on broadcaster *** STRONG cannot guarantee the playback of external video files, which have not been recorded by this device Accessories: n n n n 1 User Manual 1 Remote control unit with 1 Battery (coin cell 3 V) 1 Infrared
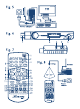
PART 1 • English 3.1 Remote Control 1. 2. 0~9 3. 4. RECALL 5. PAGE+/PAGE6. VOL+/VOL7. CH+/CH8. OK Turns the receiver On/Standby Channel selection or value input Mutes audio output of the receiver Back to previous shown channel Page up/down Menu Off: Volume up/down; Menu On: navigation & change settings Menu Off: Channel up/down; Menu On: navigation Menu Off: Displays the current channel list; Menu On: Activates the highlighted menu item. 9. MENU Menu Off: Opens the main menu.
PART 1 • English 1. Use the pq buttons to select Channel and press OK to enter. 2. Use the pq buttons to highlight the desired item and press OK to select. 3. Press EXIT to exit. Note: You can also press OK in TV mode to enter channel list. 5.1.1 TV Channel list 1. In Channel submenu select TV Channel List with the pq buttons and press OK to enter. 2. Use the tu buttons to change channel group (assumed you have already set up Favourite groups). 3.
PART 1 • English Name (A-Z): Name (Z-A): FTA: Lock: Sorting in Alphabetical Order. Sorting in Alphabetical Order. First in the list will be Free-To-Air channels. First will be listed all unlocked and then the locked channels. 5.1.1.4 Move Press the [4] button to activate the Move function. The selected channel will be marked in a symbol, use the pq buttons to move the selected channel to the desired position. With tu select Yes in the confirmation window and press OK to save. 5.1.
PART 1 • English English 2. With the pq buttons to select Channel Scan and press OK to enter the menu. 3. Use the tu buttons to select one of two Scan Modes – By Channel and By Frequency. 4. When By Channel is selected use the cursor buttons to select Scan Band and Channel No. When By Frequency is selected use the cursor buttons to select Frequency and Bandwidth. Select Network Search to ON or OFF, highlight Search and press OK to start scan.
PART 1 • English 5.3.3 Region and Time Here you can set your region and time zone. Region: This menu is used for changing the region setting. GMT Usage: This menu is used for usage of GMT. The options are: Off / User Define / By Region GMT Offset: This menu is valid only when selected “User Define” in GMT Usage menu. The GMT offset range is “-11:30 ~ +12:00”, increasing by half hours progressively. Date/Time: “Date” and “Time” menus are valid only when selected “Off” in GMT Usage menu.
PART 1 • English This menu allows you to protect the installation menu, or channels with a password and you can change the Password. If you want to enter the menu you will be asked to input the password (default: 0000). Menu Lock: Locks the installation menu. You can set menu lock to ON/OFF. Channel Lock: Off/Manual/Age:4 - Age:18 New Password: To change the password. Confirm Password: To confirm the new password. 5.4 Tools Press MENU button to enter main menu.
PART 1 • English 5.4.4 Software Upgrade 1. Enter “Tools” menu, select “Software Upgrade” and press OK button, Software Upgrade menu is shown. 2. Press pq buttons to select “Upgrade by Storage” item and press OK button, you are asked to input password. 3. Input the correct password (the default password is 0000), Software Upgrade submenu is opened. Then select the correct software file and press OK to start. Message will be displayed to confirm update process, select “Yes” to confirm or “No” to cancel. 4.
During the playback, it is possible to perform the following actions: Press YELLOW (II) button to pause the playback. Press the buttons for fast forward or fast rewind during playback Press GREEN (Iu) button once to perform slow motion, every further press will change the slow motion speed (1/2, 1/4, 1/8). 5.5.3 Removable Disk Information In this menu you can display information about the storage card. 1. In "Media+" menu, select "Removable Disk Information" and press OK button to enter this menu. 2.
PART 1 • English Instant record In viewing mode press the ● button to instantly start a record on the current channel. Press the RED (■) button to stop recording. If you press the ● button again you can adjust the duration for this record. Insert the time with the Numeric buttons and press OK to confirm then press EXIT to remove the message. From EPG Press the EPG button to enter the programme guide, than select an event and channel with the buttons described on screen.
2. Selected by number Enter the channel number directly by pressing numeric buttons, and press the OK button to select desired channel. 3. Selected by on-screen channels list You can also select the required channel directly from on-screen channel list. This is displayed using the receiver’s main menu. See chapter 5.1.1 TV Channel list in this manual for operation detail. Alternatively you can call up channel list by pressing OK in viewing mode. 4.
PART 1 • English Problem Scrambled channel message No response to remote control Possible cause Channel is scrambled What to do Select alternative channel Receiver off Handset not aimed correctly IR sensor obstructed Hand set batteries exhausted Plug in and turn on plug Aim handset at IR sensor Check for obstructions Replace handset batteries Re-install channels to cancel channel lock Contact local Service Hotline or send email to our Support via www.strong.