UM 6005-15 ENG 1/26/06 4:18 PM Page 1 USER MANUAL PART 1 English PART 2 Deutsch PART 3 Français PART 4 Italiano PART 5 Español PART 6 Environmental Issues 1
UM 6005-15 ENG 1/26/06 4:18 PM Page 2 PART 1 z English Content 1.0 Introduction 3 1.1 1.2 1.3 1.4 1.5 Safety Instructions Features & Accessories Safety Precautions Storage Equipment Set-up 3 4 5 5 6 2.0 2.1 2.2 2.3 Your Receiver Front Panel Remote Control Unit Rear Panel 6 6 7 8 3.0 3.1 3.2 3.3 3.4 Connections Connecting to TV & VCR Connecting to Digital Audio Amplifier Connecting to Satellite Dish Connecting to serial cable for downloading software 10 10 11 11 13 4.0 Starting up 14 5.
UM 6005-15 ENG 1/26/06 4:18 PM Page 3 PART 1 z English 1.0 Introduction 1.1 Safety Instructions DO NOT INSTALL YOUR RECEIVER: In a closed or poorly ventilated cabinet; Directly on top of or under any another equipment; On a surface which might obstruct the ventilation slots.
UM 6005-15 ENG 1/26/06 4:18 PM Page 4 PART 1 z English 1.
UM 6005-15 ENG 1/26/06 4:18 PM Page 5 PART 1 z English Accessories: User's Manual 1 Remote control unit 2x Batteries (AAA type) Note: The batteries should not be recharged, disassembled, electrically short-circuited or be mixed or used with other types of batteries. 1.3 Safety Precautions To maintain your receiver's optimum performance, you are advised to apply the following safety precautions: Read this manual carefully and make sure you fully understand the instructions given.
UM 6005-15 ENG 1/26/06 4:18 PM Page 6 PART 1 z English 1.5 Equipment Set-up We recommend you consult a professional installer to set up your equipment. Otherwise, please follow the instructions below: Refer to the user manual of your TV and your antenna. Make sure that the SCART cable is in a good condition. Make sure that the SCART cable connections are well shielded Make sure that the outdoor components of the antenna are in good condition. 2.0 Your Receiver 2.1 Front Panel FIGURE 1.
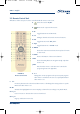
UM 6005-15 ENG 1/26/06 4:18 PM Page 7 PART 1 z English 2.2 Remote Control Unit All features of the set-top box can be controlled with the remote control unit. A. Turns the receiver On/Off. Mutes audio output of the receiver. B. C. AV Toggle between TV and AV mode. D. 0~9 Changes channel and controls numeric functions. E. FAV Toggle Favorite mode ON / OFF. F. TV/R Toggle between TV or RADIO mode. G. MENU Shows the main menu and exits from any level of menu to view mode. H.
UM 6005-15 ENG 1/26/06 4:18 PM Page 8 PART 1 z English P. MOSAIC Show pictures of 9 channels on the screen simultaneously Q. PAUSE Freeze/Resume picture. R. AUDIO Shows the list of available audio languages for the channel you are watching. In addition it sets the current channel audio to stereo ((z)), left-mono ((z or right-mono z)). S. EDIT Program edit T. SAT Switch the satellite U. TEXT Shows current service's Teletext on OSD V. SUB Show the list of subtitled languages the current channel supports.
UM 6005-15 ENG 1/26/06 4:18 PM Page 9 PART 1 z English 4. VCR SCART Connector 1 To connect your receiver to your video recorder using a scart cable. Your video signal will now be looped through your receiver to your TV set. 5. RS-232 Serial Port This serial port can be used to connect your PC with your receiver, to download new versions of software to your receiver. 6. S/PDIF Digital audio output 1 Use this coaxial output to connect your receiver to the input of your digital audio amplifier. 7.
UM 6005-15 ENG 1/26/06 4:18 PM Page 10 PART 1 z English 3.0 Connections 3.1 Connecting to TV & VCR 1 1. Connect the satellite signal from the LNB to the SAT IN connector. 2. Connect a UHF coaxial lead coming from your Cable TV or Outdoor Antenna to the ANT input connector at the back of the receiver. 3. Connect a coaxial cable to the RF OUT connector at the back of the receiver. 4.
UM 6005-15 ENG 1/26/06 4:18 PM Page 11 PART 1 z English VIDEORECORDER IN FIGURE 5. Advanced connection of the receiver to the TV set and VCR 3.2 Connecting to Digital Audio Amplifier and to TV-set with S-VHS connection. The Digital Audio Amplifier is connected with the receiver from the S/PDIF connector. The TV-set is connected with the receiver on both S-VHS connectors.
UM 6005-15 ENG 1/26/06 4:18 PM Page 12 PART 1 z English 3.3 Connecting to Satellite Dish First choose which satellite you want to receive your signals from, and have your dealer aim your dish at the requested satellite. Connect a coax cable to your LNB and the other end directly to the SAT IN connector of your receiver. FIGURE 7. Connecting a fixed satellite dish to your receiver
UM 6005-15 ENG 1/26/06 4:18 PM Page 13 PART 1 z English Another possibility for watching programs from multiple satellites is by mounting a dish to a motorized DiSEqC 1.2 positioner. Have your dealer mount the dish to the positioner, set the correct angle of the elevation and let him set the center point for your positioner.
UM 6005-15 ENG 1/26/06 4:18 PM Page 14 PART 1 z English 3.4 Connecting to serial cable for downloading software 1. Connect the RS 232 connector on the back of your receiver to the Serial port of your computer using a serial cable. 2. Instructions how to download software can be found on our website www.strongsat.com (support > download). However, this receiver can download new system software automatically by satellite. FIGURE 10.
UM 6005-15 ENG 1/26/06 4:18 PM Page 15 PART 1 z English It is recommended that you perform the first time installation following the Installation Wizard step by step. It will help you to easily achieve system configuration and channel installation. If you are a professional installer then you can skip wizard by pressing MENU button and set-up channels using the Installation menu. Press UP/DOWN to choose your language, press OK to confirm. The select satellite menu will appear as below.
UM 6005-15 ENG 1/26/06 4:18 PM Page 16 PART 1 z English SCREEN 4 If you select a satellite in the satellite list, the configure antenna menu will appear, please set the LNB Type, LNB Low Freq, LNB High Freq, Band control, Polarisation control, DiSEqC Switch and Antenna mode. SCREEN 5 2a. If you have a fixed dish then set “Antenna mode” to “Fixed”, select NEXT and press the OK button. The Adjust antenna screen as shown on screen 6 will appears.
UM 6005-15 ENG 1/26/06 4:18 PM Page 17 PART 1 z English SCREEN 6 When you have completed the adjustment, choose NEXT and press the OK button. The channel Setup menu will appear as shown on screen 8. 2b. If you have a DiSEqC Dish, you can set “Antenna mode” to DiSEqC 1.2, choose NEXT and press the OK button. The menu Adjust antenna will appear as shown on screen 7.
UM 6005-15 ENG 1/26/06 4:18 PM Page 18 PART 1 z English SCREEN 8 Choose NEXT and press the OK button to start the scan. When the scan is completed, the receiver will save the services information automatically and exit to the normal play state. 5.0 Main Menu All the important settings and features of your receiver can be operated in Main Menu. The Main Menu consists of five sub-menus which are "Channel Organizer", "Installation", “System setting” , "Timer" and "Game".
UM 6005-15 ENG 1/26/06 4:18 PM Page 19 PART 1 z English 5.1 Channel Organiser In the MAIN MENU screen, press UP/DOWN to move the cursor to Channel Organiser, and then press OK to enter the Channel Organiser menu. SCREEN 10 The Channel Organiser menu consists of two sub-menus; “Channel Manager” and “Favorites Manager”. 5.1.1 Channel Manager In this menu, you can change the order of the channels, move, delete and edit channels. To change the satellite use the RED button.
UM 6005-15 ENG 1/26/06 4:18 PM Page 20 PART 1 z English Sort (GREEN buton) You can sort the channel order in the channel list by “name a~z”, “name z~a”, “Free-CA”, “Fav - NO Fav” or Default type. SCREEN 12 Edit (YELLOW button) Select the channel that you wish to edit, press the YELLOW (Edit) button to move into the modify program menu. (SCREEN 13) In this menu, you can modify the Program Name, Down Frequency, Symbol rate, Video PID, Audio PID.
UM 6005-15 ENG 1/26/06 4:18 PM Page 21 PART 1 z English If you want to rename the channel, use the UP/DOWN keys to select “Program Name” and press OK, the program name dialog will shown as below. SCREEN 14 Use the LEFT/RIGHT button to move the cursor to the character you wish to edit. Use the UP/DOWN button to change character (scroll alphabet). If you wish to delete character you have to replace it with “space” character. When editing is complete, press the OK button.
UM 6005-15 ENG 1/26/06 4:18 PM Page 22 PART 1 z English Move channel SCREEN 15 Press the UP/DOWN keys to point the focus of the menu to the channel of your selection. Press the LEFT/RIGHT keys to point the focus of the menu to the column “Move”. When the focus is on column “Move”, press the OK button to confirm selection of the channel, using the UP/DOWN buttons move the channel to its new location and press the OK button to confirm the new location.
UM 6005-15 ENG 1/26/06 4:18 PM Page 23 PART 1 z English 5.1.2 Favorites Manager Press the UP/DOWN keys to select the channel. Press the LEFT/RIGHT keys to point the focus to the favorite group. Press the OK button to add the selected channel to the Favorite group. To remove the channel from the favorite group, repeat same operation. SCREEN 17 5.2 Installation The installation menu contains three sub-menus; “Antenna Installation”, “Auto Scan” and “Manual Scan”.
UM 6005-15 ENG 1/26/06 4:18 PM Page 24 PART 1 z English 5.2.1 Antenna Installation You can add a satellite, edit a satellite and delete a satellite in this menu. SCREEN 19 Add satellite If you want add a new satellite, press the RED key in this menu, a satellite list will appear on the screen. Press RIGHT/LEFT to select the satellite. If the satellite does not exist in the satellite list, please select “NEW SAT1”.
UM 6005-15 ENG 1/26/06 4:18 PM Page 25 PART 1 z English Edit satellite If the parameters of the satellite were changed or the satellite is a new satellite, you must set the parameters of the satellite, such as LNB type, LNB low Freq, LNB High Freq, Transponder, LNB Power, 22 k Tone, DiSEqC and Motor Position. SCREEN 21 Delete satellite If you want to delete a satellite, press the YELLOW key. Then warning message will appear as below. SCREEN 22 Select OK and press the OK key to confirm.
UM 6005-15 ENG 1/26/06 4:18 PM Page 26 PART 1 z English 5.2.2 Auto Scan SCREEN 23 Press the GREEN key to set the scan mode to Free or Free+CA. Press the YELLOW Key to set the Blind Scan to ON or OFF. Press the BLUE Key to set the scan type to NIT OFF or NIT ON. When the set-up is completed, press the RED key to start the scan, shown as below.
UM 6005-15 ENG 1/26/06 4:18 PM Page 27 PART 1 z English 5.2.3 Manual Scan In this menu, you can add a new transponder, edit the transponder or delete the transponder. And you can scan transponder. User can switch satellites with the RED button. SCREEN 25 Add Transponder: In this menu, you can add a new transponder to the system. Press the GREEN button, the Add Transponder sub-menu will appear on screen. Down Frequency: Symbol Rate: Polarity: SCREEN 26 Input the frequency of the new transponder.
UM 6005-15 ENG 1/26/06 4:18 PM Page 28 PART 1 z English Edit Transponder: In this menu, you can edit a transponder in the system. Press the YELLOW button, the Edit Transponder sub-menu will appear on screen. SCREEN 27 Delete Transponder Press the BLUE button to delete a transponder. The warning massage will be shown as below. SCREEN 28 Press LEFT/RIGHT to select OK, press the OK button to confirm.
UM 6005-15 ENG 1/26/06 4:18 PM Page 29 PART 1 z English 5.3 System setting In this menu, you can configure the systems such as language Setting, OSD style, Parental Control, TV Settings and Time Setting. SCREEN 29 5.3.
UM 6005-15 ENG 1/26/06 4:18 PM Page 30 PART 1 z English 5.3.1.1 Language Setting You can change the language of the OSD and Audio. Press UP/DOWN to select the OSD language or Audio language. Press OK/RIGHT to enter the language list and Press UP/DOWN to select the language. Press OK to confirm. SCREEN 31 5.3.1.2 TV settings You can set the TV mode, Screen mode and Video output .
UM 6005-15 ENG 1/26/06 4:18 PM Page 31 PART 1 z English TV mode The TV mode Screen will appear as follows: SCREEN 33 Press OK/RIGHT to select PAL or NTSC, press OK to confirm. If you don't know which standard your TV has, please select AUTO.
UM 6005-15 ENG 1/26/06 4:18 PM Page 32 PART 1 z English Video output The Video output Screen will appear as follows: SCREEN 35 Press OK/RIGHT to select CVBS/ RGB or S-VIDEO, press OK to confirm. Warning! If RGB is selected > SVHS output is switched OFF totally. Note: S-Video mode avilable in the model SRT 6015 only. Modulator Settings (only for model SRT 6015) The Modulator Settings Screen will appear as follows: SCREEN 36 Press UP/DOWN to select RF Audio Mode or RF Channel.
UM 6005-15 ENG 1/26/06 4:18 PM Page 33 PART 1 z English 5.3.1.3 Time Settings If a broadcaster provides GMT, you can set the time using GMT, or set your own time by yourself. If the GMT usage is ON then the Current time is set automatically or you can set the time zone. If your broadcaster provides the correct time offset then your receiver will change from summertime to wintertime automatically. If you set GMT Usage to OFF, Set Data and Set Time item are displayed.
UM 6005-15 ENG 1/26/06 4:18 PM Page 34 PART 1 z English SCREEN 38 Select OK and press the OK key, the receiver will return to its factory default state, and all user data will be deleted. Note: Your PIN code will change back to the factory setting “0000”. 5.3.2 OSD Style In this menu, you can set the Menu Colour, Transparency Level, Border Pattern and Cover Style.
UM 6005-15 ENG 1/26/06 4:18 PM Page 35 PART 1 z English 5.3.3 Parental Control In this menu, you can set channel lock status (ON or OFF), the menu lock status, parental setting and change the PIN code (shown as SCREEN 40). The default PIN code is 0000. SCREEN 40 Channel Lock Set the system channel lock to ON or OFF. If the channel lock is on, the user has to enter the parental PIN code correctly before watching the locked channel.
UM 6005-15 ENG 1/26/06 4:18 PM Page 36 PART 1 z English Parental Setting Set some channels to lock status. If a channel is locked, the user has to enter the parental PIN code correctly before watching the locked channel. SCREEN 42 Use the UP/DOWN keys to select the channel you want to lock. Press the OK button to lock the channel. Change PIN Modifying the PIN. You must enter the 4 digits PIN and confirm it again; the system PIN will be changed into the new PIN as show on SCREEN 42.
UM 6005-15 ENG 1/26/06 4:18 PM Page 37 PART 1 z English 5.3.4 System info The system information displays information about your receiver such as software and UI version. SCREEN 44 5.3.5 System Update In this menu, you can select between “STB to STB” and “OAD” STB to STB software transfer. a) First power off both STBs, connect them with cross RS 232. b) Then power on master STB (master is STB from which you will copy software) and keep slave STB off.
UM 6005-15 ENG 1/26/06 4:18 PM Page 38 PART 1 z English Over Air Download (OAD) Select this option in order to update your receiver with the latest software version. The receiver will check availability of the software update on air and load the latest software, if available. You will be asked to confirm update. Do not switch power off and do not disconnect the receiver from the aerial during update process.
UM 6005-15 ENG 1/26/06 4:18 PM Page 39 PART 1 z English 5.4 Timer You can set the timer to make the receiver perform designated actions including timer based wake up or sleep instructions to the set-top-box. SCREEN 46 Use the UP/DOWN buttons to select timer. Press the LEFT/RIGHT key to activate/inactivate current timer. Press the OK button to enter your selected timer settings. Action: You can select the following functions: “Power On”: The receiver powers on at the designated date and time.
UM 6005-15 ENG 1/26/06 4:18 PM Page 40 PART 1 z English 5.5 Game The receiver has one game Tetris and a calendar. In this menu user can select any game item and press OK to play the game. Or you can press the GAME key in normal play state into the game menu directly. SCREEN 47 5.5.1 Tetris SCREEN 48 Key function: LEFT/ RIGHT key to move the block to left or right. DOWN to drop the block. UP to Rotate the block.
UM 6005-15 ENG 1/26/06 4:18 PM Page 41 PART 1 z English 5.5.2 Calendar UP/DOWN: +/- months. LEFT/RIGHT: +/- years (range from 1900 to 2100).
UM 6005-15 ENG 1/26/06 4:18 PM Page 42 PART 1 z English 6.0 Other operation functions 6.1 System Information In normal operation status (no menu operation), press the INFO button twice, the Program Information menu will appear on screen as show on . In this menu, the user can view the current program information such as the satellite name, program name, program number, local frequency, polarity, 22K tone, DiSEqC, down frequency, symbol rate, video PID and audio PID.
UM 6005-15 ENG 1/26/06 4:18 PM Page 43 PART 1 z English 6.3 EPG (Electronic Program Guide) The EPG shows the event information on the current TP channel by time zone. With MENU off, press the EPG button. The EPG Menu will appear: SCREEN 52 Press UP/DOWN to choose the channel. Press RIGHT into EPG for schedules of the current channel. SCREEN 53 In EPG schedules menu: Press the UP/DOWN keys to choose the schedule items. Press P+ / P- into next / previous day's schedules.
UM 6005-15 ENG 1/26/06 4:18 PM Page 44 PART 1 z English SCREEN 54 In EPG schedule details: Press P+ / P- into next/ previous page. Press LEFT/EXIT to return to the EPG schedule Menu. You can set up the event timer by pressing OK in the EPG schedule screen. To set up an timer event: 1.Press UP/DOWN to move the cursor to the event for which you want to add a timer. 2.Press OK to add a timer. SCREEN 54 shows you current event timer information based on the event you have chosen.
UM 6005-15 ENG 1/26/06 4:18 PM Page 45 PART 1 z English 6.4 Selection Audio Language Press the AUDIO button on the remote control to select the audio language as show in . Select the LEFT, RIGHT ,MIX or STEREO. press OK to make one selection. SCREEN 56 6.5 Teletext function With menu off, press TEXT.
UM 6005-15 ENG 1/26/06 4:18 PM Page 46 PART 1 z English If current the program has no Teletext, the screen below will appear: SCREEN 58 46
UM 6005-15 ENG 1/26/06 4:18 PM Page 47 PART 1 z English A.1 Trouble Shooting There may be various reasons for the abnormal operation of the receiver. Check the receiver according to the procedures shown below. If the receiver does not work properly after checking it, please contact the dealer. Don't open the receiver cover . This may cause a dangerous situation. Symptom Cause Remedy The display on front panel does not light up The power cord is not plugged in.
UM 6005-15 ENG 1/26/06 4:18 PM Page 48 PART 1 z English A.2 Specifications 1. Tuner and demodulator Input frequency Input impedance Input level LNB power supply Waveform Symbol rate Viterbi rate Reed Solomon decode 950 ~ 2150 MHz 75 ohm -65 dBm ~ -25 dBm 13/18 V ± 0.5 V, Max 500 mA, QPSK 2 - 45 MS/s K = 7,R = 1/2, 2/3, 3/4, 5/6, 7/8, auto 204, 188, T = 8 2.
UM 6005-15 ENG 1/26/06 4:18 PM Page 49 PART 1 z English 5. Power Supply Input Voltage Power Consumption Stand-by Power 90 - 240 V AC, 50/60 Hz +/- 5 % Max. 20 W <= 8 W 6. Physical Specification Size (W x H x D) Weight 260 x 40 x 140 mm 1.2 kg 7.
UM 6005-15 ENG 1/26/06 4:18 PM Page 50 PART 1 z English A.3 Glossary of Terms C band 3.7 ~ 4.2 GHz Frequency. DiSEqC Digital Satellite Equipment Control. EPG Electronic program guides that are transmitted by a broadcaster from a particular satellite to display information guide about a program content. Fixed Dish A dish antenna that is aimed at one particular satellite. Free-To-Air broadcast Unscrambled broadcast which you can view for free. Ku band 11 ~ 13 GHz Frequency.
UM 6005-15 ENG 1/26/06 4:18 PM Page 51 PART 1 z English PIN Code Personal Identification NumberA four-digit code that is used for locking/unlocking, e.g. with the parental control feature. Polarization Allows several programmes to be fitted into the same frequency band. The signals from a satellite are transmitter either with linear (vertical or horizontal) polarization or circular (right or left) polarization. Serial data port.
SRT 5010-Spain 7/9/05 4:36 PM Page 44
UM 6005-15 GER 1/27/06 3:39 PM Page 1 PART 2 z Deutsch Inhaltverzeichnis 1.0 1.1 1.2 1.3 1.4 1.5 Einleitung Wichtige Sicherheitsmaßnahmen Eigenschaft & Zubehör Sicherheitsmaßnahmen Lagerung Geräte Aufbau 2 2 3 4 4 4 2.0 2.1 2.2 2.3 Ihr Satelliten Empfänger Frontblende Fernbedienung Geräte Rückseite 5 5 6 8 3.0 3.1 3.2 9 9 3.3 3.
UM 6005-15 GER 1/27/06 3:39 PM Page 2 PART 2 z Deutsch 1.0 Einleitung 1.1 Wichtige Sicherheitsmaßnahmen Betreiben Sie Ihren Receiver nicht: In einem geschlossenen oder unzureichendbelüfteten Schrank Unmittelbar auf oder unter anderen Geräten Wenn die Lüftungsschlitze des Gehäuses abgedeckt sind. Setzen Sie Ihren Receiver und das Zubehör folgendem nicht aus: Direkter Sonneneinstarhlung oder anderen Geräten, die Hitze abstrahlen.
UM 6005-15 GER 1/27/06 3:39 PM Page 3 PART 2 z Deutsch 1.2 Eigenschaft & Zubehör Dieser Receiver ist für alle frei empfangbaren Radio und TV Programme geeignet.
UM 6005-15 GER 1/27/06 3:39 PM Page 4 PART 2 z Deutsch 1.
UM 6005-15 GER 1/27/06 3:39 PM Page 5 PART 2 z Deutsch 2.0 Ihr Empfänger 2.1 Frontblende FIGUR 1. Gerätvorderseite 1. STANDBY/ ON/ OFF Die rote LED zeigt an, dass sich Ihr Gerät im Standby Modus befindet. Leuchtet die LED grün, ist Ihr Gerät eingeschaltet. 2. 4-LED Display 1 Im Standby Modus zeigt das Display die aktuelle Uhrzeit an. Bei eingeschaltetem Gerät zeigt das Display den aktuellen Fernseh- oder Radiokanal.
UM 6005-15 GER 1/27/06 3:39 PM Page 6 PART 2 z Deutsch 2.2 Fernbedienung Sie können mit dieser Fernbedienung alle Funktionen Ihres Receivers steuern. A. EIN/ AUS. B. Mute Taste. Dient zur Stummschaltung. C. AV FIGUR 2. Fernsteuerung Umschaltung zwischen TV und AV. D. Ziffernblock 0~9 Direkteingabe von Zahlen im Menü oder bei der Senderwahl. E. FAV Umschalten und Anzeigen der Favoritenlisten. F. TV/R Umschalten zwischen TV und RADIO. G.
UM 6005-15 GER 1/27/06 3:39 PM Page 7 PART 2 z Deutsch M. OK Im Menümodus: Bestätigung des gewählten Menüpunkts. N. V+ / VRegelung der Lautstärke. O. P+ / PUmschalten der Programme. P. MOSAIC Es werden neun Programme gleichzeitig auf dem Fernseher angezeigt. Q. PAUSE Durch drücken der Pause tasten bekommen sie ein Standbild. Durch erneutes Drücken lauft das aktuelle TV-Programm weiter. R. AUDIO Zeigt Ihnen eine Liste der verfügbaren Sprachen im laufenden Fernsehprogramm.
UM 6005-15 GER 1/27/06 3:39 PM Page 8 PART 2 z Deutsch 2.3 Geräte Rückseite FIGUR 3. Geräte Rückseite 1. SAT IN Hier wird das Antennenkabel von Ihrer Satanlage kommend angeschlossen 2. SAT OUT Ermöglicht Ihnen einen zweiten Receiver anzuschließen (analoger oder digitaler Receiver). 3. TV SCART Connector (TV SCART Anschluss) Benutzen Sie diesen Anschluss, um Ihren Receiver an Ihren Fernseher mittels eines Scart Kabels anzuschließen. 4.
UM 6005-15 GER 1/27/06 3:39 PM Page 9 PART 2 z Deutsch 3.0 Anschließen 3.1 Anschluss an TV & VCR Bitte beachten Sie die Sicherheitshinweise im Kapitel 1.1. Generell gilt: trennen Sie bei allen Anschlussarbeiten den Receiver vom Stromnetz. (nur im Modell SRT 6015) 1. Verbinden Sie das Satellitensignalkabel des LNB's mit dem SAT IN - Eingang. 2. Verbinden den RF OUT Anschluss an der Rückseite des Receivers mit dem Koaxial EINGANG an Ihrem Gerät. 3.
UM 6005-15 GER 1/27/06 3:39 PM Page 10 PART 2 z Deutsch 3.2 Anschluss des digitalen Verstärkers und TV Gerät mit S-VHS Anschluss Der digitale Verstärker ist mit dem Receiver über den S/PDIF Anschluss verbunden. Das TV Gerät ist mit beiden S-VHS Anschlüssen verbunden. (FIGURE 6) FIGUR 6. Anschluss an den Digital-Audio-Verstärker 3.3 Anschluss an die Satellitenschüssel Verbinden Sie Ihren Receiver mit einem geeigneten koaxialem Antennenkabel und Ihrer Satellitenschüssel. FIGUR 7.
UM 6005-15 GER 1/27/06 3:39 PM Page 11 PART 2 z Deutsch Anschluss des Receivers an eine motorisierte Antenne DiSEqC 1.2 Schließen sie Ihren Receiver mit Hilfe eines koaxialen Antennenkabels an die Satellitenschüssel an. FIGUR 8. Anschluss an eine motorisierte Antenne 3.4 Anschluss eines seriellen Kabels zum Software Update über PC 1. Verbinden Sie den seriellen Port Ihres PC´s mit dem RS 232 Anschluss Ihres Receivers mittels eines seriellen Kabels. 2.
UM 6005-15 GER 1/27/06 3:39 PM Page 12 PART 2 z Deutsch 4.0 Inbetriebnahme Stellen Sie sicher, dass Ihr Satellitenreceiver und Ihre Satellitenschüssel korrekt angeschlossen sind und das Signal von guter Qualität ist. Wenn Sie hierzu Fragen haben, wenden Sie sich an Ihren Fachhändler. Nach Anschluss aller notwendigen Kabel überprüfen Sie deren festen Sitz und stecken Sie nun den Netzstecker ein.
UM 6005-15 GER 1/27/06 3:39 PM Page 13 PART 2 z Deutsch 1. Wählen Sie den Satelliten aus, auf den Ihre Satellitenschüssel ausgerichtet ist In Deutschland ist dies in der Regel Astra, 19,2. Sollten Sie sich unsicher sein, wenden Sie sich bitte an Ihren Fachhändler. Als nächstes erscheint folgendes Bild. BILDSCHIRM 3 Durch bestätigen mit OK gelangen Sie von hieraus zur Programmliste. Bildschirm 8. 2.
UM 6005-15 GER 1/27/06 3:39 PM Page 14 PART 2 z Deutsch Nachdem der entsprechende Satellit in der Satellitenliste ausgwählt ist, überprüfen Sie bitte, ob die angezeigte Standard Konfiguration Ihrer Satellitenanlage entspricht. Sollte dies nicht der Fall sein, tragen Sie bitte die entpsrechenden Werte manuell ein. BILDSCHIRM 5 2a. Sollten Sie eine nicht motorisierte Satellitenschüssel haben, wählen Sie bei Antennen Modus bitte fixed aus und bestätigen Sie mit OK.
UM 6005-15 GER 1/27/06 3:39 PM Page 15 PART 2 z Deutsch BILDSCHIRM 7 Lassen Sie Ihre Schüssel durch einen Fachmann auf die richtige Satellitenposition ausrichten und wählen Sie einen entsprechenden Transponder. Im Feld Stärke und Qualität können Sie die korrekte Ausrichtung Ihrer Schüssel erkennen (mind. 65%). Durch drücken der LINKS/REHTS Tasten können Sie nun die Schüssel entsprechend auf weitere Satellitenpositionen ausrichten. Durch drücken der Store Taste werden diese entsprechend gespeichert.
UM 6005-15 GER 1/27/06 3:39 PM Page 16 PART 2 z Deutsch 5.0 Hauptmenü Alle wichtigen Einstellungen und Funktionen finden Sie im Hauptmenü. Dorthin gelangen Sie durch drücken der Taste MENÜ (Bildschirm 9). Das Hauptmenü untergliedert sich in fünf Untermenüs. Durch drücken der Auf und Ab Tasten können Sie im Haupmenü navivieren durch OK bestätigen Sie Ihre Auswahl. BILDSCHIRM 9 5.
UM 6005-15 GER 1/27/06 3:39 PM Page 17 PART 2 z Deutsch 5.1.1 Senderliste (Kanalverwaltung) In diesem Menü können Sie die Programmreihenfolgen ändern, Programme löschen oder hinzufügen. BILDSCHIRM 11 Sortieren (grüner Knopf auf der Fernbedienung) Sie können die Reihenfolge der Programme alphabetisch (auf oder absteigend) sortieren oder nach verschlüsselt oder unverschlüsselten Programmen.
UM 6005-15 GER 1/27/06 3:39 PM Page 18 PART 2 z Deutsch Bearbeiten (gelber Knopf auf der Fernbedienung) Wählen Sie ein zu bearbeitendes Programm aus und drücken Sie den gelben Knopf auf der Fernbedienung. Nun können Sie die Frequenz, Symbolrate, Video PID und Audio PID verändern (Bildschirm 13). BILDSCHIRM 13 Wenn Sie den Kanal umbennnen möchten, wählen Sie über den Knopf UP/DOWN (Aufwärts/Abwärts) "Programmname” und drücken OK. Nun wird ein Dialog für Programmname erscheinen.
UM 6005-15 GER 1/27/06 3:39 PM Page 19 PART 2 z Deutsch Programmplatz ändern BILDSCHIRM 15 Durch die Taste Auf und Ab wählen Sie das entsprechende Programm aus. Durch drücken der LINKS/RECHTS Taste markieren Sie das Programm und bestätigen mit OK. Dann wählen Sie den neuen Programmplatz aus und bestätigen mit OK. Diesen Vorgang können Sie so oft wiederholen bis alle Programme auf der von Ihnen gewünschten Plätzen sind.
UM 6005-15 GER 1/27/06 3:39 PM Page 20 PART 2 z Deutsch 5.1.2 Favoritenlisten Drücken Sie die Taste Ab und Auf und wählen Sie ein entsprechendes Programm aus. Durch drücken der LINKS/RECHTS Tasten können Sie die jeweilige Favoritenliste auswählen. Durch bestätigen mit OK wir das Programm der Favoritenliste hinzugefügt. Diesen Vorgang können Sie beliebig oft wiederholen. BILDSCHIRM 17 5.2 Installation Das Installationsmenü besteht aus drei Untermenüs.
UM 6005-15 GER 1/27/06 3:39 PM Page 21 PART 2 z Deutsch 5.2.1 Antennen-Installation In diesem Menü können Sie einen Satellit hinzufügen,bearbeiten sowie löschen. BILDSCHIRM 19 Satellit hinzufügen Zur Hinzufügung eines neuen Satelliten drücken Sie den roten Knopf im Antennen Installationsmenü um die vorprogrammierte Satellitenliste aufzurufen. Wählen Sie mit den LINKS/RECHTS Tasten den gewünschten Satelliten. Markieren Sie den gewünschten Satelliten und drücken Sie Taste Hinzufügen.
UM 6005-15 GER 1/27/06 3:39 PM Page 22 PART 2 z Deutsch Satellit bearbeiten Zur Änderung der Parameter eines ausgewählten Satelliten, drücken Sie bitte die Taste Bearbeiten und ändern Sie die Einstellungen wie z.B. LNB Typ, LNB Unt.freq, LNB ob.Freq, Transponder, LNB Strom, 22k Ton, DiSEqC und Motor Position wie in Bildschirm 21 beschrieben.
UM 6005-15 GER 1/27/06 3:39 PM Page 23 PART 2 z Deutsch 5.2.2 Auto-Suchlauf BILDSCHIRM 23 Vor Starten des Suchlaufes wählen Sie durch das Drücken der grünen Taste zwischen „unverschlüsselten“ oder „unverschlüsselten und verschlüsselte“ Sendern. Durch Drücken der gelben Taste schalten Sie die Blindabtastung ein oder aus. Druch Drücken der blauen Taste aktivieren oder deaktivieren Sie die Netzwerksuche.
UM 6005-15 GER 1/27/06 3:39 PM Page 24 PART 2 z Deutsch 5.2.3 Manuller-Suchlauf In diesem Menü läßt sich ein neuer Transponder hinzufügen, bearbeiten oder löschen. Gleichzeitig können Sie einen Suchlauf pro Transponder durchführen. Wählen Sie mittels der Pfeiltasten den gewünschten Transponder und starten Sie mit der roten Taste den Transponder Suchlauf. BILDSCHIRM 25 Transponder hinzufügen In diesem Menü können Sie einen neuen Transponder zur Liste hinzufügen.
UM 6005-15 GER 1/27/06 3:39 PM Page 25 PART 2 z Deutsch Transponder bearbeiten In diesem Menü können Sie die Parameter eines bereits vorhandenen Transponders verändern. Gehen Sie mittels der gelben Taste in das Menü. BILDSCHIRM 27 Transponder Löschen Gehen Sie mittels der blauen Taste in das Menü „Transponder löschen“. Wählen Sie den gewünschten Transponder mit den Pfeiltasten und bestätigen Sie Ihre Auswahl durch Drücken der OK Taste.
UM 6005-15 GER 1/27/06 3:39 PM Page 26 PART 2 z Deutsch 5.3 Systemeinstellung In diesem Menü können Sie weitere Einstellungen wie zum Beispiel Sprache, OSD-Stil, Kindersicherung, TV-Einstellungen und Zeiteinstellungen konfigurieren. BILDSCHIRM 29 5.3.
UM 6005-15 GER 1/27/06 3:39 PM Page 27 PART 2 z Deutsch 5.3.1.1 Spracheinstellung In diesem Menü kann man die Menü- und die Audiosprache ändern. Bewegen Sie sich im Menü mit den NACH OBEN/ UNTEN Tasten zu der Option die Sie ändern möchten und drücken Sie auf OK/ NACH RECHTS. Sie können nun die jeweilige Sprache mit den NAVIGATIONSTASTEN wählen. Drücken Sie auf OK um die Änderung zu bestätigen BILDSCHIRM 31 5.3.1.
UM 6005-15 GER 1/27/06 3:39 PM Page 28 PART 2 z Deutsch TV-Modus Das Menü TV-Modus sieht folgendermaßen aus: BILDSCHIRM 33 Mit den OK/NACH RECHTS Tasten können Sie zwischen PAL oder NTSC wählen. Drücken Sie OK um Ihre Eingabe zu bestätigen. Sie können AUTO wählen, wenn Ihnen der TV Modus Ihres Fernseher nicht bekannt ist. Bildschirmmodus Das Menü Bildschirmmodus sieht folgendermaßen aus: BILDSCHIRM 34 Mit OK/NACH RECHTS können Sie zwischen dem 4:3 oder 16:9 Format wechseln.
UM 6005-15 GER 1/27/06 3:39 PM Page 29 PART 2 z Deutsch Videoausgabe Das Menü Videoausgabe sieht folgendermaßen aus: BILDSCHIRM 35 Mit den Knöpfen OK/NACH RECHTS kann man zwischen CVBS oder RGB wählen. Drücken Sie OK zur Bestätigung. Drücken Sie OK oder die RECHTE Taste um die Auswahl zu treffen: CVBS/RGB oder SVideo, dann drücken Sie OK zur Betätigung. ACHTUNG! Wenn Sie RGB gewählt haben ist der S-VHS Ausgang komplett ausgeschaltet. Hinweis: S-Video Ausgang nur im Model SRT 6015.
UM 6005-15 GER 1/27/06 3:39 PM Page 30 PART 2 z Deutsch 5.3.1.3 Zeiteinstellung Sie können die Zeiteinstellung Ihres Receivers über die GMT-Funktion oder manuell durchführen. Wenn die GMT-Verwendung eingeschaltet ist, wird die Zeit automatisch gesetzt. Sofern der Sender automatische Zeitzonen Wechsel unterstützt, wechselt der Receiver automatisch zwischen Sommer- und Winterzeit . Verwenden Sie zur manuellen Einstellung der Zeit die numerischen Tasten auf der Fernbedienung. BILDSCHIRM 37 5.3.1.
UM 6005-15 GER 1/27/06 3:39 PM Page 31 PART 2 z Deutsch Wählen Sie OK um mit der Rücksetzung auf Werkseinstellungen fortzufahren. Es werden alle bisher eingestellten Einstellungen gelöscht. WARNUNG: Ihr Pin-Code wird auf den werkseitigen PIN “0000” zurückgesetzt. 5.3.2 OSD Menü-Stil In diesem Menü können Sie die Menüfarbe, die Transparenzstufe, das Rahmenmuster und den Menü-Stil ändern. BILDSCHIRM 39 5.3.
UM 6005-15 GER 1/27/06 3:39 PM Page 32 PART 2 z Deutsch Kanalsperre Hier können Sie die Kanalsperre aktivieren/deaktivieren. Wenn die Kanalsperre aktiviert (EIN) ist, müssen Sie bei jedem Kanalwechsel den korrekten PIN eingeben. BILDSCHIRM 41 Menüsperre Hier können Sie die Menüsperre aktivieren/deaktivieren. Wenn die Menüsperre aktiviert (EIN) ist, müssen Sie bei einigen Menüpunkten (Bsp. Programmsuche oder Setzen der Werkseinstellungen) den PIN eingeben.
UM 6005-15 GER 1/27/06 3:39 PM Page 33 PART 2 z Deutsch PIN ändern Um den voreingestellten PIN zu ändern, müssen Sie zuerst den werkseitigen PIN eingeben. Danach können Sie den voreingestellten PIN durch einen PIN Ihrer Wahl ersetzen. Dazu müssen Sie Ihren gewählten PIN wie im unteren Bild angezeigt zweimal eingeben BILDSCHIRM 43 5.3.4 System-Info Dieser Menüpunkt zeigt die Version der auf Ihrem Receiver befindlichen Software und UL-Version.
UM 6005-15 GER 1/27/06 3:39 PM Page 34 PART 2 z Deutsch 5.3.5 System-Update In diesem Menü können Sie die Software Ihres Receivers aktualisieren (“STB zu STB” oder “ODA” ). [Abkürzung: STB = Set Top Box = Receiver] STB zu STB Softwarenübertragung a) Schalten Sie beide Receiver ab und verbinden Sie die beiden Geräte über die RS 232 Schnittstelle.
UM 6005-15 GER 1/27/06 3:39 PM Page 35 PART 2 z Deutsch Über Satelliten updaten/ herunterladen - Over Air Download (ODA) Mit dieser Option können Sie ein Softwareupdate über Satellit durchführen. Dabei wird überprüft, welche Software über Satellit verfügbar ist und gegebenenfalls wird eine neue Software auf Ihr Gerät geladen. Vorher müssen die mögliche Aktualisierung bestätigen.
UM 6005-15 GER 1/27/06 3:39 PM Page 36 PART 2 z Deutsch 5.4 Das Timer-Menü In diesem Menü können Sie Timer einrichten und den Receiver bei Abwesenheit mit bestimmten Funktionen steuern. Dazu gehört das zeitbedingte Einschalten (Wecken) oder den Wechsel in den Standby. BILDSCHIRM 46 Drücken Sie die NACH OBEN/UNTEN Taste und wählen Sie den zu setzenden Timer. Nun können Sie wählen, ob Sie diesen Timer aktivieren oder deaktivieren möchten.
UM 6005-15 GER 1/27/06 3:39 PM Page 37 PART 2 z Deutsch 5.5 Spiel Der Receiversoftware hat 1 Spiel (Tetris) und einen Kalender installiert. Im Menü Spiel können Sie das Spiel auswählen und starten. Außerdem können Sie mit dem Button SPIEL während des laufenden TV/Radio Betriebes drücken, um direkt ins Spielemenü zu gelangen. BILDSCHIRM 47 5.5.1 Tetris BILDSCHIRM 48 Bedienung: LINKS/RECHTS: Bewegung der Blöcke nach links oder rechts. NACH UNTEN: Hinunterziehen eines Blockes.
UM 6005-15 GER 1/27/06 3:39 PM Page 38 PART 2 z Deutsch 5.5.2 Kalender NACH OBEN/UNTEN: +/- Monate. LINKS/RECHTS: +/- Jahre (Bereich von 1900 bis 2100). BILDSCHIRM 49 6.0 Weitere Funktionen 6.1 System-Information Im laufenden TV/Radio Betrieb können Sie durch zweimaliges Drücken der INFO Taste die Programminformationen des laufenden Programms aufrufen.
UM 6005-15 GER 1/27/06 3:39 PM Page 39 PART 2 z Deutsch 6.2 Mosaic (Neun-Bilder-Anzeige) Im laufenden TV Betrieb können Sie durch Drücken des MOSAIC Taste in den Mosaic Modus wechseln. Hierbei werden neun Bilder von laufenden Programmen angezeigt. BILDSCHIRM 51 6.3 EPG (Elektronischer Programmführer) Der EPG zeigt Programminformationen zum ausgewählten Programm an.
UM 6005-15 GER 1/27/06 3:39 PM Page 40 PART 2 z Deutsch BILDSCHIRM 53 Im EPG aufgelistetes Menü: Mit den NACH OBEN/UNTEN Tasten können Sie zwischen den einzelnen Programminformationen wählen. Mit P+/P- können Sie zum nächsten/vorherigen Ereignis blättern. Drücken Sie NACH LINKS oder EXIT, um zum EPG Menü zurückzukehren. Drücken Sie NACH RECHTS, um Informationen zur Sendung anzuzeigen . BILDSCHIRM 54 Aufgelistete Informationen im EPG: Mit P+ / P- gelangen Sie zur nächsten/vorherigen Seite.
UM 6005-15 GER 1/27/06 3:39 PM Page 41 PART 2 z Deutsch Einrichtung eines Timers im EPG: 1. Drücken sie NACH OBEN/NACH UNTEN, um das Ereignis zu markieren, für welches Sie einen Timer setzen möchten. 2. Drücken Sie OK um den Timer zu setzen Bildschirm 54 zeigt die aktuell ausgewählte Timerinformation. Sie können die automatisch eingestellten Werte manuell modifizieren. Drücken Sie OK um die Einstellungen zu speichern. Mit EXIT können Sie das Timer Menü verlassen. BILDSCHIRM 55 6.
UM 6005-15 GER 1/27/06 3:39 PM Page 42 PART 2 z Deutsch 6.5 Teletext Funktion Drücken Sie die Taste TEXT im laufenden TV Betrieb um den Teletext zu öffnen. BILDSCHIRM 57 Im Teletext: Mit den NACH OBEN/UNTEN Tasten können Sie sich innerhalb der angezeigten Teletext bewegen. Mit den numerischen Tasten auf der Fernbedienung können Sie die Seitenzahlen direkt durch Eingabe auswählen. Wenn das gewählte Programm keinen Teletext anbietet, wird folgende Meldung angezeigt.
UM 6005-15 GER 1/27/06 3:39 PM Page 43 PART 2 z Deutsch A.1 Fehlerbehebung Digitale Receiver können sich gelegentlich „aufhängen“ (ähnlich einem PC). In diesem Fall empfehlen wir Ihnen, den Receiver vom Netzstrom zu trennen, um den Receiver neu einzustellen. Warten Sie ca. 30 Sekunden und schließen Sie das Gerät erneut an den Netzstrom. Überprüfen Sie nun, ob das Gerät wie erwartet funktioniert.
UM 6005-15 GER 1/27/06 3:39 PM Page 44 PART 2 z Deutsch A.2 Spezifikation 1. Tuner und Demodulator Eingangsfrequenz Eingangsimpedanz Eingangsniveau LNB Stromversorgung Impulsform Symbolrate Viterbi-Rate Reed Solomon decodierung 950 ~ 2150 MHz 75 Ω -65 dBm ~ -25 dBm 13/18V ± 0.5 V, Max 500 mA, QPSK 2-45 MS/s K = 7, R = 1/2, 2/3, 3/4, 5/6, 7/8, auto 204, 188, T = 8 2.
UM 6005-15 GER 1/27/06 3:39 PM Page 45 PART 2 z Deutsch 5. Stromversorgung Netzspannung Leistungsaufnahme Leistungsaufnahme - Standby 90 - 240 V AC, 50/60 Hz +/- 5 % Max. 20 W <= 8 W 6. Physische Spezifikation Maße (L x H x T) Gewicht 260 x 40 x 140 mm 1.2 kg 7.
UM 6005-15 GER 1/27/06 3:39 PM Page 46 PART 2 z Deutsch A.3 Glossar der Fachbegriffe C band 3.7 ~ 4.2 GHz Frequenz. DiSEqC Kontrolle digitaler Satellitenvorrichtungen. EPG Anleitung Elektrisches Programms, welche über Rundfunk von einem besonderen Satellit zur Anzeige der Informations- -Anleitung über einen Programm-Inhalt umgesetzt ist. Fixed Dish Eine Reflektor-Antenne, welche an einen besonderen Satellit orientiert ist.
UM 6005-15 GER 1/27/06 3:39 PM Page 47 PART 2 z Deutsch PID Die umgesetzte Paket hat ein Etikett, welches dem Empfänger erwähnt, wie der Empfänger die empfangene Information behandeln soll. Normalerweise nutzen die Satellitenempfänger vier Typ von PID, und zwar V-PID (Video PID), A-PID (Audio PID), P-PID (Program PID) und Daten PID (EPG Information). PIN Code Personale Identifikation, mit Nummer A und Vier-Ziffer Kode zur Verriegelung/Entriegelung,bzw.mit der Kindersicherungsfunktion.
UM 6005-15 GER 1/27/06 3:39 PM Page 50
UM 6005-15 FR 1/27/06 11:50 AM Page 1 PART 3 z Français Table des Matières 1.0 1.1 1.2 1.3 1.4 1.5 Introduction Instructions de sécurité Fonctionnalites & accessoires Mesures de sécurité Stockage Configuration de l'équipement 2 2 3 4 5 5 2.0 2.1 2.2 2.3 Votre Récepteur Panneau Avant Appareil de Télécommande Panneau Arrière 6 6 7 8 3.0 3.1 3.2 3.3 3.
UM 6005-15 FR 1/27/06 11:50 AM Page 2 PART 3 z Français 1.0 Introduction 1.1 Instructions de Sécurité N'INSTALLEZ PAS VOTRE RÉCEPTEUR: Dans un coffret fermé ou mal aéré; Directement sur ou sous un autre équipement; Sur une surface qui pourrait obstruer la rainure de ventilation.
UM 6005-15 FR 1/27/06 11:50 AM Page 3 PART 3 z Français 1.2 Fonctionnalités & Accessoires Permet de recevoir tous les programmes Free to Air numérique de TV et par radio via satellite Affichage du numéro du canal courant ou de l'heure Son numérique par le connecteur coaxial (S/PDIF) 1 Bloc d'alimentation séparé Aide à la configuration pour l'installation initiale Capacité de mémoire de 3200 canaux max.
UM 6005-15 FR 1/27/06 11:50 AM Page 4 PART 3 z Français Accessoires: Manuel d'Utilisateur 1 télécommande 2 x piles (type AAA) Note: Les piles ne devraient pas être rechargées, démontées, court-circuitées électriquement ou être mélangées ou employées avec d'autres types de piles. 1.
UM 6005-15 FR 1/27/06 11:50 AM Page 5 PART 3 z Français 1.4 Stockage Votre récepteur et ses accessoires sont stockés et livrés dans un conditionnement conçu pour protéger contre les décharges électriques et l'humidité. En le déballant, assurez-vous que toutes les pièces soient incluses et maintenez la boîte loin des enfants.
UM 6005-15 FR 1/27/06 11:50 AM Page 6 PART 3 z Français 2.0 Votre Récepteur 2.1 Panneau Avant Schéma 1. Panneau Avant 1. Indicateur de mode La lumière ROUGE indique que le récepteur est en mode STAND-BY (VEILLE). La lumière VERTE indique que le récepteur est en mode AWAKE (ACTIF). 2.
UM 6005-15 FR 1/27/06 11:50 AM Page 7 PART 3 z Français 2.2 Appareil de Télécommande Toutes les fonctionnalités du récepteur peuvent être utilisées avec la télécommande. A. Allumer/Éteindre le récepteur. B. Mettre le son en mode «muet». C. AV Commuter entre le mode TV et AV. D. 0~9 Changer le canal et commander les fonctions numeriques. E. FAV Commuter le mode Favoris entre ON (MARCHE) et OFF (ARRÊT). F. TV/R Schéma 2. Télécommande Commuter entre le mode TV et RADIO. G.
UM 6005-15 FR 1/27/06 11:50 AM Page 8 PART 3 z Français M. OK Activer l'article du menu en surbrillance. Montrer une liste de canal selon le mode TV/Radio. N. V+ / VSert à augmenter ou diminuer le niveau de volume du récepteur. O. P+ / PMonter ou descendre dans la liste des programmes. P. MOSAIC (MOSAÏQUE) Montrer les images simultanées de 9 canaux sur l'écran. Q. PAUSE Geler/Relancer l'image. R. AUDIO Afficher la liste de langues audios disponibles pour le canal que vous regardez.
UM 6005-15 FR 1/27/06 11:50 AM Page 9 PART 3 z Français 3. Connecteur péritel TV Pour relier votre récepteur à votre appareil de TV en utilisant un câble péritel. 4. Connecteur péritel VCR (Magnétoscope) 1 Pour relier votre récepteur à votre magnétoscope en utilisant un câble péritel. Votre signal vidéo fera maintenant une boucle entre le récepteur et votre TV. 5.
UM 6005-15 FR 1/27/06 11:50 AM Page 10 PART 3 z Français 3.0 Connexions 3.1 Se relier à la TV & au magnétoscope (Seulement sur le modèle SRT 6015) 1. Connectez le signal satellite du connecteur LNB à l'entrée SAT. 2. Connectez le câble coaxial UHF venant de votre TV câblée ou de votre antenne extérieur au connecteur d'entrée ANT à l'arrière du récepteur. 3. Connectez le câble coaxial au connecteur à l'arrière du récepteur. 4.
UM 6005-15 FR 1/27/06 11:50 AM Page 11 PART 3 z Français 3.2 Connecting to Digital Audio Amplifier et à votre TV avec la connexion S-VHS The Digital Audio Amplifier is connected with the receiver from the S/PDIF connector. Votre TV est connectée avec votre récepteur sur les deux connecteurs S-VHS. (FIGURE 6) Schéma 6. Schéma de câblage à l'Amplificateur Audio Numérique 3.
UM 6005-15 FR 1/27/06 11:50 AM Page 12 PART 3 z Français Si vous voulez regarder des programmes de plus d'un satellite (par exemple d'Astra et d'Hot Bird) il est recommandé d'utiliser des paraboles fixes et un commutateur de DiSEqC 1.0. Faites régler les paraboles aux satellites demandés par votre revendeur et connectez le LNB par le câble coaxial au connecteur ENTREE (IN) du commutateur de DiSEqC 1.0. Connectez le connecteur OUT (SORTIE) du commutateur de DiSEqC 1.
UM 6005-15 FR 1/27/06 11:50 AM Page 13 PART 3 z Français 3.4 Se relier au câble série pour télécharger le logiciel 1. Connectez le connecteur RS 232 au dos de votre récepteur au port série de votre ordinateur en utilisant un câble série. 2. Des instructions pour télécharger le logiciel peuvent être trouvées sur notre site Web www.strongsat.com (support) téléchargement (download)). Cependant, ce récepteur peut télécharger le nouveau logiciel système automatiquement par satellite. Schéma 10.
UM 6005-15 FR 1/27/06 11:50 AM Page 14 PART 3 z Français 4.0 Démarrage Assurez-vous que votre récepteur satellite est correctement connecté à votre télévision et votre parabole, et que votre signal satellite est de bonne qualité (si vous n'êtes pas sûr à ce sujet demandez à votre revendeur local strong de vérifier votre installation ou signal satellite). Vérifier que la prise d'énergie sur le récepteur est branchée à la prise murale. Allumez le récepteur.
UM 6005-15 FR 1/27/06 11:51 AM Page 15 PART 3 z Français Les étapes d'installation futures sont dépendantes du satellite sur lequel votre parabole est pointée. 1. Votre parabole est pointée sur Astra 1C, 1E, 1F ou un satellite d'Hotbird. Appuyez sur HAUT/BAS pour choisir le satellite d'ASTRA OU d'Hotbird et appuyez sur le bouton OK de votre télécommande. L'écran ci-dessous apparaîtra. ÉCRAN 3 Suivez l'instruction écrite sur l'écran.
UM 6005-15 FR 1/27/06 11:51 AM Page 16 PART 3 z Français Si vous choisissez un satellite dans la liste satellite, le menu configurer antenne apparaîtra, veuillez configurer le type de LNB, LNB Bas Freq, LNB Haut Freq, Contrôle de bande, Commande de polarisation, Mode de commutateur et d'antenne de DiSEqC. ÉCRAN 5 2a. Si vous avez une parabole fixe, alors placez "Mode d'antenne" à "Fixé", choisissez PROCHAIN et appuyez sur le bouton OK. L'écran Ajuster l'antenne apparaîtra comme montré sur l'écran 6.
UM 6005-15 FR 1/27/06 11:51 AM Page 17 PART 3 z Français 2b. Si vous avez une parabole avec un commutateur DiSEqC, vous pouvez placer Mode d'antenne" à DiSEqC 1.2, choisissez PROCHAIN et appuyez sur le bouton OK. Le menu Ajuster l’antenne apparaîtra comme montré sur l'écran 7. ÉCRAN 7 Vous devriez choisir le transpondeur recevable à votre endroit (choisissez le champ de "transpondeur" et choisissez le transpondeur en appuyant sur le bouton GAUCHE/ DROIT.
UM 6005-15 FR 1/27/06 11:51 AM Page 18 PART 3 z Français 5.0 Menu Principal Toutes les configurations et fonctionnalités importantes de votre récepteur peuvent être actionnées dans le Menu Principal. Le menu principal se compose de cinq sous-menus qui sont “Organisateur de canal”, “Installation”, “Paramètres du système”, “Timer” et "”Jeu”. Appuyez sur la touche MENU quand le menu est éteint, L'écran Menu Principal apparaîtra. ÉCRAN 9 5.
UM 6005-15 FR 1/27/06 11:51 AM Page 19 PART 3 z Français 5.1.1 "Gestionnaire de Canal" Dans ce menu, vous pouvez changer l'ordre des canaux, déplacez, supprimez et éditez les canaux. Pour changer le satellite, utilisez le bouton ROUGE. ÉCRAN 11 Trier (buton VERT) Vous pouvez trier l'ordre de canal dans la liste de canal par le type “nom a~z”, “nom z~a”, “Libre-CA”, “Fav - NON Fav” ou Défaut.
UM 6005-15 FR 1/27/06 11:51 AM Page 20 PART 3 z Français ÉCRAN 13 Si vous voulez renommer le canal, employez les touches HAUT/BAS pour choisir le "nom de programme" et appuyez sur OK, le nom de programme s'affichera comme ci-dessous. ÉCRAN 14 Utilisez le bouton GAUCHE/DROIT pour déplacer le curseur au caractère que vous souhaitez éditer. Utilisez le bouton HAUT/BAS pour changer le caractère (faire défiler l'alphabet).
UM 6005-15 FR 1/27/06 11:51 AM Page 21 PART 3 z Français Déplacer le canal ÉCRAN 15 Appuyez sur les touches HAUT/BAS pour diriger le curseur du menu sur le canal de votre choix. Appuyez sur les touches GAUCHE/DROIT pour sélectionner la colonne "Déplacer" du menu.
UM 6005-15 FR 1/27/06 11:51 AM Page 22 PART 3 z Français 5.1.2 Gestionnaire de Favoris Appuyez sur les touches HAUT/BAS pour choisir le canal. Appuyez sur les touches GAUCHE/DROIT pour diriger le curseur sur le groupe préféré. Appuyez sur le bouton OK pour ajouter le canal choisi au groupe préféré. Pour enlever le canal du groupe préféré, répétez la même opération. ÉCRAN 17 5.
UM 6005-15 FR 1/27/06 11:51 AM Page 23 PART 3 z Français 5.2.1 Installation d'Antenne Vous pouvez ajouter un satellite, éditer un satellite et supprimer un satellite dans ce menu. ÉCRAN 19 Ajouter le satellite Si vous voulez ajouter un nouveau satellite, appuyez sur la touche ROUGE dans ce menu, une liste de satellite apparaîtra sur l'écran. Appuyez sur DROIT/GAUCHE pour choisir le satellite. Si le satellite n'existe pas dans la liste satellite, veuillez choisir “NOUVEAU SAT1”.
UM 6005-15 FR 1/27/06 11:51 AM Page 24 PART 3 z Français ÉCRAN 21 Supprimer le satellite Si vous voulez supprimer un satellite, appuyez sur la touche JAUNE. Puis le message d'avertissement apparaître comme ci-dessous. ÉCRAN 22 Choisissez OK et appuyez sur la touche OK pour confirmer.
UM 6005-15 FR 1/27/06 11:51 AM Page 25 PART 3 z Français 5.2.2 Balayage Auto ÉCRAN 23 Appuyez sur la touche VERTE pour placer le mode de balayage à Free (Libre) ou Free+CA (Libre+CA). Appuyez sur la touche JAUNE pour placer Blind Scan sur ON (MARCHE) ou OFF (ARRET). Appuyez sur la touche BLEU pour placer le type de balayage à NIT ARRET ou NIT MARCHE. Quand l'installation est accomplie, appuyez sur la touche ROUGE pour commencer le balayage, montré comme ci-dessous.
UM 6005-15 FR 1/27/06 11:51 AM Page 26 PART 3 z Français 5.2.3 Balayage Manuel Dans ce menu, vous pouvez ajouter un nouveau transpondeur, éditez le transpondeur ou supprimez le transpondeur. Et vous pouvez scanner le transpondeur. L'utilisateur peut commuter des satellites avec le bouton ROUGE. ÉCRAN 25 Ajouter le Transpondeur: Dans ce menu, vous pouvez ajouter un nouveau transpondeur au système. Appuyez sur le bouton VERT, le sous-menu Ajouter le transpondeur, apparaîtra sur l'écran.
UM 6005-15 FR 1/27/06 11:51 AM Page 27 PART 3 z Français Éditer le Transpondeur: Dans ce menu, vous pouvez éditer un transpondeur dans le système. Appuyez sur le bouton JAUNE, le sous-menu Editer le transpondeur, apparaîtra sur l'écran. ÉCRAN 27 Supprimer le Transpondeur: Appuyez sur le bouton BLEU pour supprimer un transpondeur. Le message d'avertissement sera affiché comme ci-dessous. ÉCRAN 28 Appuyez sur GAUCHE/DROIT pour choisir OK, appuyez sur le bouton OK pour confirmer.
UM 6005-15 FR 1/27/06 11:51 AM Page 28 PART 3 z Français 5.3 Configuration du système Dans ce menu, vous pouvez configurer les systèmes tels que les paramètres de langue, Modèle d'OSD, Contrôle Parental, paramètres de la TV et Configuration de l'heure. ÉCRAN 29 5.3.
UM 6005-15 FR 1/27/06 11:51 AM Page 29 PART 3 z Français 5.3.1.1 Configuration de la Langue Vous pouvez changer la langue. Appuyez sur HAUT/BAS pour choisir la langue d'OSD ou la langue audio. Appuyez sur OK/DROIT pour ouvrir la liste de langues et appuyez sur HAUT/BAS pour choisir la langue. Appuyez sur OK pour confirmer. ÉCRAN 31 5.3.1.2 Configuration de la TV Vous pouvez configurer le mode de la TV, le mode d'écran et la sortie vidéo.
UM 6005-15 FR 1/27/06 11:51 AM Page 30 PART 3 z Français Mode de la TV L'écran de «mode de la TV» apparaîtra comme suit: ÉCRAN 33 Appuyez sur OK/DROIT pour choisir PAL ou NTSC, appuyez sur OK pour confirmer. Si vous ne connaissez pas le standard de votre TV, veuillez choisir AUTO. Mode d'écran L'écran de format de la TV apparaîtra comme suit. ÉCRAN 34 Appuyez sur OK/DROIT pour choisir 4:3 ou 16:9, appuyez sur OK pour confirmer.
UM 6005-15 FR 1/27/06 11:51 AM Page 31 PART 3 z Français Sortie vidéo L'écran de rendement vidéo apparaîtra comme suit: ÉCRAN 35 Appuyez sur OK/DROIT pour choisir CVBS ou RVB, appuyez sur OK pour confirmer. Pressez OK/DROITE pour sélectionner CVBS/ RGB ou S-VIDEO, pressez OK pour confirmer. Attention! Si RGB est sélectionné > sortie SVHS éteinte. Note: Sortie Vidéo S-VHS seulement sur le modèle SRT 6015.
UM 6005-15 FR 1/27/06 11:51 AM Page 32 PART 3 z Français 5.3.1.3 Configuration de l'heure Si votre opérateur fournit le l'information GMT, vous pouvez placer l'heure en utilisant le mode GMT, ou placer votre propre heure. Si le mode GMT est sur ON (en MARCHE), alors l'heure courante est indiquée automatiquement, vous pouvez alors indiquer votre fuseau horaire. Si votre opérateur fournit l'heure exacte alors votre récepteur passera de l'horaire d'été à l'heure d'hiver automatiquement.
UM 6005-15 FR 1/27/06 11:51 AM Page 33 PART 3 z Français Choisissez OK et appuyez sur la touche OK, le récepteur reviendra à son état de défaut d'usine, et toutes les données d'utilisateur seront supprimées. Note: Votre code PIN changera de nouveau pour le code PIN usine: "0000". 5.3.2 Style d'OSD Dans ce menu, vous pouvez changer la Couleur de Menu, le Niveau de Transparence, le Modèle de cadre et le Style d'habillage. ÉCRAN 39 5.3.
UM 6005-15 FR 1/27/06 11:51 AM Page 34 PART 3 z Français Verrouillage du Canal Placer le verrouillage du canal sur MARCHE ou ARRÊT. Si le verrouillage du canal est en marche, l'utilisateur doit entrer le code PIN parental correctement avant de regarder le programme verrouillé. ÉCRAN 41 Verrouillage du Menu Appuyez sur OK pour choisir si vous avez besoin ou pas du verrouillage pour le menu, OUI ou NON, appuyez sur OK pour confirmer.
UM 6005-15 FR 1/27/06 11:51 AM Page 35 PART 3 z Français Utilisez les touches HAUT/BAS pour choisir le canal que vous voulez verrouiller. Appuyez sur le bouton OK pour verrouiller le canal. Changer le code PIN Modifier le code PIN (mot de passe). Vous devez entrer le mot de passe de 4 chiffres et le confirmer encore; le code PIN du système changera en nouveau code PIN comme montré dans l'ÉCRAN 43. ÉCRAN 43 5.3.
UM 6005-15 FR 1/27/06 11:51 AM Page 36 PART 3 z Français 5.3.5 Mise à Jour de Système Dans ce menu, vous pouvez choisir entre "STB à STB" et "OTA" Transmission de logiciel de STB à STB a) Eteignez les deux STBs tout d'abord, reliez-les. b) Puis allumez le STB maître (le maître est le STB dont vous copierez le logiciel) et gardez STB asservi éteint. Naviguer dans le menu du STB maître et choisissez "Mise à jour de système - STB à STB".
UM 6005-15 FR 1/27/06 11:51 AM Page 37 PART 3 z Français Choisissez alors "COM1" ou "COM2" selon le port que vous utilisez dans l'ordinateur et la configuration de port comme suit: Bytes par seconde: Bytes de données: Parité: Bytes d'arrêt: Contrôle de flux: 115200 8 Aucune 1 Aucun 3. Dans le menu Hyper Terminal, choisissez “transférer” et appuyez alors sur "envoyer le dossier". Choisissez le dossier avec le nouveau logiciel (*.UPD) que vous voulez télécharger et choisissez le protocole “1K Xmodem”.
UM 6005-15 FR 1/27/06 11:51 AM Page 38 PART 3 z Français 5.4 Timer Vous pouvez configurer le timer pour faire effectuer au récepteur les actions indiquées, comme les instructions de réveil/ veille basées sur l'horloge du décodeur. ÉCRAN 46 Utilisez les boutons HAUT/BAS pour choisir le timer. Appuyez sur la touche GAUCHE/DROIT pour activer/désactiver le chronométreur courant. Appuyez sur le bouton OK pour mémoriser votre configuration.
UM 6005-15 FR 1/27/06 11:51 AM Page 39 PART 3 z Français 5.5 Jeu Le récepteur a un jeu (Tetris) et un calendrier. Dans ce menu, l'utilisateur peut choisir le jeu et appuyez sur OK pour y jouer ou il peut appuyer directement sur la touche de JEU de la télécommande pendant lorsque le récepteur est allumé. ÉCRAN 47 5.5.1 Tetris ÉCRAN 48 Fonction de touche: La touche GAUCHE/DROIT est utilisée pour déplacer la brique vers la gauche ou la droite. BAS est utilisé pour laisser tomber la brique.
UM 6005-15 FR 1/27/06 11:51 AM Page 40 PART 3 z Français 5.5.2 Calendrier HAUT/BAS: +/- mois. GAUCHE/DROIT: +/- années (gamme de 1900 à 2100). ÉCRAN 49 6.0 Autres fonctions 6.1 Information du système Dans le statut d'opération normale (aucune opération de menu), appuyez sur le bouton INFO deux fois, le menu de l'information de programmes apparaîtra sur l'écran comme montré sur (Écran 50).
UM 6005-15 FR 1/27/06 11:51 AM Page 41 PART 3 z Français 6.2 Mosaïque (Vue de Neuf Images) Dans le statut d'opération normale (aucune opération de menu) appuyez sur le bouton MOSAIC (MOSAÏQUE). Neuf images seront affichées sur l'écran comme on peut le voir sur (l'Écran 50). ÉCRAN 51 6.3 EPG (Guide de Programmes Electroniques) L'EPG montre les événements sur le canal en cours. Avec le MENU arrêté, appuyez sur le bouton EPG. Le menu EPG apparaîtra: ÉCRAN 52 Appuyez sur HAUT/BAS pour choisir le canal.
UM 6005-15 FR 1/27/06 11:51 AM Page 42 PART 3 z Français ÉCRAN 53 Dans le menu de programmes du mode EPG: Appuyez sur les touches HAUT/BAS pour choisir les composants du programme. Appuyez sur P+ / P- pour entrer dans le programme des prochains/précédents jours. Appuyez sur GAUCHE/SORTIE pour retourner au menu EPG. Appuyez sur DROIT pour montrer les détails de l'émission. ÉCRAN 54 Dans les détails de programme du mode EPG: Appuyez sur P+ / P- pour entrer dans la prochaine/précédente page.
UM 6005-15 FR 1/27/06 11:51 AM Page 43 PART 3 z Français Écran 54 vous montre que l'information mémorisée dans le timer d'événement en cours basée sur l'événement que vous avez choisi. Vous pouvez également utiliser cet écran pour modifier chaque valeur. Pour sauver les configurations, appuyez sur OK. Pour quitter l'installation du timer d'événement, appuyez sur SORTIE. ÉCRAN 55 6.
UM 6005-15 FR 1/27/06 11:51 AM Page 44 PART 3 z Français 6.5 Fonction de Télétexte Avec le menu, appuyez sur TEXTE. ÉCRAN 57 En TEXTE sur OSD: Appuyez sur HAUT/BAS pour ajouter/ soustraire le numéro de page montré.
UM 6005-15 FR 1/27/06 11:51 AM Page 45 PART 3 z Français A.1 Dépannage Il y a diverses raisons possibles de comportement anormal du récepteur. Vérifiez le récepteur selon les procédures montrées ci-dessous. Si le récepteur ne fonctionne pas correctement après la vérification, veuillez contacter le revendeur. N'ouvrez pas le couvercle du récepteur. Ceci peut causer une situation dangereuse.
UM 6005-15 FR 1/27/06 11:51 AM Page 46 PART 3 z Français A.2 Spécifications 1. Tuner et démodulateur Fréquence d'entrée Impédance d'entrée Niveau d'entrée Alimentation électrique de LNB type de modulation Symbol Rate Taux de viterbi Décodeur Reed - Salomon 950 ~ 2150 MHz 75 Ω 65 dBm ~ -25 dBm 13/18 V ± 0.5 V, Max 500 mA, QPSK 2-45 MS/s K=7, R=1/2, 2/3, 3/4, 5/6, 7/8, auto 204, 188, T=8 2.
UM 6005-15 FR 1/27/06 11:51 AM Page 47 PART 3 z Français 5. Alimentation Electrique Tension d'entrée Consommation d'énergie Consommation en veille 90 - 240 V AC, 50/60 Hz +/- 5 % Max. 20 W <= 8 W 6. Spécification Physique Dimension (L x H x P) Poids 260 x 40 x 140 mm 1.2 kg 7.
UM 6005-15 FR 1/27/06 11:51 AM Page 48 PART 3 z Français A.3 Glossaire des termes Bande C Fréquence de 3.7 ~ 4.2 GHz. DiSEqC Commande des commutations d'antennes satellites. EPG Guide électronique de programme qui est transmis par un radiodiffuseur d'un satellite particulier pour afficher l'information au sujet d'un contenu de programme. Parabole Fixée Une antenne parabolique qui est orientée vers un satellite particulier.
UM 6005-15 FR 1/27/06 11:51 AM Page 49 PART 3 z Français Code de PIN Numéro d'identification personnelle Un code à quatre chiffres qui est employé pour le verrouillage/ déverrouillage, e.g. avec le dispositif de contrôle parental. Polarization Permet à plusieurs programmes d'être adaptés dans la même bande de fréquence. Les signaux d'un satellite sont transmis avec la polarisation linéaire (verticale ou horizontale) ou polarisation circulaire (droite ou gauche). RS 232 Port série de données.
SRT 5010-Spain 7/9/05 4:36 PM Page 44
UM 6005-15 ITA 1/27/06 5:37 PM Page 1 PART 4 z Italiano INDICE 1.0 1.1 1.2 1.3 1.4 1.5 Introduzione Istruzioni per la sicurezza Come utilizzare questo manuale Caratteristiche e accessori Precauzioni per la sicurezza Imballo 2 2 2 3 4 4 2.0 2.1 2.2 2.3 Il Ricevitore Pannello Frontale Telecomando Pannello Posteriore 4 4 5 6 3.0 3.1 3.2 6 6 3.3 3.
UM 6005-15 ITA 1/27/06 5:37 PM Page 2 PART 4 z Italiano 1.0 Introduzione 1.1 Istruzioni per la sicurezza Attenzione: NON INSTALLARE IL RICEVITORE In un luogo chiuso o non ben ventilato; Direttamente sopra o sotto qualche altro apparecchio; Su una superficie che può ostruire i fori di ventilazione. NON ESPORRE IL RICEVITORE O I SUOI ACCESSORI: a. A luce solare diretta o vicino ad altre attrezzature che generano calore; b. Alla pioggia o a forte umidità; c.
UM 6005-15 ITA 1/27/06 5:37 PM Page 3 PART 4 z Italiano 1.3 Caratteristiche e accessori Ricevitori dedicati alla ricezione di tutti i canali digitali da satellite terrestri TV e Radio in chiaro Guida alla prima installazione Display con numero canale e ora Audio digitale via uscita coassiale (S/PDIF) 1 Interruttore alimentazione Installazione semplice e rapida con menu user-friendly Eccellente qualità Audio & Video Capacità di memorizzare fino a 3.
UM 6005-15 ITA 1/27/06 5:37 PM Page 4 PART 4 z Italiano 1.4 Precauzioni per la sicurezza Per garantire il corretto funzionamento del ricevitor si consiglia di prendere le seguenti precauzioni: Leggere attentamente il manuale e seguire alla lettera le istruzioni fornite. Se si desidera, si può pulire il ricevitore con un leggero panno morbido inumidito leg- germente con un detergente neutro e solo dopo averlo scollegato dalla tensione di rete.
UM 6005-15 ITA 1/27/06 5:37 PM Page 5 PART 4 z Italiano 2.2 Telecomando Tutte le funzione del ricevitore possono essere controllate tramite il telecomando. A. Accensione/Spegnimento (On/Off) Muto Passaggio da TV a AV (abilita l’ingresso SCART VCR) D. 0~9 Tastiera numerica E. FAV Accesso ai canali favoriti F. TV/R Cambia fra modo TV o RADIO G. MENU Mostra il menu principale ed esce da qualunque livello menu H. INFO Mostra le informazioni sul canale corrente I.
UM 6005-15 ITA 1/27/06 5:37 PM Page 6 PART 4 z Italiano 2.3 Pannello Posteriore FIGURA 3. Pannello Posteriore 1. SAT IN Ingresso segnale satellite. 2. SAT OUT Uscita satellite. Vi dà la possibilità di collegare un ulteriore ricevitore (analogico o numerico). 3. Connettore TV SCART Per collegare il ricevitore al TV. 4. Connettore VCR SCART 1 Per collegare il ricevitore al VCR usando un cavo SCART. 5.
UM 6005-15 ITA 1/27/06 5:37 PM Page 7 PART 4 z Italiano 3.0 Connessioni 3.1 Collegamento al TV & VCR 1 1. Collegare il cavo proveniente dal LNB al connettore SAT IN. 2. Collegare il cavo dell'antenna TV al connettore ANT IN. 3. Collegare un cavo coassiale al connettore RF OUT. 4. Collegare l'altro lato del cavo coassiale al connettore d'ingresso del vostro TV. FIGURA 4 Connessione di base con un cavol Scart 1.
UM 6005-15 ITA 1/27/06 5:37 PM Page 8 PART 4 z Italiano 3.2 Collegamento ad un amplificatore audio digitale e al TV con connettore S-VHS L’amplificatore audio digitale è collegato con il ricevitore dal connettore coassiale S/PDIF. Il TV è collegato al ricevitore con un cavo S-VHS. (FIGURA 6) FIGURA 6. Collegamento all’Amplificatore audio digitale 3.3 Collegamento alla parabola Collegare il cavo proveniente dal LNB al connettore SAT IN. FIGURA 7.
UM 6005-15 ITA 1/27/06 5:37 PM Page 9 PART 4 z Italiano Pe ricevere un mggior numero di satelliti e programmi è possibile utilizzare una parabola motorizzata da un posizionatore DiSEqC 1.2. Collegare il LNB con un cavo coassiale al connettore SAT IN del posizionatore e collegare i connettore OUT del posizionatore al connettore SAT IN alla parte posteriore del vostro ricevitore. FIGURA 9. Collegamento di una parabola motorizzata 3.4 Colegamento al PC per il trasferimento del software 1.
UM 6005-15 ITA 1/27/06 5:37 PM Page 10 PART 4 z Italiano SCHERMO 1 Premete UP/DOWN(SU/GU) per scegliere la vostra lingua, premete OK per confirmare. Il menu scelta del satellite ecomparirà sullo schermo. SCHERMO 2 1. Se la parabola è puntata sui satelliti Astra 1C, 1E, 1F oppure Hotbird. Premere UP/DOWN per selezionare ASTRA O Hotbird e premere OK.
UM 6005-15 ITA 1/27/06 5:37 PM Page 11 PART 4 z Italiano Seguire e istruzioni che compaiono sullo schermo. Una volta ottenuto il massimo livello e qualità proseguire selezonando sullo schermo il tasto PROSSIMO and premere il tatso OK. Il menu Impostazione Canali comparirà come indicato sullo schermo 8. 2. Se la parabola è puntata su un altro satellite, selezionare “Altro” nel menu selezione satellite e premere OK: comparirà una lista di satelliti da cui scegliere il vostro.
UM 6005-15 ITA 1/27/06 5:37 PM Page 12 PART 4 z Italiano 2a. Se la parabola è di tipo fisso impostare “Modo Antenna” su “Fisso”, selezionare PROSSIMO e premere OK. Comparirà la schermata Regolazione Antenna come da schermo 6. Selezionare un transponder ricevibile nella vostra zona e regolare il puntamento dell’antenna fino ad ottenere il massimo livello e qualità. SCHERMO 6 Completato il puntamento, scegliere PROSSIMO e premere OK. Il menu Impostazione Canale comparirà come indicato nello schermo 8.
UM 6005-15 ITA 1/27/06 5:37 PM Page 13 PART 4 z Italiano Selezionare un transponder ricevibile nella vostra zona. Spostarsi sul campo “Sposta Antenna” e regolare il puntamento usando i tasti DESTRA/SINISTRA fino ad ottenere il massimo livello e qualità. Terminato il puntamento premere il tasti “Salva posizione”, impostare il numero della posizione con i tatsi DESTRA/SINISTRA. Poi scegliere PROSSIMO e premere OK. Sarete guidati al menu Impostazione Canali come da schermo 8.
UM 6005-15 ITA 1/27/06 5:37 PM Page 14 PART 4 z Italiano 5.0 Menu Principale Tutte le regolazioni ed i parametri del ricevitore possono essere impostati dal Menu Principale. Il Menu Principale consiste di cinque sotto-menu che sono “Organizzazione Canali”, “Installatione”, “Impostazioni Sistema”, “Timer” e “Gioco”. Premere il tasto MENU, comparirà il Menu Principale. SCHERMO 9 5.1 Organizzazione Canali Selezionare con i tasti SU/GIÙ il sottomenu Organizzazione Canali e premere OK.
UM 6005-15 ITA 1/27/06 5:37 PM Page 15 PART 4 z Italiano 5.1.1 Gestione Canali In questo menu, è possibile cambiare l’ordine dei canali, spostare, rimuovere e modificare il nome dei canali. Per cambiare satellite utilizzare il tasto ROSSO, SCHERMO 11 5.1.1.1 Ordinare (Tasto Verde) Si può ordinare i canali per “nome a~z”, per “nome z~a”, “Liberi-codificati”, “Fav - NO Fav” oppure predefinito.
UM 6005-15 ITA 1/27/06 5:37 PM Page 16 PART 4 z Italiano 5.1.1.2 Modificare (Tasto Giallo) Scegliere il canale che si vuole modificare, premere il tasto GIALLO (Modificare) In questo menu, è possibile modificare il Nome Programma, Frequenza Oscillatore Locale, Symbol rate, PID Video, PID Audio. SCHERMO 13 Per modificare il nme del canale, utilizzare le frecce SU/GIÙ per scegliere “Nome programma” e premere OK.
UM 6005-15 ITA 1/27/06 5:37 PM Page 17 PART 4 z Italiano 5.1.1.3 Sposta Canale SCHERMO 15 Premere i tasti SU/GIÙ per selezionare il canale da spostare. Premere i tasti DESTRA/SINISTRA per entrare nella finestra “sposta”. Premere il tasto OK per confermare la selezione del canale e usare i tasti SU/GIÙ per spostare il canale nella nuova posizione. Premere il tatso OK per confermare. 5.1.1.4 Elimina Canale SCHERMO 16 Premere i tasti SU/GIÙ per selezionare il canale da spostare.
UM 6005-15 ITA 1/27/06 5:37 PM Page 18 PART 4 z Italiano 5.1.2 Gestione Favoriti Premere i tasti SU/GIÙ per scegliere il canale. Premere i tasti DESTRA/SINISTRA per selezionare quale in quale delle quattro liste inserire il canale. Premre OK per aggiungere il canale scelto alla lista desiderata. Per rimuovere il canale dalla lista Favoriti, ripetere la medesima operazione. SCHERMO 17 5.
UM 6005-15 ITA 1/27/06 5:37 PM Page 19 PART 4 z Italiano 5.2.1 Installazione Antenna Potete aggiungere un satellite, modificare il nome di un satellite e rimuovere un satellite. SCHERMO 19 Aggiungere un satellite Per aggiungere un satellite premere il tasto ROSSO nel menu: un elenco satellito comparirà sullo schermo. Premere DESTRA/SINISTRA per scegliere il satellite. Se il satellite desiderato non è presente nella lista, selezionare “NUOVO SAT1”.
UM 6005-15 ITA 1/27/06 5:37 PM Page 20 PART 4 z Italiano Modificare un satellite Se i parametri di un satellite sono cambiati oppure se si tratta di un nuovo satellite, è necessario impostare i parmetri, il tipo LNB, Banda Bassa LNB, Banda Alta LNB, Transponder, Alimentazione LNB, Tono 22 kHz, DiSEqC e Posizione Motore. SCHERMO 21 Rimuovere un satellite Per cancellare un satellite, premere il tasto GIALLO. Un avviso comparirà sullo schermo. SCHERMO 22 Premere OK per confermare la cancellazione.
UM 6005-15 ITA 1/27/06 5:37 PM Page 21 PART 4 z Italiano 5.2.2 Ricerca Automatica SCHERMO 23 Premere il tasto VERDE impostare il modo ricerca su to Liberi or Liberi+Codificati Premere il tasto GIALLO per impostare la Ricerca Casuale su ON o OFF. Premere il tatso BLU per impostare il tipo di ricerca NIT OFF or NIT ON. Premere il tasto ROSSO per avviare la ricerca automatica.
UM 6005-15 ITA 1/27/06 5:37 PM Page 22 PART 4 z Italiano 5.2.2 Ricerca Manuale In questo menu, è possibile aggiungere, modificare o cancellare un nuovo transponder. E possibile cambiare satellite premendo il tasto ROSSO, SCHERMO 25 Aggiungere un Transponder: Premere il tasto VERDE, il sottomenu Aggiungere Transponder comparirà allo schermo. SCHERMO 26 Frequenza: Symbol Rate: Polarità: 22 Inserire la frequenza del transponder. Inserire il symbol rate del transponder.
UM 6005-15 ITA 1/27/06 5:37 PM Page 23 PART 4 z Italiano Modifica Transponder: Premere il tasto GIALLO, Il sootomenu Modifica Transponder comparirà sullo schermo. SCHERMO 27 Cancella Transponder Premere il tatso BLU per rimuovere il transponder. Un avviso comparirà sullo schermo. SCHERMO 28 Selezionare il tatso e premere OK per confirmare. Ricerca Premete SU/GIÙ per scegliere un transponder, premere il tasto OK per cercare i canali.
UM 6005-15 ITA 1/27/06 5:37 PM Page 24 PART 4 z Italiano 5.3 Impostazione Sistema In questo menu, si possono impostare i parametri di sistema come lingua, stile OSD, Controllo Parentale, parametri TV e Ora SCHERMO 29 5.3.
UM 6005-15 ITA 1/27/06 5:37 PM Page 25 PART 4 z Italiano 5.3.1.1 Impostazione Lingua Premere SU/GIÙ per scegliere la lingua del’OSD oppure la lingua Audio. Premete OK/DESTRA per entrare nella lista delle lingue e premere SU/GIÙ per scegliere la lingua. Premere OK per confermare. SCHERMO 31 5.3.1.2 Regolazioni TV Potete impostare i parametri del TV, dello modo Schermo e dell’uscita Video.
UM 6005-15 ITA 1/27/06 5:37 PM Page 26 PART 4 z Italiano Tipo TV SCHERMO 33 Selezionare il tipo di TV PAL oppure NTSC (PAL in Europa), premere OK per confermare. Tipo Schermo SCHERMO 34 Selezianare 4:3 oppure 16:9, premete OK per confermare.
UM 6005-15 ITA 1/27/06 5:37 PM Page 27 PART 4 z Italiano Selezioanre CVBS oppure RGB, premete OK per confermare Premere OK/DESTRA per selezionare CVBS/ RGB o S-VIDEO, premere OK per confermare Attenzione! Se viene selezionato RGB l'uscita SVHS viene completamente disattivata. Nota: Uscita S-VHS solo sui modello SRT 6015. Impostazioni modulatore (solo per il modello SRT 6015) SCHERMO 36 Selezionare il Modo audio RF (PALB/G per l'Italia) o Canale RF.
UM 6005-15 ITA 1/27/06 5:37 PM Page 28 PART 4 z Italiano 5.3.1.4 Parametri di fabbrica Questa opzione permette di impostare i parametri di fabbrica cancellando tutti i parametri, canali e preferenze memorizzate in precedenza. Sarà necessario quindi rifare tutta la sintonia dei canali. SCHERMO 38 5.3.2 Stile OSD Questo Menu permette di impostare i Colori del Menu, il livello di transparenza, Il tipo di bordo e lo stile di apparizione dei menu.
UM 6005-15 ITA 1/27/06 5:37 PM Page 29 PART 4 z Italiano 5.3.3 Controllo Parentale Questo menu permette di attivare o disattivare (ON or OFF) l blocco della visione di u determinato canale o il blocco dell’accesso al menu. Il codice PIN di fabbrica 0000. SCHERMO 40 Blocco Canale Selezionare ON o OFF. Per vedere un canale bloccato è necessario inserire il codice PIN.
UM 6005-15 ITA 1/27/06 5:37 PM Page 30 PART 4 z Italiano Blocco Parentale SCHERMO 42 Utilizzare i tasti SU/GIU per scegliere il canale da bloccare. Premere OK per confermare il blocco. Modifica PIN Digitare il codice PIN vecchio, digitare due volte il nuovo codice PIN.
UM 6005-15 ITA 1/27/06 5:37 PM Page 31 PART 4 z Italiano 5.3.4 Informazioni di Sistema Vengono riportate la versione software e hardware del ricevitore. SCHERMO 44 5.3.5 Aggiornamento Sistema E possibile aggiornare il software tra due ricevitori (“STB a STB”) o via satellite (“OAD”) Trasferimento software STB a STB. a) Scollegare i due STB dalla rete e collegarli insieme con cavi RS 232 null modem. b) Accendere il STB master (quello da cui verràcopiato il software) e tenere il STB slave spento.
UM 6005-15 ITA 1/27/06 5:37 PM Page 32 PART 4 z Italiano Aggiornamento via Satellite (Over the Air Download - OAD) Questa funzione permette di scaricare nuove versioni software direttamente da satellite. Non scollegare il ricevitore dalla rete elettrica né staccare il cavo d’antenna durante il processo di scaricamento. Aggiornamento da PC 1. Colleare il PC al ricevitore (il ricevitore deve scollegato dalla rete) con un cavo RS 232 null modem. 2.
UM 6005-15 ITA 1/27/06 5:37 PM Page 33 PART 4 z Italiano 5.4 Timer Questo menu permette di impostare il timer per l’accensione e lo spegnimento auomatico del ricevitore. SCHERMO 46 Selezionare il numero di Timer con i tasti SU/GIU. Premere i tasti SINISTRA/DESTRA per attivare/disattivare il timer. Premere il tasto OK per inserire i parametri del timer. “Accensione”: il ricevitore si accende alla data ed ora indicate.
UM 6005-15 ITA 1/27/06 5:37 PM Page 34 PART 4 z Italiano 5.5 Gioco Il ricevitore è dotato di un gioco (Tetris) e un calendario. Per giocare è possibile premere il tasto GAME sul telecomando o selezionando tetris nel menu Gioco. SCHERMO 47 5.5.1 Tetris SCHERMO 48 Funzione Tasti: SINITRA/DESTRA GIU SU 34 muove il blocco a sinistra o a destra. per far cadere il blocco. per ruotare il blocco.
UM 6005-15 ITA 1/27/06 5:37 PM Page 35 PART 4 z Italiano 5.5.2 Calendario SU/GIU: SINISTRA/DESTRA: +/- mesi. +/- anni (da 1900 a 2100). SCHERMO 49 6.0 Altre funzioni 6.1 Informazioni Programma Nella condizione di funzionamento normale premere il tasto Info due volte, la schermata con le informazioni sul programma comparirà sullo schermo.
UM 6005-15 ITA 1/27/06 5:37 PM Page 36 PART 4 z Italiano 6.2 Mosaico Nella condizione di funzionamento normale il premendo il tasto MOSAIC, viene visualizzata l’anteprima di 9 canali contemporaneamente. SCHERMO 51 6.3 EPG (Guida Elettronica Programmi) L’ EPG mostra le informazioni sulla programmazion corrente e futura del canale in visione e dei canali appartenenti allo stesso trasponder. Premendo il tasto EPG comparirà la seguente schermata: SCHERMO 52 Premere SU/GIU per scegliere il canale.
UM 6005-15 ITA 1/27/06 5:37 PM Page 37 PART 4 z Italiano SCHERMO 53 Nel menu dei programmi EPG: Premere i tasti SU/GIU per selezionare il programma Premere il tasto DESTRA per visualizzarne i dettagli. Premere i tasti P+/P- per cambiare giorno. Premere i tasti SINISTRA/EXIT per ritornare al menu EPG. Premere i tasti DESTRA per mostrare I dettagli di questo articolo. SCHERMO 54 Nei dettagli deli programma: Premere i tasti P+/P- in per passare alla pagina precedente o successiva.
UM 6005-15 ITA 1/27/06 5:37 PM Page 38 PART 4 z Italiano E possile attivare un timer direttamente dal menu EPG. 1. Premere i tasti SU/GIU per muovere il cursore all’evento per cui desiderate attivare un timer. 2.Premere OK per aggiungere un timer. Lo Schermo 54 mostra le informazioni del timer sull’evento che avete scelto. E possibile modificare i parametri del timer. Per memorizzare i parametri premere OK. Per annullare premere ESCI. SCHERMO 55 6.
UM 6005-15 ITA 1/27/06 5:37 PM Page 39 PART 4 z Italiano 6.5 TELEVIDEO Premere il tasto TEXT. SCHERMO 57 Premere SU/GIU per cambiare pagina oppure usare i tasti numerici per digitare direttamente il numero di pagina. Se il programma non ha il televideo comparirà la seguente schermata.
UM 6005-15 ITA 1/27/06 5:37 PM Page 40 PART 4 z Italiano A.1 Problemi e soluzioni Ci possono essere vari motivi per il funzionamento anormale del ricevitore. Controlli il ricevitore secondo le procedure qui indicate. Se il ricevitore non funziona correttamente dopo il controllo consultate il vostro rivenditore o l’assistenza tecnica. Non aprire il coperchio del ricevitore. Oltre ad invalidare la garanzia potrebbe essere pericoloso.
UM 6005-15 ITA 1/27/06 5:37 PM Page 41 PART 4 z Italiano A.2 Caratteristiche Tecniche 1. Sintonizzatore e demodulatore Frequenza d’ingresso Impedanza d’ingresso Livello ingresso Alimentazione LNB Modulazione Symbol Rate FEC Decodifica Reed Solomon 950 ~ 2150 MHz 75 Ω -65 dBm ~ -25 dBm 13/18 V ±0.5V, Max 500 mA, QPSK 2 - 45 MS/s K=7, R=1/2, 2/3, 3/4, 5/6, 7/8, auto 204, 188, T=8 2.
UM 6005-15 ITA 1/27/06 5:37 PM Page 42 PART 4 z Italiano 5. Alimentazione Tensione d’ingresso Consumo Consumo Stand-by 90 - 240 V AC, 50/60 Hz +/-5% Max. 20 W <= 8 W 6. Caratteristiche fisiche Dimensioni (L x A x L) Peso 260 x 40 x 140 mm 1.2 kg 7.
UM 6005-15 ITA 1/27/06 5:37 PM Page 43 PART 4 z Italiano A.3 Glossario Banda C DiSEqC Gamma di Frequenza 3.7 ~ 4.2 GHz. Digital Satellite Equipment Control. EPG Guida Elettronica dei Programmi: fornisce informazoni sul programma corrente e futuro. Trasmissione di programmi in chiaro. Gamma di Frequenza 11 ~ 13 GHz. (Low-Noise Block down-converter).
UM 6005-15 ITA 1/27/06 5:37 PM Page 44 PART 4 z Italiano INFORMAZIONE AGLIUTENTI ai sensi dell’art. 13 del decreto legislativo 25 luglio 2005, n.
UM 6005-15 ITA 1/27/06 5:37 PM Page 45 PART 4 z Italiano 45
SRT 5010-Spain 7/9/05 4:36 PM Page 44
UM 6005-15 SPA PART 5 1/27/06 1:54 PM Page 1 Español INDICE 1.0 1.1 1.2 1.3 1.4 1.5 Introducción Instrucciones para la seguridad Como utilizar este manual Características y accesorios Precauciones para la seguridad Imbalaje 2 2 2 3 4 4 2.0 2.1 2.2 2.3 El Receptor Panel Frontal Telemando Panel Posterior 5 5 6 8 3.0 3.1 3.2 9 9 3.3 3.
UM 6005-15 SPA 1/27/06 1:54 PM Page 2 PART 5 Español 1.0 Introducción 1.1 Instrucciones para la seguridad Atención: NO INSTALAR EL RECEPTOR En un lugar cerrado o mal ventilado; Directamente bajo o encima de cualquier aparato; Sobre una superficie que pueda obstruir los agujeros de ventilación. NO EXPONER EL RECEPTOR O SUS ACCESORIOS A: a. A luz solar directa o próximo a otros equipos que generen o puedan generar calor; b. A la lluvia o humedad elevada; c.
UM 6005-15 SPA PART 5 1/27/06 1:54 PM Page 3 Español 1.3 Características y accesorios Receptor dedicado a la recepción de todos los canales de digital terrestre TV y Radio en abierto Guía de primera instalación Display con número de canal y hora Audio digital via salida coaxial (S/PDIF) 1 Interruptor de alimentación Instalación simple y rápida con menú fácil manejo Excelente calidad Audio & Video Capacidad de memorización hasta 3.
UM 6005-15 SPA 1/27/06 1:54 PM Page 4 PART 5 Español Accesorios: Manual usuario 1 Telemando 2 Batería (tipo AAA) Nota: Las baterías no deben recargarse, cortocircuitarse o mezclar con otros tipos de baterías. 1.4 Precauciones para la seguridad Para garantizar el correcto funcionamiento del receptor se aconseje tomar las siguientes precauciones. Leer atentamente el manual y seguir las indicaciones suministradas.
UM 6005-15 SPA PART 5 1/27/06 1:54 PM Page 5 Español 2.0 El Receptor 2.1 Panel Frontal FIGURA 1. Panel Frontal 1. Led encendido/stand by La luz ROJA indica que el receptor está en STAND-BY. La luz VERDE indica que el receptor está encendido. 2.
UM 6005-15 SPA 1/27/06 1:54 PM Page 6 PART 5 Español 2.2 Telemando Todas las funciones del receptor pueden ser controladas mediante el telemando. A. Encendido/apagado (On/Off). B. Silencio. C. AV Paso de TV a AV (Habilita la entrada SCART VCR). D. 0~9 Teclador numérico. E. FAV Acceso a los canales favoritos. F. TV/R Cambia entre modo TV o RADIO. G. MENU Muestra el menu principal y sale de cualquier nivel del menú. H. INFO Muestra la información sobre el canal actual. I. EPG FIGURA 2.
UM 6005-15 SPA PART 5 1/27/06 1:54 PM Page 7 Español M. OK Confirma una selección en el menú. Visualiza la lista de canales durante el visionado. N. V+ / VAumenta/reduce el nivel de volumen del receptor. O. P+ / PPagina siguiente y anterior en la selección del menú. P. MOSAICO Muestra los canales anteriores TV contemporaneamente. Q. PAUSA Para/ Activa la imagen. R. AUDIO Muestra la lista de los idiomas audio disponibles para el canal visualizado.
UM 6005-15 SPA 1/27/06 1:54 PM Page 8 PART 5 Español 2.3 Panel Posterior FIGURA 3. Panel Posterior 1. SAT IN Entrada señal satélite. 2. SAT OUT Salida satélite. Da la posibilidad de conectar otro receptor (analógico o digital). 3. Conector TV SCART Para conectar el receptor al TV. 4. Conector VCR SCART 1 Para conectar el receptor al VCR utilizando un cable SCART. 5.
UM 6005-15 SPA PART 5 1/27/06 1:54 PM Page 9 Español 3.0 Conexiones 3.1 Conexión al TV & VCR 1 1. Conectar el cable procedente del LNB al conector SAT IN. 2. Conectar el cable de la antena TV al conector ANT IN. 3. Conectar un cable coaxial al conector RF OUT. 4. Conectar el otro lado del cable coaxial al conector de entrada de la TV. FIGURA 4. Conexión de base con un cable Scart 1. Conexionar a la señal procedente del LNB al conector SAT IN. 2.
UM 6005-15 SPA 1/27/06 1:54 PM Page 10 PART 5 Español 3.2 Conexión al amplificador audio digital y a la TV con conector S-VHS El amplificador audio digital está conectado con el receptor por el conector coaxial PDIF. La TV está conectada al receptor con un cable S-VHS. FIGURA 6. Conexión al amplificador audio digital 3.3 Conexión a la parabólica Conectar el cable procedente del LNB al conector SAT IN. FIGURA 7.
UM 6005-15 SPA PART 5 1/27/06 1:54 PM Page 11 Español Es posible conectar al receptor varias parabólicas o sistemas multi foco utilizando los conmutadores DiSEqC de 2 o 4 entradas. FIGURA 8. Conexión de dos parabólicas con conmutador DiSEqC Para recibir un mayor número de satélite y programas es posible utilizar una parabólica motorizada con un posicionador DiSEqC 1.2.
UM 6005-15 SPA 1/27/06 1:54 PM Page 12 PART 5 Español 3.4 Conexión al PC para la transferencia del software 1. Conectar el al puerto de serie RS 232 con un cable modem. 2. La operación de carga del software se ilustra en el parágrafo 5.3.5. Se aconseja realizar la operación por parte de personal experto en PC. FIGURA 10. Conexión del receptor al PC con cable serial 4.
UM 6005-15 SPA PART 5 1/27/06 1:54 PM Page 13 Español PANTALLA 2 1. Si la parabólica esta orientada a Astra 1C, 1E, 1F o Hotbird. Apretar UP/DOWN para seleccionar ASTRA O Hotbird y apretar OK. PANTALLA 3 Seguir las instrucciones que aparecen en pantalla. Una vez obtenido el máximo nivel y calidad proseguir seleccionando en pantalla con la tecla PROXIMO y apretar la tecla OK. El menú Configuración Canales aparecerá como se indica en la pantalla 8.
UM 6005-15 SPA 1/27/06 1:54 PM Page 14 PART 5 Español 2. Si la parabólica esta orientada a otro satélite, seleccionar “otro” en el menú de selección de satélite y apretar OK: aparecerá una lista de satélites de los cuales seleccionar el suyo. PANTALLA 4 Una vez seleccionado el satélite, aparecerá el menú configuración antena; Configura el tipo LNB, LNB Baja Freq, LNB Alta Freq, Control de Banda, Control Polaridad, Conmutador DiSEqC y modo Antena. PANTALLA 5 2a.
UM 6005-15 SPA PART 5 1/27/06 1:54 PM Page 15 Español PANTALLA 6 Completado la orientación, seleccionar PRÓXIMO y apretar OK. El menú Configuración canal apareceré como se muestra en el pantalla 8. 2b. Si la parabólica esta motorizada con un motor DiSEqC, seleccionar "Modo Antena" DiSEqC 1.2, seleccionar PROXIMO Y OK. El menú Regulación Antena aparecerá como se muestra en la pantalla 7.
UM 6005-15 SPA 1/27/06 1:54 PM Page 16 PART 5 Español Seleccionar un transponder que se reciba en su zona. Situarse sobre el campo “Desplazar Antena” y regulara la orientación utilizando las teclas DERECHA/IZQUIERDA hasta obtener el máximo nivel de calidad. Terminado la orientación apretar la tecla “Guardar posición”, configurar el número de la posición con las teclas DERECHA/IZQUIERDA. Después seleccionar PRÓXIMO y apretar OK. Será guiado al menú configuración Canal como se indica en la pantalla 8.
UM 6005-15 SPA PART 5 1/27/06 1:54 PM Page 17 Español 5.0 Menu Principal Todas las regulación de los parámetros del receptor pueden ser configurados desde el menú Principal. EL menú Principal contiene 5 sub-menús que son "Organización Canales", "Instalación", “Configuración sistema”, “Timer" y "Juegos". Apretar la tecla MENU, aparecerá el menú Principal (PANTALLA 9). PANTALLA 9 5.1 Organización canales Seleccionar con las teclas SIGUIENTE/ANTERIOR el submenú Organización canales y apretar OK.
UM 6005-15 SPA 1/27/06 1:54 PM Page 18 PART 5 Español 5.1.1 Gestion Canales En este menú, es posible cambiar el orden de los canales, configura, eliminar o modificar el nombre de los canales. Para cambiar el satélite utilizar la tecla ROJA. PANTALLA 11 5.1.1.1 Ordenar (Tecla Verde) Se pueden ordenar los canales por “nombre a~z”, por “nombre z~a”, “Libres-codificados”, “Fav - NO Fav” o bien predefinidos.
UM 6005-15 SPA PART 5 1/27/06 1:54 PM Page 19 Español 5.1.1.2 Modificar (Tecla amarilla) Encender el canal que se quiere modificar, apretar la tecla AMARILLO (MOODIFICAR) PANTALLA 13 en este menú es posible modificar el Nombre Programa, Frecuencia oscilador local, Symbol rate, PID Video, PID Audio. PANTALLA 13 Para modificar el nombre del canal, utilizar SIGUIENTE/ANTERIOR para seleccionar “Nombre programa” y apretar OK.
UM 6005-15 SPA 1/27/06 1:54 PM Page 20 PART 5 Español 5.1.1.3 Desplazar canal PANTALLA 15 Apretar las teclas SIGUIENTE/ANTERIOR para seleccionar el canal a mover. Apretar las teclas DERECHA/IZQUIERDA para entrar en la ventana “mover” Apretar la tecla OK para confirma la selección del canal y usar la tecla SIGUIENTE/ANTERIOR para situar el canal en la nueva posición. Apretar la tecla OK para confirmar. 5.1.1.
UM 6005-15 SPA PART 5 1/27/06 1:54 PM Page 21 Español 5.1.2 Gestionar Favoritos Apretar la tecla SIGUIENTE/ANTERIOR para seleccionar el canal. Apretar la tecla DERECHA/IZQUIERDA para seleccionar de cual de las cuatro listas vamos a introducir el cana. Apretar OK para añadir el canal seleccionado a la lista deseada. Para quietar el canal de la lista de Favoritos, repetir la misma operación. PANTALLA 17 5.
UM 6005-15 SPA 1/27/06 1:54 PM Page 22 PART 5 Español 5.2.1 Instalación antena Permite añadir un satélite, modificar el nombre del satélite o eliminar un satélite. PANTALLA 19 Añadir un satélite Para añadir un satélite apretar la tecla ROJA en el menú: una selección de satélites sobre la pantalla. Apretar DERECHA/IZQUIERDA para seleccionar el satélite. Si el satélite deseado no está presente en esa lista, seleccionar “NUEVO SAT1”.
UM 6005-15 SPA PART 5 1/27/06 1:54 PM Page 23 Español Modificar un satélite Si los parámetros de un satélite varían o bien se trata de un nuevo satélite, es necesario configurar los parámetros siguientes: el tipo LNB, Banda Baja LNB, Banda Alta LNB, Transponder, Alimentación LNB, Tono 22 KHz, DiSEqC y Posición Motore PANTALLA 21 Eliminar un satélite Para cancelar un satélite apretar la tecla AMARILLA aparecerá un aviso sobre la pantalla. PANTALLA 22 Apretar OK para confirmar la cancelación.
UM 6005-15 SPA 1/27/06 1:54 PM Page 24 PART 5 5.2.2 Busqueda Automática PANTALLA 23 Apretar la tecla VERDE configurar el modo búsqueda de Libres o Libres + Codificados Apretar la tecla AMARILLA para configurar la búsqueda Casual en ON o OFF Apretar la tecla AZUL para configurar el tipo de búsqueda NIT OFF o NIT ON. Apretar la tecla ROJA para iniciar la búsqueda automática.
UM 6005-15 SPA PART 5 1/27/06 1:54 PM Page 25 Español 5.2.2 Busqueda Manual En este menú, es posible añadir, modificar o cancelar un nuevo transponder Es posible cambiar el satélite apretando la tecla ROJA. PANTALLA 25 Añadir un Transponder Apretar la tecla VERDE, el submenú Añadir Transponder aparecerá en la pantalla. PANTALLA 26 Frecuencia: Symbol Rate: Polaridàd: introducir la frecuencia del transponder. introducir el symbol rate del transponder. Seleccionar la polaridad del transponder.
UM 6005-15 SPA 1/27/06 1:54 PM Page 26 PART 5 Español Modificar Transponder: Apretar la tecla AMARILLA, el submenú Modificar Transponder aparecerá sobre la pantalla. PANTALLA 27 Cancelar Transponder Apretar la tecla AZUL para quitar el transponder. Un aviso aparecerá sobre la pantalla. PANTALLA 28 Seleccionar la tecla y apretar OK para confirmar. Búsqueda Apretar ARRIBA/ABAJO para seleccionar un transponder, apretar la tecla OK para buscar los canales.
UM 6005-15 SPA PART 5 1/27/06 1:54 PM Page 27 Español 5.3 Configuración del Sistema En este menú, se pueden configurar los parámetros del sistema como idioma, estilo OSD, control parental, parámetros de TV y hora. PANTALLA 29 5.3.
UM 6005-15 SPA 1/27/06 1:54 PM Page 28 PART 5 Español 5.3.1.1 Configuración idioma Apretar SIGUIENTE/ANTERIOR para seleccionar el idioma del OSD o bien el idioma Audio. Apretar la tecla OK/Derecha para entrar en la lista de idiomas y apretar Sig/anterior para seleccionar el idioma. Apretar OK para confirmar. PANTALLA 31 5.3.1.2 Regulaciones TV Se puede configurar los parámetros del TV, del modo pantalla o de la salida vides.
UM 6005-15 SPA PART 5 1/27/06 1:54 PM Page 29 Español Tipo TV PANTALLA 33 Seleccionar el tipo de TV PAL o bien NTSC (PAL en Europa), apretar OK para confirmar. Tipo pantalla PANTALLA 34 Seleccionar 4:3 o bién 16:9, apretar OK para confirmar.
UM 6005-15 SPA 1/27/06 1:54 PM Page 30 PART 5 Español Seleccioarn CVBS o RGB, apretar OK para confirmar Apretar OK/DERECHA para seleccionar CVBS/ RGB o S-VIDEO, apretar OK para confirmar. Atención! Si se selecciona RGB la salida SVHS se desactiva completamente. Nota: Salida S-Video solamente en el modelo SRT 6015.
UM 6005-15 SPA PART 5 1/27/06 1:54 PM Page 31 Español 5.3.1.4 Parámetros de fábrica Esta opción permite configurar los parámetros de fábrica cancelando todos los parámetros, canales o preferencias memorizadas con anterioridad. Será necesario entonces rehacer toda la sintonización de canales. PANTALLA 38 Nota: El código PIN regresará al valor de fábrica “0000”. 5.3.
UM 6005-15 SPA 1/27/06 1:54 PM Page 32 PART 5 Español 5.3.3 Control Parental Este menú permite activar o desactivar (ON o OFF) el bloqueo de la visión de un determinado canal o el bloqueo del acceso al menú (mostrado como en PANTALLA 40). El código PIN de fábrica 0000. PANTALLA 40 Bloqueo de canal Seleccionar ON o OFF. Para ver el canal bloqueado es necesario introducir el código PIN.
UM 6005-15 SPA PART 5 1/27/06 1:54 PM Page 33 Español Bloqueo Parental. PANTALLA 42 Utilizar las teclas SIGUIENTE/ANTERIOR para seleccionar los canales a bloquear. Apretar OK para confirmar el bloqueo. Modificar PIN Digitar el código PIN viejo, digitar dos veces el nuevo código PIN.
UM 6005-15 SPA 1/27/06 1:54 PM Page 34 PART 5 Español 5.3.4 Informaciones del sistema Se muestra la versión software y hardware del receptor. PANTALLA 44 5.3.5 Actualización Sistema Es posible actualizar el software entre dos receptores (“STB a STB”) o via satelite (“OAD”) Trasferencia software STB a STB. a) Desconectar los dos STB de la red y conectarlos juntos con un cable RS 232 null modem. b) Encender el STB master (del que se copiará el software) y tener el STB esclavo apagado.
UM 6005-15 SPA PART 5 1/27/06 1:54 PM Page 35 Español Actualización via Satellite (OAD) Esta función permite descargar nuevas versiones software directamente del satélite. No desconectar el receptor de la red eléctrica ni quitar el cable de antena durante el proceso de descarga. Actualización desde PC 1. Conectar el PC al receptor (el receptor desconectado de la rede) con un cable RS 232 null modem. 2.
UM 6005-15 SPA 1/27/06 1:54 PM Page 36 PART 5 Español 5.4 Programador Timer Este menú permite configurar el timer para el encendido o apagado automático del receptor. PANTALLA 46 Seleccionar el número de Timer con las teclas SIGUIENTE/ANTERIOR Apretar las teclas IZQUIERDA/DERECHA para activar/desactivar el timer. Apretar la tecla OK para introducir los parámetros del timer. “Encendido”: el receptor se enciende a la fecha u hora indicada.
UM 6005-15 SPA PART 5 1/27/06 1:54 PM Page 37 Español 5.5 Juegos El receptor está dotado de un juego (Tetris) y un calendario. Para jugar apretar la tecla JUEGO sobre el mando o seleccionar tetris del menú juegos. PANTALLA 47 5.5.1 Tetris PANTALLA 48 Funciones Teclas. IZQUIERDA/DERECHA mueve el bloque a izquierda o derecha. ABAJO para hacer caer el bloque. ARRIBA para rotar el bloque.
UM 6005-15 SPA 1/27/06 1:54 PM Page 38 PART 5 Español 5.5.2 Calendario SOBRE/ABAJO: +/- mes. IZQUIERDA/DERECHA: +/- año (desde 1900 a 2100). PANTALLA 49 6.0 Otras funciones 6.1 Informaciones de programa En la condición de funcionamiento normal apretar la tecla info dos veces, la pantalla con la información sobre el programa aparecerá en pantalla.
UM 6005-15 SPA PART 5 1/27/06 1:54 PM Page 39 Español 6.2 Mosaico En la condición de funcionamiento normal y apretando la tecla MOSAICO se visualiza la 9 canales anterior contemporáneamente. PANTALLA 51 6.3 EPG (Guia Electrónica de programas) L' EPG muestra las informaciones sobre la programación actual y futura del canal en visión o de los canales pertenecientes al mismo transponder. Apretando la tecla EPG aparecerá la siguiente pantalla: PANTALLA 52 Apretar ARRIBA/ABAJO para seleccionar el canal.
UM 6005-15 SPA 1/27/06 1:54 PM Page 40 PART 5 PANTALLA 53 En el menú de los programas EPG: Apretar la tecla ARRIBA/ABAJO para seleccionar el programa. Apretar la tecla DERECHA para visualizar los detalles. Apretar las teclas P+ / P- para cambiar el día. Apretar las teclas IZQUIERDA/SALIR para regresar al menú EPG. Apretar la tecla DERECHA para mostrar los detalles de estos artículos. PANTALLA 54 En los detalles de los programas: Apretar las teclas P+ / P- para pasar a la página anterior o siguiente.
UM 6005-15 SPA PART 5 1/27/06 1:54 PM Page 41 Español Es posible activar un programador directamente desde el menú EPG. 1. Apretar las teclas ARRIBA/ABAJO para mover el cursor para seleccionar el evento sobre el que se quiere activa un timer. 2. Apretar OK para añadir el timer. La PANTALLA 54 muestra las informaciones del timer sobre el evento seleccionado. Es posible modificar los parámetros del timer. Para memorizar los parámetros apretar OK. Para anular apretar ESCI. PANTALLA 55 6.
UM 6005-15 SPA 1/27/06 1:54 PM Page 42 PART 5 Español 6.5 Televideo Apretar las tecla TEXT. PANTALLA 57 Apretar ARRIBA/BAJO para cambiar la página o utilizar las teclas numéricas para teclear directamente el número de página. Si el programa no tiene tele video aparecerá la siguiente pantalla.
UM 6005-15 SPA PART 5 1/27/06 1:54 PM Page 43 Español A.1 Problemas y soluciones SE pueden dar varios motivos para el funcionamiento anormal del receptor. Controle el receptor según el procedimiento indicado. Si el receptor no funciona correctamente después del control consulte a su vendedor o a la asistencia técnica. No abra la cubierta del receptor. Además de invalidar la garantia puede resultar peligroso.
UM 6005-15 SPA 1/27/06 1:54 PM Page 44 PART 5 Español A.2 Característiacas Técnicas 1. Sintonizador y demodulador Frecuencia de entrada Impedancia de entrada Nivel de entrada Alimentación LNB Modulación Symbol Rate FEC Decodifica Reed Solomon 950 ~ 2150 MHz 75 Ω -65 dBm ~ -25 dBm 13/18 V ± 0.5 V, Max 500 mA, QPSK 2-45 MS/s K = 7, R = 1/2, 2/3, 3/4, 5/6, 7/8, auto 204, 188, T = 8 2.
UM 6005-15 SPA PART 5 1/27/06 1:54 PM Page 45 Español 5. Alimentación Tensión de entrada Consumo Consumo Stand-by 90 - 240 V AC, 50/60 Hz +/- 5 % Max. 20 W <= 8 W 6. Características fisicas Dimensiones (L x A x L) Peso 260 x 40 x 140mm 1.2 kg 7.
UM 6005-15 SPA 1/27/06 1:54 PM Page 46 PART 5 Español A.3 Glosario Banda C Gama de Frecuencia 3.7 ~ 4.2 GHz. DiSEqC Digital Satellite Equipment Control. EPG Guía Electrónica de programación: suministra información sobre el programa actual y futuro. Free-To-Air Transmisión de programas en abierto. Ku band Gama de frecuencia 11 ~ 13 GHz. LNB (Low-Noise Block down-converter).
UM 6005-15 SPA PART 5 1/27/06 1:54 PM Page 47 Español 47
SRT 5010-Spain 7/9/05 4:36 PM Page 44
UM DVB-T Env-6 9/27/05 3:49 PM Page 3 PART 6 z Environmental Issues Environmental Issues Strong is committed to reducing the impact of its products on the environment. To maximise the benefits of our design enhancements, your co-operation is required. Electronic product recycling Do not dispose of this product with your domestic rubbish. At the end of its useful life, this product contains materials which when processed correctly can be recovered and recycled.