Digital Satellite Receiver with Cryptoworks Embedded and Common Interface SRT 6500 CI User Manual
PART 1 • English 1.0 2.0 3.0 4.0 5.0 INTRODUCTION 2 1.1 Safety Instructions 2 1.2 Storage 2 1.3 Equipment Set-up 2 1.4 Features and Accessories 3 YOUR RECEIVER 4 2.1 Front Panel 4 2.2 Rear Panel 4 2.3 Remote Control 5 CONNECTING THE RECEIVER 7 3.1 To a TV set, using TV SCART connection. 7 3.2 To a HiFi system and a TV set, using both A/V connections 7 3.3 To a VCR and a TV set, using both SCART connections 8 3.
PART 1 • English 1.0 INTRODUCTION 1.1 Safety Instructions DO NOT INSTALL YOUR RECEIVER: n In a closed or poorly ventilated cabinet; directly on top of or under any another equipment; on a surface which might obstruct the ventilation slots.
PART 1 • English 1.4 Features and Accessories English This Digital satellite receiver with Cryptoworks embedded enables you to tune in on the hundREDs of digital television and radio channels broadcasting to your region, with the highest video, audio and data quality attainable with current technology. It performs numerous functions to provide you with a variety of services.
PART 1 • English 2.0 YOUR RECEIVER 2.1 Front Panel 3 4 5 6 7 1 2 8 9 1.LED (4 Digit) Displays the time when in “Stand-By” mode and the channel number when the unit is operating. 2.IR Sensor Detects the infra-red command signals generated by the remote control handset 3.Arrow buttons p and q Move the cursor Up or Down in an application screen or change channels sequentially Up or Down in normal operation.
PART 1 • English 4.TV SCART To connect your receiver to your TV set using a SCART cable. English 5.S/PDIF Digital audio output Use this coaxial output to connect your receiver to the input of your digital audio amplifier 6.AUDIO-R and AUDIO-L Audio Right (RED) and Audio Left (White) RCA connectors to connect to audio amplifier 7.Digital Audio (optical) 8.S-VHS 9.TO TV (include modulator) to connect your receiver to your TV set or VCR using RF cable 10. ANT IN to connect your aerial antenna or cable TV lead.
PART 1 • English Batteries How to insert the batteries n Open the cover at the top of the rear side of the handset n Insert two ‘AAA’ type batteries (1.5V), respecting the indicated polarity +/- signs n Close the cover When to replace the batteries n When the operational range of the handset gets smaller, or when the receiver no longer responds to each and every command. Always replace both batteries at the same time.
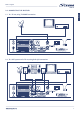
PART 1 • English 3.0 CONNECTING THE RECEIVER English 3.1 To a TV set, using TV SCART connection. RF IN SCART 3.
PART 1 • English 3.3 To a VCR and a TV set, using both SCART connections RF IN SCART RF IN SCART 3.
PART 1 • English Ensure that your satellite receiver is correctly connected to your television and dish, and that your satellite signal is of good quality. Check if all connections are done in correct way. If you are not sure about this then ask your local Strong dealer to check your installation or satellite signal. Once you start the receiver for the first time a country selection dialog will be displayed. Select your country from the list using Vol t/u buttons.
PART 1 • English 5.0 SETUP AND OPERATION 5.1 Before Setup Information A menu is a field of text, displayed on the TV screen. Selectable menu items are generally highlighted. Items that are not highlighted cannot be selected. Most menus display explanatory information at the bottom of the screen. 5.2 Setup Menu To install the receiver properly you have to perform a “Setup Procedure”. After you finish the setup procedure, you can start watching TV or listening to Radio.
PART 1 • English 5.2.1System Setup English Press the OK button on ‘System Setup’ in the Setup Menu. The following window will appear. Set the Video Format, TV Type, Scart RGB output, GMT Offset, Positioner, LNB Reference and Summer Time. n Use CHp/q to move up and down in the list. n Use Vol t/u to change the setting.
PART 1 • English 5.2.2.1 DiSEqC 1.2 positioner setup. Mounting of the antenna on DiSEqC 1.2 positioner is complicated job. In order to get the best performance of the system it should be installed by a professional. In “Antenna Setup” menu set Positioner to “DiSEqC 1.2” and press OK button to enter to “Antenna position” menu. n Use CH p/q to move up and down in the list. n Use Vol t/u to change the setting. Satellite: select satellite position of which you would like to setup.
PART 1 • English 5.2.3 Channel Search English Press OK on ‘Channel Search’ in the Setup Menu. The following window will appear. Set the Satellite, Tune Method, Transponder, Frequency, Symbol Rate, FEC and Function. n Use CH p/q to move up and down the list. n Use Vol t/u to change the setting. Satellite Name: choose from the list of satellites selected in “Antenna setup” menu. Tune Method: Main options are: “Sat” – receiver will search channels according to stored list of transponders.
PART 1 • English 5.2.3.3 How to delete present transponder: n set “Tune method” to “TP” or “TP+NIT” n move focus to “Transponder” and choose transponder you want to delete n move focus to “Function” select “Delete” and press OK. Message “Saving data...” will be shown on screen. Selected transponder deleted from the list. 5.2.3.
PART 1 • English Local Time: if you want to correct time and date then enter in format dd/ Sleep Time: 0 ~ 180 min. Receiver will be turned off after selected time interval. Timer: select timer number Status: Disabled/Enabled. If Enabled – receiver will be turned on within selected channels at defined “start time” and turned off after “duration” interval Channel type: TV/Radio. Channel number: enter channel number.
PART 1 • English 5.3 Main Menu Settings From the Main Menu you can access to the Program Guide, Channel Sorting, Language Preference Settings, Favorites Editing, Channel Editing, Conditional Access and Software Version information. n Press MENU n Use CH p/q to move up and down the list. n Use Vol t/u to change the setting. n Upon reaching the required menu line, press OK to enter the setting. n Press EXIT to go back to the previous mode. 5.3.
PART 1 • English 5.3.3 Language English Press OK on the ‘Language Preference’. The following window will appear. Select the menu language and Logo for Radio channel Menu Language: Available English / Hungarian / Czech / Slovak / Bulgarian / Turkish / German Radio Ch Logo: enable or disable logo for Radio channels n Use CH p/q to move upwards and downwards in the menus. n Use Vol t/u to change the values in the alternatives.
PART 1 • English you wish. If you wish to remove channel from favourite group select group “[0] – unselect”. Press EXIT to return to function selection. 5.3.4.3 Lock channel Lock function is designed to give parents possibility to deny access of children to unwanted channels (channels with adult content, for example). It is necessary to know PIN code to watch locked channels. It is recommended to change factory default PIN code to different. To lock channel highlight icon and press OK.
PART 1 • English 5.3.5.1 Smart Card English You can enjoy not only Free-To-Air services but also Cryptoworks embedded service channels. To view Cryptoworks embedded service channels, just insert Smart card into slot. Once you insert the smart card, you will see Cryptoworks embedded service channels. If you need further information, contact your service provider or distributor.
PART 1 • English 5.3.6 About Press OK on the ‘About’. The following window will appear. It shows model name, application Ver., and device version. System software update. Software in this receiver can be updated thought satellite signal. Software update will be available on the satellite Astra 19E. To download latest software version highlight “Update” and press OK. Receiver will check if newest version is available. In case it is available you will be asked to confirm update.
PART 1 • English 5.4 General Viewing Information English 5.4.1 Program Information Information on the currently viewed program appears for a few seconds, when you press INFO. Favourite Scramble Lock Teletext Satellite Name Clock Channel Name Channel Number Program Information 5.4.2 TV/Radio Channels List While watching TV or listening to Radio you can call the channel list by pressing TV/Radio or OK button.
PART 1 • English To sort channels in various modes press EXIT while focus of the list is pointed to the channels. If you have multi satellite installation then field with satellite name will be highlighted. Use Vol t/u to select satellite of your choice. Press OK to return to the channel list. Highlight “List” to sort channels by alphabet, number of FTA. n mode “ALL (1,2,3..)” is to display all channels from current satellite in channel number order n mode “ALL (A.B.C..
PART 1 • English English TV Channel List - chennels sorting EXIT Vol t/u to select sort mode OK Radio list is similar to TV list. To select between TV and Radio list use TV/Radio button while channel list is displayed on screen. 5.4.3 Favorite Channels Lists While watching TV or listening to Radio you can call the respective favorite channels list by pressing FAV. If you press FAV button while watching TV channel – the list of TV Favourite channels will be displayed.
PART 1 • English 5.4.4 Program Guide Press EPG to access the electronic program guide, if available from the broadcaster. Once you enter to Program Guide the “Now & Next” mode is selected. You can select mode “Schedule” if press Vol u or you can change between TV and Radio list if press Vol t button. Now & Next mode Select “Now & Next” and press OK. Select channel of your choice using CH p/q buttons. Select program information using Vol t/u buttons.
PART 1 • English 5.4.7 Teletext English Press TXT to access the Teletext service if available from the broadcaster. A.1 PROBLEM SOLVING There may be various reasons for the abnormal operation of the unit. Therefore, if the unit does not work properly, check it according to the procedures shown in the table below: Symptom The display on front panel Cause Remedy The power cord is not plugged in. Check that the power cord is plugged in to the wall outlet.
PART 1 • English A.2 SPECIFICATIONS Demodulator Modulation: QPSK Input Symbol Rate: 2 - 45 Ms/s SCPC & MCPC signals from C & KU band satellites Video Decoder Profile level: MPEG-2 Main profile @ Main level Data Rate: Up to 15 Mbit/s Video Resolution: 720 x 576, 720 x 480 Video Format: NTSC, PAL, SECAM Aspect Ratio: 4:3, 16:9 Audio Decoder MPEG 1/MusiCam Layer I & II; Audio mode: Mono, Dual mono, Stereo Sampling Rate: 32, 44.