Picture similar Digital High Definition Satellite Receiver SRT 7000 User Manual
PART 1 • English STRONG declares that this item complies with the basic requirements and other relevant regulations of directives CE 2004/108/EEC and 73/23EEC; RoHS 2002/95EEC Subject to alterations. In consequence of continuous research and development technical specifications, design and appearance of products may change. All product names are trademarks or registered trademarks of their respective owners. © STRONG 2010. All rights reserved.
PART 1 • English 1.0 Instruction 1.1 Safety Instructions DO NOT INSTALL YOUR RECEIVER: In a closed or poorly ventilated cabinet; directly on top of or under any other equipment; on a surface which might obstruct the ventilation slots.
PART 1 • English English This manual provides complete instructions for installing and using this receiver. The following symbols will serve as follow. Warning Indicates warning information. Tips Indicates any other additional important or helpful information. MENU Represents a button on the remote control or the receiver (Bold Character) Move to Represents a menu item within a window. (Italic Character) 1.
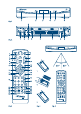
PART 1 • English 4. 5. 6. 7. 8. 9. VIDEO (RCA) To connect to the RCA video input of your TV or VCR using an RCA cable AUDIO (L/R) To connect to the audio input of your HIFI or television TV SCART To connect to TV using a SCART cable VCR SCART To connect to a Video or DVD recorder HDMI To connect to the HDMI input of your TV using a good quality HDMI cable. Power cord The receiver requires a mains voltage of 100~240V AC 50~60Hz (auto selecting).
25. u /PLAY Starts/resumes the playback. 26. 2 /PAUSE Starts/resumes timeshift when USB device is connected. Freezes/ resumes the playback of Multimedia files. 27. 3 /STOP Stops playback/timeshift/record 28. REPEAT Selects different repeat modes during playback 29. RED Flexible functions in OSD MENU and Teletext 30. GREEN In viewing mode changes resolution of HDMI output between 1080i, 720p, 576p and 576i; flexible functions in OSD MENU and Teletext. 31.
PART 1 • English 4.0 First Time Installation After all connections have been made properly, switch on TV and make sure the receiver is connected to the main power. Then switch on the receiver. If you are using the receiver for the first time or restored to factory default, the First Installation menu will appear on your TV screen. Use tu buttons to select the OSD Language of your preference and press OK to confirm. An Info page will be displayed.
PART 1 • English 6.0 Operation In viewing mode, several features are available to make watching TV a true pleasure. This paragraph describes these features. Please also read chapter 7.0 to get familiar with the menu of your new receiver. 6.1 Changing channels English Your new receiver is equipped with different ways to change channels. via direct access via the channel list via the pqkeys. via the RECALL key. 6.1.
PART 1 • English 6.4 Teletext Your receiver includes a fully featured Teletext. To access Teletext, press the TTX button in viewing mode and use the 0~9 or pq buttons to select the number of the page you wish to see. Subpages (once loaded and if available) can be selected with the tu buttons. The coloured buttons of the remote control allow you to jump to selected pages directly, as indicated on the bottom of the teletext screen. Press TTX again or EXIT to go back to viewing mode. 6.
PART 1 • English English To stop a recording press STOP button on remote control. Another way of doing recordings is to use the Timer – please refer to 7.4.1 Timer of this manual. Average record size (values are approximately, depend from bit rate of actual broadcast): MPEG2 SD channel – 1 hour take about 2.2 GB space MPEG4 SD channel – 1 hour take about 1 GB space MPEG4 HD channel – 1 hour take about 4.
PART 1 • English Disable favourite TV or radio program Repeat the step 1 described above and select Disable in the Favourite Type window. View favourite program 1. In normal viewing mode (no menu mode) press the FAVOURITE to display a list of favourite programs. Press FAVOURITE again to toggle between available favourite lists. 2. Select your favourite program bypq and press OK to switch to it. 3. Now in viewing mode by pressing pqyou can select channels from the chosen favourite group only.
PART 1 • English English 7.1.3 S ort Here you can sort your channels in the following orders: Default Sort the channels in the original order By Service Name Sort the channels in alphabetical order (A-Z) By Frequency Sort the channels in frequency order (Low-High) By Encrypt Sort the channels from free to scrambled 7.2 Picture Press MENU then select Picture. The menu provides options to adjust the video settings. Press pq to select an option and tu to adjust the setting.
PART 1 • English 7.3 Channel Search To access the menu press MENU and select Channel Search. It contains two options: Installation and DB (Data Base) Management. Select an option and press OK to enter it. Press EXIT to exit the menu. 7.3.1 Installation 7.3.1.1 S atellite Selection Use pqbuttons to highlight the satellite your dish is aimed at. Its antenna settings will be shown at the right side. You can enter the right side with tu buttons and return to the satellite list with EXIT. 7.3.1.
After configuring press OK or BLUE again to start scanning with the selected settings. Your receiver will now perform an automatic channel search with scan progress shown on screen. During channel search you can skip Transponders by pressing MENU button, or quit the scan process by EXIT. Once the process is finished, all found channels will be stored and the receiver will switch to the first found channel.
PART 1 • English 7.3.2 DB Management (save your channel settings on an USB-Storage-Device and load it anytime back) This menu allows you to up/download the channel Data Base of your receiver from/to an USB-Device. This very convenient feature enables you to save your personal settings like Channel-, Favourite-, Sat- and TP-lists on an USB Storage Device and upload them later back to the receiver. This could be done e.g. after unintentional changes or Factory Reset.
PART 1 • English 7.5 Option Press MENU and select Option. In this menu you can adjust the OSD Language, Subtitle Language, Audio Language, Digital Audio mode and Banner Time. Select an option and press tu to adjust the setting. Press EXIT to exit the menu. English OSD Language Select the preferred language of On Screen Display. Subtitle Language Select the preferred subtitle language. Audio Language Select the preferred audio language for watching TV channels.
PART 1 • English Software update In Main Menu select Software Update and press OK or u to select. There are two software update options available: SW update By OTA The OTA (Over the Air) function allows you to search for software updates available on satellite. Please ask your local STRONG dealer or visit our website http://www.strong.tv for according information.
PART 1 • English Press MENU and select USB. The menu provides Multimedia feature to playback Music, Photo, Movie and with the receiver Recorded files. Supported are different file formats listed below. In this menu you also can see information about the total and free space of the connected USB device, make video and photo configurations and format the USB device into the receiver accepted format. The unit supports USB devices with FAT and FAT32 format.
PART 1 • English Photo Your receiver allows you to watch a slide show with all photo’s available in the chosen folder. To use the slide show choose a folder with photo files. Press PLAY (u) to start and STOP (3) or EXIT to stop the slide show. See the different Photo Configure options explained in point 7.7.2 below. In the Photo mode there are following functions available: OK: opens selected photo in full screen format. PLAY (u): starts slide show; 2: to pause/resume slide show.
PART 1 • English 7.7.2 P hoto Configure Slide Time: You can adjust slide show interval to 1~8 seconds. Slide Mode: You can select one of the 60 slide show effects or Random (mixed effects). Aspect Ratio: Keep - displays the picture as its original aspect Discard - displays the picture in full screen mode. English 7.7.3 M ovie Subtitle This subtitle function is only relevant in Movie menu for movies, which contains subtitle files in .srt or .txt format.
PART 1 • English 8.0 Troubleshooting There may be various reasons for abnormal operation of the receiver. Please check the receiver according to the procedures shown below. If the receiver does not work properly after checking it, please contact your local Serviceline or STRONG dealer. Alternatively you can send a support mail via our website: www. strong.tv. NEVER open or disassemble your receiver. This may cause a dangerous situation and will void the warranty.
PART 1 • English 9.0 Specifications English Demodulator Demodulation: QPSK, 8PSK Input symbol rate: DVB-S QPSK: 1 ~ 45 Ms/s DVB-S2 8PSK/QPSK: 10~30 Ms/s FEC decoder: Auto, 1/2, 2/3, 3/4, 5/6, 7/8 in DVB-S mode 1/2, 3/5, 2/3, 3/4, 4/5, 5/6, 8/9, 9/10 in DVB-S2 mode 3/5, 2/3, 3/4, 5/6, 8/9, 9/10 in 8PSK mode Video Decoder Profile level: MPEG-2 MP@ML, MP@HL, MPEG-4 H.264/AVC Input rate: Max.
PART 1 • English 11 Oct 2010 18:49 General Data Input voltage range: 100 – 240 V AC 50/60 Hz Power consumption: max. 18 W, typ. 8.5 W (without external storage device) Power consumption in standby: max. 1 W (without external storage device) Operating temperature: 0 ~ +40 °C Storage temperature: -10 ~ +50 °C Operating humidity range: 10 ~ 85 % RH, Non-condensing Size (W x D x H) in mm: 220 x 170 x 45 Weight: 0.