
User manual


3
PART 1 • English
English
This manual provides complete instructions for installing and using this receiver. The following symbols
will serve as follow.
WARNING Indicates warning information.
TIPS Indicates any other additional important or helpful information.
MENU Represents a button on the remote control or the receiver
(Bold Character)
Move to Represents a menu item within a window.
(Italic Character)
1.4 Accessories
1 User Manual
1 Remote control unit
2x Batteries (AAA type)
NOTE: The batteries should not be recharged, disassembled, electrically short-circuited or be
mixed or used with other types of batteries. If rechargeable accumulators instead of
batteries are going to be used, we recommend using (e.g. NiMH) types with low self-
discharge to ensure long time operation of remote control.
1.5 Usage of external USB devices
It is recommended to use USB 2.0 storage devices. If your device is not compatible to USB 2.0
specifications, recording, playback and other multimedia functions of the receiver would not
work properly.
STRONG cannot guarantee compatibility to all types of USB storage devices.
It is advised not to store important information on USB storage devices used with the receiver. Always
make backups of data on your USB storage device before using it with this receiver. STRONG will not
take responsibility for any loss of information or circumstances caused by loss of information.
Please ensure that either the USB device is already formatted to FAT/FAT32, or format the USB device via
your receiver, refer to chapter 7.7 USB for details.
2.0 YOUR RECEIVER
2.1 PIN code default: 0000
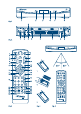
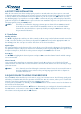
2.2 Front panel
Fig. 1
1. Power button: To turn ON/OFF the main power supply
2. Remote control sensor:
Receives the signal from the remote control
3. LED display: Shows channel number in operation and time in Standby
4. Standby indicator: Shows power state of the receiver
green LED - receiver is turned on
red LED - receiver is in standby mode
5. USB: To connect external storage devices
6. Channel up/down: To change channels without using the remote control
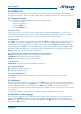
2.3 Rear panel
Fig. 2
1. SAT OUT To loop through the satellite signal to a second receiver
2. SAT IN To connect to the LNB of your satellite dish for reception of satellite
broadcast signal
3. S/PDIF To connect to a digital or home cinema audio amplifier