
User manual


5
PART 1 • English
English
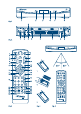
25. u /PLAY Starts/resumes the playback.
26. 2 /PAUSE Starts/resumes timeshift when USB device is connected. Freezes/
resumes the playback of Multimedia files.
27. 3 /STOP Stops playback/timeshift/record
28. REPEAT Selects different repeat modes during playback
29. RED Flexible functions in OSD MENU and Teletext
30. GREEN In viewing mode changes resolution of HDMI output between 1080i,
720p, 576p and 576i; flexible functions in OSD MENU and Teletext.
31. YELLOW In viewing mode changes aspect ratio and aspect conversion of Video
outputs; flexible functions in OSD MENU and Teletext.
32. BLUE In viewing mode displays Schedule menu for easy setup timers; flexible
functions in OSD MENU and Teletext.
2.5 Installing the Batteries
Remove the battery cover from the remote control and put 2xAAA size batteries inside the compartment.
The diagram inside the battery compartment shows the correct way to install the batteries.
1. Open the cover 2. Install batteries 3. Close the cover
Fig. 4
NOTE: The batteries should not be recharged, disassembled, electrically short-circuited, be
mixed or used with other types of batteries.
2.6 Using the Remote Control
Fig. 5
To use the remote control, point it towards the front of the digital receiver. The remote control has a
range of up to 7 metres from the receiver in an appropriate angle.
The remote control will not operate if its path is blocked.
NOTE: Sunlight or very bright light will decrease the sensitivity of the remote control.
3.0 CONNECTIONS
3.1 Basic connection using a Scart cable
Fig. 6
1. Connect the LNB of your satellite antenna to the SAT IN connector of your receiver using a
good quality coax cable and suitable ‘F-connector’ plugs.
2. Connect one end of a good quality Scart cable to the TV SCART connector on your receiver
and the other end to the SCART input of your TV.
3. Plug the power cord to a suitable wall outlet.
3.2 Basic connection using an HDMI cable
Fig. 7
1. Connect the LNB of your satellite antenna to the SAT IN connector of your receiver using a
good quality coax cable and suitable ‘F-connector’ plugs.
2. Connect one end of a good quality HDMI cable to the HDMI output on your receiver and
the other end to the HDMI input of your TV.
3. Plug the power cord to a suitable wall outlet.
3.3 Connecting multiple fixed LNB´s using a DiSEqC 1.0 switch
Fig. 8
1. Connect the LNB’s of your fixed antenna to the inputs of a DiSEqC 1.0 switch
2. Connect the output or “to receiver” connector of the DiSEqC 1.0 switch to the SAT IN
connector on your receiver.
3. Refer to section 3.1 or 3.2 for TV and mains connections.