
User manual


PART 1 • English
4
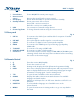
1. Power button: To turn ON/OFF the main power supply
2. Remote control
sensor: Receives the signal from the remote control
3. LED display: Shows channel number in operation and time in Standby
4. Standby indicator: Shows power state of the receiver
Green LED - receiver is turned on
Red LED - receiver is in standby mode
5. USB: For connection of external storage devices
6. Channel up/down: To change channels without using the remote control
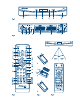
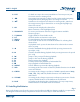
2.3 Rear panel
Fig. 2
1. SAT IN To connect to the LNB of your satellite dish for reception of satellite
broadcast signal
2. SAT OUT To loop through the satellite signal to a second receiver
3. S/PDIF To connect to a digital or home cinema audio amplifier
4. HDMI To connect to the HDMI input of your TV using a good quality
HDMI cable.
5. TV SCART To connect to TV using a SCART cable
6. DVD/VCR SCART To connect to a Video or DVD recorder
7. Power cord The receiver requires a mains voltage of 100~240V AC 50~60Hz (auto
selecting). Please check the local power conditions before connecting
the receiver to the mains supply.
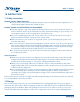
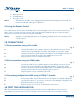
2.4 Remote Control
Fig. 3
1. q Turns the receiver ON/Standby
2. ! To turn the sound on or off.
3. EPG Viewing mode: Displays the EPG (Electronic Programme Guide)
4. INFO Press once to display channel number/name and now/next info. Press
twice to display detailed event info and transponder/signal strength
information. Pressing again – back to viewing mode.
5. TTX To open teletext if available on the current channel.
6. AUDIO Displays the audio selection menu with selections for available
languages and audio modes
7. DTV/VCR Switches to VCR input if it is in DTV state. Switches to DTV if it is in
VCR state
8. SUBTITLE To select subtitles language out of available ones on the
current channel
9. MENU To open the main menu in viewing mode or to go one step back in
the menu