
User manual


English
PART 1 • English
5
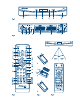
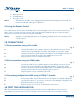
10. EXIT Go back one step in the menu/cancellation of current process/exit
from main menu to viewing mode
11. tu Decreasing/increasing the volume level in viewing mode/navigating
through the menus/changing values of settings in a menu
12. pq Switches to the next/previous channel in viewing mode, switches to
the next/previous page in channel list or moving the highlight up/
down in the menu.
13. OK Viewing mode: Displays the channel list.
Menu: activation of the highlighted item
14. FAVOURITE To access your favourite channels. Toggles between available
favourite groups
15. TV/RADIO Toggles between TV and radio mode
16. 0-9 Channel number and numeric value input
17. RECALL To switch between the last viewed channels.
18. GOTO In TV mode: shows the list of installed satellites for selecting their
channel lists.
In playback mode: opens the time banner for selection the moment
where to jump.
19. 5 Searches backwards during playback. Each pressing increases the
speed (x2 – x32)
20. 6 Searches forwards during playback. Each pressing increases the speed
(x2 – x32)
21. 7 Jumps to the previous file during playback.
22. 8 Jumps to the next file during playback.
23. u Starts/resumes the playback.
24. 2 Freezes/resumes the playback of multimedia files.
25. 3 Stops playback of multimedia files.
26. REPEAT Selects different repeat modes during playback
27. RED In viewing mode: fast search of channels; flexible functions in the OSD
menu and Teletext
28. GREEN In viewing mode: changes resolution of HDMI output between 1080p,
1080i, 720p, 576p and 576i; flexible functions in the OSD menu
and Teletext.
29. YELLOW In viewing mode: changes aspect ratio and aspect conversion of Video
outputs; flexible functions in the OSD menu and Teletext.
30. BLUE In viewing mode: displays the schedule menu for easy setup timers;
flexible functions in the OSD menu and Teletext.
2.5 Installing the Batteries
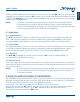
Fig. 4
Remove the battery cover from the remote control and put 2x AAA size batteries inside the compartment.
The diagram inside the battery compartment shows the correct way to install the batteries.