
User manual


PART 1 • English
6
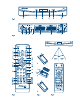
1. Open the cover
2. Install batteries
3. Close the cover
NOTE: The batteries should not be recharged, disassembled, electrically short-circuited, be
mixed or used with other types of batteries.
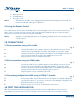
2.6 Using the Remote Control
Fig. 5
To use the remote control, point it towards the front of the digital receiver. The remote control has a
range of up to 7 metres from the receiver, if properly aligned towards the IR eye on the front panel.
The remote control will not operate if its path is blocked.
NOTE: Sunlight or very bright light (such as TL lighting) might decrease the sensitivity of the
remote control.
3.0 CONNECTIONS
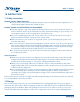
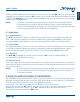
3.1 Basic connection using a Scart cable
Fig. 6
A. Connect the LNB of your satellite antenna to the SAT IN connector of your
receiver using a good quality coax cable and suitable ‘F-connector’ plugs.
B. Connect one end of a good quality Scart cable to the TV SCART connector on
your receiver and the other end to the SCART input of your TV.
C. Plug the power cord to a suitable wall outlet.
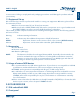
3.2 Basic connection using an HDMI cable
Fig. 7
A. Connect the LNB of your satellite antenna to the SAT IN connector of your
receiver using a good quality coax cable and suitable ‘F-connector’ plugs.
B. Connect one end of a good quality HDMI cable to the HDMI output on your
receiver and the other end to the HDMI input of your TV.
C. Plug the power cord to a suitable wall outlet.
3.3 Connecting multiple fixed LNBs using a DiSEqC 1.0 switch
Fig. 8
A. Connect the LNBs of your fixed antenna to the inputs of a DiSEqC 1.0 switch
B. Connect the output or “to receiver” connector of the DiSEqC 1.0 switch to the
SAT IN connector on your receiver.
C. Refer to section 3.1 or 3.2 for TV and mains connections.
4.0 FIRST TIME INSTALLATION
After all connections have been made properly, switch on your TV and make sure the receiver is
connected to the main power. If you are using the receiver for the first time or restored to factory