
User manual


5
PART 1 • English
English
19. GREEN/PAUSE Freezes/resumes the current broadcast
20. YELLOW/SUB Displays a list of available subtitling for the current channel
21. BLUE/TEXT Displays the teletext browser
22. 2 Freezes/resumes the playback of recordings or music files
23. : Jumps to the previous track during MP3 playback
24. " Jumps to the next track during MP playback
25. 4 Starts recording of the current broadcast
26. 1 Starts playback of the selected file in File Explorer
27. 6 Fast forward
28. 5 Fast rewind
29. 3 Stop
3.0 CONNECTIONS
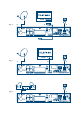
3.1 Basic connection using a Scart cable
Fig. 4.
A Connect the LNB of your satellite dish to the SAT IN connector of your receiver using a good
quality coax cable and suitable ‘F-connector’ plugs.
B Connect one end of a good quality Scart cable to the TV SCART connector on your receiver and
the other end to the SCART input of your TV.
C Plug the power cord to a suitable wall outlet.
3.2 Basic connection using an HDMI cable
Fig. 5.
A Connect the LNB of your satellite dish to the SAT IN connector of your receiver using a good
quality coax cable and suitable ‘F-connector’ plugs.
B Connect one end of a good quality HDMI cable to the HDMI output on your receiver and the
other end to the HDMI input of your TV.
C Plug the power cord to a suitable wall outlet.
3.3 Connecting multiple fixed dishes using a DiSEqC 1.0 switch
Fig. 6.
A Connect the LNB’s of your fixed dishes to the inputs of a DiSEqC 1.0 switch
B Connect the output or “to receiver” connector of the DiSEqC 1.0 switch to the SAT IN connector
on your receiver.
C Refer to section 3.1 or 3.2 for TV and mains connections.
3.4 Connecting and using the IR extender
The included IR extender allows you to place the receiver out of sight (e.g. in a closed cabinet) while
still being able to control it. Plug the IR extender into the IR connector on the back of the receiver.
Locate the extender on a position giving it direct sight to the remote control. Once a suitable location is
found, remove the protecting foil from the adhesive tape on the back of the extender and fix it by slightly
pressing it down on the surface it should be placed on.