Picture similar digital high definition Terrestrial Receiver sRT 8102 user manual
Table of Contents 18 Jan 2012 16:03 1.0 Introduction 1.1 Safety Instructions 1.2 Storage 1.3 Equipment Set-up 1.4 Accessories 1.5 Usage of external USB devices 2.0 Your Receiver 2.1 PIN-CODE DEFAULT: 0000 2.2 Front Panel 2.3 Rear Panel 2.4 Remote Control 3.0 Connection 3.1 Connecting to a Terrestrial Antenna 3.2 Connecting to TV with HDMI cable 3.3 Connecting to TV with SCART cable 3.4 Connecting to a Digital Audio Amplifier and TV using HDMI 3.5 Connecting a USB storage device 4.
PART 1 • English 1.0 Introduction 1.1 Safety Instructions DO NOT INSTALL YOUR RECEIVER: In a closed or poorly ventilated cabinet; directly on top of or under any other equipment; on a surface which might obstruct the ventilation slots.
PART 1 • English 1.3 Equipment Set-up English We recommend you consult a professional installer to set up your equipment. Otherwise, please follow the instructions below: Refer to the user manual of your TV and antenna. Make sure that the HDMI cable and outdoor components are in a good condition. Use only a HDMI 1.3 cable or higher for maximum performance. If you use TV SCART connection, use then well shielded SCART cable.
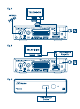
PART 1 • English 3. Mode indicator: RED indicates that the receiver is in STANDBY mode. GREEN indicates that the receiver is in OPERATING mode. 2.3 Rear Panel Fig. 2 1. ANT IN To connect to your antenna for the reception of broadcast signal. 2. TO TV To connect to the terrestrial antenna input of your TV set. This connection will allow you to watch analogue terrestrial programmes via the tuner in your TV. 3. TV SCART To connect your receiver with your TV set using a SCART cable. 4.
PART 1 • English English 3.0 Connection 3.1 Connecting to a Terrestrial Antenna To receive broadcast signal, your terrestrial indoor or outdoor antenna must be connected to the ANT IN connector on the back of the receiver. Use a properly shielded antenna cable and suitable connectors. The TO TV connector allows you to loop the antenna signal to a second receiver or TV set. Fig. 4 3.2 Connecting to TV with HDMI cable The TV set shall be connected with the receiver using a good quality HDMI 1.
PART 1 • English 4.0 Starting up for the first time If you use your receiver for the first time, the Welcome “Easy install” menu appears. Use pq to move the highlight to the setting you wish to alter and use tu to change values. Start by selecting your language using tu. Once you have selected your language, press q to move the highlight to the next item and use tu to change. Language: Select your language. Region: Select your region where this receiver is used.
PART 1 • English We at STRONG understand that you can’t wait to enjoy your new high definition digital terrestrial receiver. The following quick guide will make you familiar with the basic operation of this device. We do, however, advice you to read the full manual to get the best performance from your receiver. To turn your receiver ON or to Standby, use the q button on the remote control. Choose the desired channel with the pq buttons.
PART 1 • English 6.2 Info Banner While watching TV you can press the INFO button any time to get information about the current channel and event*. Press INFO twice for extended EPG details about the current channel. Press INFO three times for technical details about the current channel. *Event information is displayed when available. Availability depends on broadcast. 6.3 Selection of audio language Some channels support a choice of audio formats and/or languages.
PART 1 • English Your new receiver allows you to make an instant recording of the programme you are watching. Simply press 4 to start the recording. To enter the duration for the recording, press 4 again. Use the 0~9 keys to input the desired recording time. During the start of recording a recording sign will be shortly shown on the upper left of your TV screen. To stop the recording, press 3. Select Yes and press OK again to stop the recording.
PART 1 • English Select Yes to save the changes or No to discard. Locking/unlocking multiple channels in one session is possible. 7.1.1.3 Skipping channels Channels marked with Skip will be skipped when zapping channels with the pq buttons. Despite that, these channels are still available from the channel list. To mark channels for skipping, press GREEN while in TV Channel List. The Skip symbol on the top of the screen will move up to indicate that the Skip function is selected.
Delete Press BLUE in Edit Channel to enable the Delete function. The Delete sign will move up to indicate that Delete is selected. Use pq to highlight the desired channel and press OK to mark it for deletion. The receiver asks you to enter the pin code. Once you have marked all channels you wish to delete, press EXIT twice. A confirmation banner will be displayed. Select Yes to delete the marked channels or No to cancel. 7.1.
PART 1 • English The following settings are available: Antenna Power: Set to On if you use an active antenna. When set to On, 5 V will be present on the ANT IN connector of the receiver. Select Off for passive antennas. Beeper: Select On for an audible indication of signal reception. Off turns the beeper off. Channel No.: Select a channel that is known to carry a broadcast in your region. The Signal Strength and Signal Quality bars give a visual indication of the reception.
Connection: Use this option to select the connection to your TV set. Select HDMI or TV SCART. If connection type HDMI is selected, then on TV SCART only the CVBS signal is available. Digital Audio Output: Toggles between PCM and Bitstream output. When PCM is selected, all all digital audio will be converted to stereo audio. Bitstream enables multichannel audio on HDMI for use with a Home Cinema Set. 7.3.3 Local Time Setting Here you can set up your region and time zone.
PART 1 • English 7.3.5 Parental Lock This menu allows you to protect the installation menu and/or channels with a password. You can also enter a new password in the Parental Lock menu. Use pq to select Parental Lock from the System Setup menu and press OK to proceed. You will be asked to enter your pin code. (DEFAULT: 0000) Menu Lock: Locks the installation menu. You can set Menu Lock to On or Off. Channel Lock: Choose between: Off, AGE 4, AGE 5, …up to AGE 18.
PART 1 • English This option allows you to reset the receiver to factory settings, which clears all stored channels. Warning! By resetting your receiver to factory default, all your settings and stored channels will be permanently deleted. It will restore your receiver to an “out of the box” state. Please use this option with care. Use pq to select "Load Factory Setting" in the Tools menu and press OK. You are asked to input password. Input the correct password using the 0~9 buttons (default: 0000).
PART 1 • English Note: After performing this function, the USB device is no longer accessible from your receiver. To gain access to your storage device again, re insert it or switch the receiver to standby and on again. 7.5 Games Your receiver is equipped with two games which can be played on your TV screen using the receiver remote control. Use pq to select Game from the Main menu and press OK or u to proceed.
PART 1 • English English 1 = Set marker point in play back, press again to delete marker point. 2 = Jump to next marker point. 3 = Jump forwards in time. (See details in 7.6.5 DVR Configuration under Step to) Note: You can also access the Record Manager from viewing mode with the RED key on the remote control. The help banner at the bottom of the screen explains all buttons used in this record manager to edit. Press EXIT to save the settings and quit the menu. 7.6.
PART 1 • English 8.0 Troubleshooting There may be various reasons for abnormal operation of the receiver. Check the receiver according to the procedures shown below. If the receiver does not work properly after checking it, please contact your dealer or the local Service Hotline. Do NOT try to open or disassemble the receiver. It may cause a dangerous situation and warranty will be void.
PART 1 • English English 9.0 Technical Specifications Demodulator: Demodulator: COFDM; 16 QAM/64 QAM, QPSK Transmission mode: 2 K - 8 K Video Decoder: Profile level: MPEG-2 MP@ML, AVC/H264HP@L4.1, MPEG4 ASP supported Video resolutions: 576i/576P/720P/1080i/1080P Decoding & Video out: PAL Aspect ratio: 4:3 Letterbox, 4:3 Pan & Scan, 16:9, Auto Audio Decoder: Audio support: AAC/DD+*/AC3/PCM MPEG MusiCam Layer 2 Sampling rate: 32, 44.
PART 1 • English General Data Supply Voltage: Power Consumption: Power consumption in Standby: Operating Temperature: Storage Temperature: Operating Humidity Range: Size (WxDxH) in mm: Net-weight: 20 220 – 240 V AC (SMPS), 50/60 Hz 5.5 W (typ.), 12.00 W (max) 0.47 W 0 ~ 40 °C -30 ~ 80 °C 10~85%, RH, Non-condensing 142 x 112 x 40 0.