
Operation Manual


4
PART 1 • English
3. Mode indicator: RED indicates that the receiver is in STANDBY mode.
GREEN indicates that the receiver is in OPERATING mode.
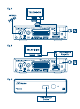
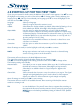
2.3 Rear Panel
Fig. 2
1. ANT IN To connect to your antenna for the reception of broadcast signal.
2. TO TV To connect to the terrestrial antenna input of your TV set.
This connection will allow you to watch analogue terrestrial
programmes via the tuner in your TV.
3. TV SCART To connect your receiver with your TV set using a SCART cable.
4. HDMI To connect your receiver with your TV set using a HDMI cable.
5. Power Cord Your receiver requires a voltage of 220 ~ 240 V AC (Auto-
selectable), 50/60 Hz ±5%. Check the local power specification
before connecting your receiver to the wall outlet.
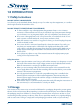
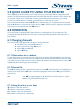
2.4 Remote Control
Fig. 3
1. q Turns the receiver On/Standby
2. ! Mutes audio output of the receiver
3. PG+/PG Page up/down and 10 channels steps in channel list mode
4. DTV/VCR No function
5. INFO Shows the current channel information
6. VOL+/VOL Volume up/down
7. MENU Opens the main menu, In menu you will get one step back
8. EXIT Exits from the menu or sub-menu
9. pq Menu Off: Change channel to previous/next.
Menu On: Moves the cursor up/down.
10. tu Menu Off: Increases/decreases the volume level.
Menu On: Change settings for specific Menus
11. OK Menu Off: Displays the current channel list
Menu On: Activates the highlighted menu item.
12. 4 Records the TV programme to the connected storage device
13. TIMESHIFT Activates the time shift function
14. 0~9 Channel selection or value input
15. EPG Shows the EPG (Electronic Programme Guide) in TV mode
16. RECALL Back to previous shown channel
17. AUDIO Sets the current audio channel to left, right or stereo
18. TV/RADIO Toggles between TV or RADIO mode
19. FAV Favourite group selection
20. FILE Shows the Media Player list
21. TXT Shows Teletext on OSD (On Screen Display)
22. SUBTITLE Shows list of subtitled languages
23. 5 6 Fast rewind / Fast forward
24. Coloured buttons for Multimedia and Teletext functions