Імітація зображення Цифровий ефірний приймач високої чіткості SRT 8502 Посібник користувача Руководство пользователя User Manual 400 Каналів Ручн./ авто ТВ Інфо Цифрове аудіо Субтитри пошук 6 Списки обраних 10 Таймерів 1.
Українська Table of Contents 25 Apr 2012 11:50 1.0 INTRODUCTION 1.1 Safety Instructions 1.2 Storage 1.3 Equipment Set-up 1.4 Accessories 2.0 Your receiver 2.1 Front panel 2.2 Rear panel 2.3 Remote control 2.4 Installing thebatteries 2.5 Management of the receiver using the remote control 3.0 Connecting the Receiver 3.1 Connecting the antenna 3.2 Connecting to TV 3.3 Connecting to a digital audio amplifier. 3.4 Connecting an external USB drive. 4.0 The first installation 4.
Українська 1.0 INTRODUCTION 1.1 Safety Instructions DO NOT INSTALL YOUR RECEIVER: In a closed or poorly ventilated cabinet; directly on top of or under any other equipment; on a surface which might obstruct the ventilation slots.
Українська This manual provides complete instructions for installing and using this receiver. The following symbols will serve as follow. WARNING: Indicates warning information. Note Indicates any other additional important or helpful information. MENU Represents a button on the remote control or the receiver. (Bold Character) Move to Represents a menu item within a window. (Italic Character) 1.4 Accessories Receiver- 1 pc. Power adaptor – 1 pc. User‘s Manual- 1 pcs. Remote control -1 pc.
Українська 2.3 Remote control 1. 2. 3. 4. 5. 6. 7. 8. 9. 10. 11. 12. 13. 14. 15. 16. 17. 18. 19. 20. 21. Fig. 3 T o switch the receiver between the working and standby modes. Enable / disable audio output of the receiver. To change output format. AUDIO to select the menu track audio support. TV / R to switch between watching TV and listening to radio channels. PG + / PG- in view: to switch channels.
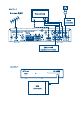
Українська 3.0 Connecting the Receiver Before you make any connection to the receiver to other devices or equipment, make sure that the receiver is connected to all attached devices are disconnected from their sources of supply. 3.1 Connecting the antenna Connect the cable from the terrestrial antenna (internal or external) to the ANT IN connector located on the rear panel of the receiver. This connector marked as “АНТ ВХІД”. 3.
Українська Antenna Power: Use the tu to turn antenna power on / off/. Before connecting the antenna, please read the User Guide for the antenna. If you use an active internal or external antenna that requires power supply voltage of 5 V DC and consumes less than 50 mA, then set it to On. Otherwise, set it to Off. After all settings are made (including the adjustment of the antenna), press BLUE button on the remote control to start scanning for channels. The receiverwill start searching forchannels.
Українська 5.2.3 Switching between TV, Radio and Favorite channels The receiver supports the following lists of channels: List of TV channels. List of Radio channels. 6 favorite lists of channels: Movies, News, Sports, Kids, Culture and Shopping. How to prepare lists of favorite channels, see § 6.1.1. To switch between TV and Radio channels: When viewing a channel, use the button TV / R.
Українська 5.4.2 Extended information panel To display on-screen extended information panel press from the channel view mode button twice. Extended information panel, additionally to standard, displays the following information: The beginning and end of the current program, the name and description*. If the description of the program does not fit in the display area, you can use the pq to scroll through the information. To view information about the next program, use the button tu.
Українська When using an external hard drive with USB interface, be aware that the drive voltage should not exceed 5 V, and current consumption should not exceed 500 mA. It is strongly recommended to use an additional power adapter for external hard drives. It is strongly recommended not to store sensitive data (information) on the external drive that is used with a receiver. Always make a backup copy of data stored on an external drive before you use it with the receiver.
Українська Press the OK. All channels will be marked with the symbol x; Press the EXIT to exit the Delete all; The pop-up window appear to confirm the deletion of channels: choose OK to confirm delete or Cancel to cancel the deletion. Using the Delete ALL will delete all channels and generated lists of favorites. Add to your favorites list. You can create up to 6 lists of favorite channels: Movies, News, Sports, Children, Culture and Shopping.
Українська Auto Search After selecting this menu item and pressing the OK, the receiver will perform an automatic search for a channels at all frequencies and update the channel list. During search process the receiver will display the progress of the search, the current frequency and name of found TV and Radio channels. At the end of the auto search the receiver will propose to exit menu to view mode or return back to Channel search menu.
Українська a broadcast by the operator). If you do not want the receiver to display the subtitles, then set the value to Off. Note that many programs being subtitled "the built in" in the video subtitles and such can’t be disabled. Start up channel: if you selectLast Watched then the receiverwill alwaysstart-up with last watched channel. If you select Fixed channel - after the power on the receiver will always start on your selected channel. To selecta fixed channel - select this option andpress OK.
Українська Current Date: Select the current date in the submenu that opens after you click OK. This option is available, if Auto time setting is set to Off. Current Time: set the current time using the number buttons. This option is available, if Auto time setting is set to Off. Auto channel update: if set to On the receiver will update the channel settings in the standby mode. Upon detection of new channels on the air receiver will offer to add them to the list of channels. Click OK.
Українська 6.4 Receiver Information 6.4.1 Signal Information 6.4.2 Receiver Information 6.4.3 Updating the software using a USB flash drive Updating the software (the software) from the USB drive is optional. Typically, a receiver software is automatically updated via a signal provided by the operator of digital terrestrial television. However, the update signal available for a limited time and maybe your receiver has not received updates via terrestrial signal.
Українська Do not disconnect the antenna cable from the receiver until the software update is completed. Non-compliance with the above instructions may result in damage to the receiver of the system and, consequently, to a denial of warranty from the manufacturer. 6.5 Conditional Access Menu Conditional Access is intended primarily for professionals, includes hard translatable terms and abbreviations. In this regard, many options are displayed in English.
Українська No video or audio Video is “mosaic”, sound is noisy or disappear time to time Message “No rights” or “Pay TV channel” Not possible to control receiver by remote control Forget your PIN code On TV set selected not correct input. Select correct input source on your TV. Check correct connection. Connection done not properly. Make sure connectors are of good quality. Disconnect receiver and TV set from the main power. Disconnect cable, connecting receiver and TV set from the both devices.
Українська Guard interval: DVB-T: 1/32, 1/16, 1/8, 1/4; DVB-T2: 1/128, 1/32, 1/16, 19/256, 1/8, 19/128, 1/4 Forward Error Corrections: DVB-T: 1/2, 2/3, 3/4, 5/6 7/8; DVB-T2: 1/2, 3/5, 2/3, 3/4, 4/5 5/6 Video decoder Profile: MPEG-2 MP @ ML, MP @ HL, MPEG-4 H.
Українська 18