A DEVICE SETUP AND OPERATION STRUCTURED MONITORING PRODUCTS
NOTICE OF COPYRIGHT INFORMATION © 2017, Structured Monitoring Products, Inc., Orlando. Florida All rights reserved to Structured Monitoring Products. This document was designed, prepared, and submitted by Structured Monitoring Products to be used only by the recipient.
Table of Contents 1. Revision History and Change Control.............................................................................. 2 2. Equipment Statements .............................................................................................. 3 3. Setting up the VetGuardian ........................................................................................ 6 4. Install Driver .......................................................................................................... 8 4.1.
1.
2. EQUIPMENT STATEMENTS For All Equipment: Changes or modifications not expressly approved by SMP could void the user's authority to operate the equipment.1 This device complies with Part 15 of FCC Rules. Operation is subject to the following two conditions: (1) this device may not cause harmful interference, and (2) this device must accept any interference received, including interference that may cause undesired operation.
Compliance Information for the WiFi module FCC PART 15 STATEMENTS: This equipment has been tested and found to comply with the limits for a Class A digital device, pursuant to Part 15 of the FCC Rules. These limits are designed to provide reasonable protection against harmful interference when the equipment is operated in a commercial environment.
To satisfy FCC RF Exposure requirements for mobile and base station transmission devices, a separation distance of 20 cm or more should be maintained between the antenna of this device and persons during operation. To ensure compliance, operation at closer than this distance is not recommended. The antenna(s) used for this transmitter must not be co-located or operating in conjunction with any other antenna or transmitter.
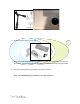
3. SETTING UP THE VETGUARDIAN 1. Unpack the contents of the box 2. The Device Arm is already connected to the Piranha-Lox® mount 3. Unpack the TP_Link ®Hotspot Router and plug it to the wall socket within the room. (Note: The TP-Link DOES NOT connect to anything else). 4. Unpack VetGuardian (Contained in the smaller box) and mount the bottom of the device to the Device Arm. 5. Warning! The screw-insert of the VetGuardian is glued in. So be careful when you mount the device to the arm.
6. Attach the Kennel Gear to a Cat cage 7. Mount the assembled VetGuardian along with the Device Arm and the Pirhana Lox on to the Kennel Gear, with the VetGuardian outside the cage with the camera lens facing the animal. 8. Plug in the VetGuardian using the adapter provided in the box.
4. INSTALL DRIVER 4.1.RUNNING THE KIPLING PROGRAM 1. Install the Kipling Software driver. o The Kipling program contains the drivers and Kipling SW which can be used to test the hardware connections. 2. Once the TP-Link is setup as an Access Point, Turn on VetGuardian 3. A Green LED Light indicates that the device is on 4. Wait for a few seconds and the Camera, the Yellow light, and the flashing blue light will appear on the camera 5. On the Desktop, look for the Kipling Software 6.
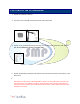
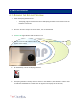
7. After the program loads, you may see the below page. Make sure the wifi is option checked and then click on Refresh Devices 8. If the refresh is successful, you will see the screen below. (DO NOT CLICK ON THE DISCONNECT BUTTON). If it's not successful, please keep refreshing as shown in step 6, until you get the screen below. If it still does not work after a couple of tries, call 305-799-3075 for support.
9. You will notice that an Yellow light also starts flickering on the VetGuardian 10. After this step, close the Kipling Software. 11. Some other errors you may encounter are shown below.
5. VETGUARDIAN 5.1.INSTALL THE VETGUARDIAN SOFTWARE PER THE INSTALLER FILE Note: Registration may be required to run the program. 5.2.RUNNING THE VETGUARDIAN PROGRAM 1. WARNNG! DO NOT OPEN\RUN VETGUARDIAN SOFTWARE and the KIPLING test software. It will cause the Wifi Connection to disconnect. 2. Make sure Kipling is closed 3. Open the VetGuardian application only after step 7 of Section 4.2 (running Kipling software) is successful 4. Please make sure you click VG Application only once.
5. When the application opens up, you will be seeing the screen below. 6.
7. Then choose Setting Menu, select Calibrate (if needed). 8. Warning! Make sure the unit is pointing at an empty cage or any location where there is no movement. Calibration is performed to differentiate between noise and signal. After Calibration, The application understands that if there is no movement, it will assign 0 for RR and HR. 9. Calibration Window open and after Calibration is completed, Click OK. 10. After the Calibration is completed, focus the device on the cat in the cage. 11.
13. To complete Monitoring, click on Stop Monitoring. o After stopping notes ,etc can be entered 14. To open the Saved animal file 15. Choose the file to open and view the saved HR and RR readings 16. To see the physical location of the files, open this Root Directory: C:\DataCapture. All Pictures are saved at every minute and stored in this folder.
15