USER MANUAL
El Capistan - dTape Echo Contents Knobs and Switches ����������������������������������������������������������������������������������������� 3 Front Panel Controls ����������������������������������������������������������������������������������������������������3 Rear Panel I/O and Control ������������������������������������������������������������������������������ 7 Live Edit Functions ������������������������������������������������������������������������������������������� 9 Low End Contour ����
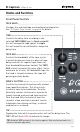
El Capistan - dTape Echo Knobs and Switches Front Panel Controls TAPE HEAD Changes the selected tape machine/head configuration. See “In Depth: Tape Heads” on page 5 for details. TIME Controls the delay time according to the selected TAPE HEAD type. In fixed and multi this will change the tape speed. In single this will move the record head to change the delay time. TAPE AGE Controls the bandwidth of the tape, just as it would change over time in a physical tape delay machine.
El Capistan - dTape Echo Knobs and Switches Front Panel Controls (cont.) MODE Changes the operation mode for each associated tape machine. See “In Depth: Tape Heads” on page 5 for detailed info. MIX Controls the balance of dry and wet signals, from 100% dry at minimum to 100% wet at maximum. The mix occurs entirely in analog. 50/50 mix is at the 3 o’clock position. REPEATS Varies the number of repeats, from one to saturated oscillation. SPRING Controls the level of the integrated spring reverb.
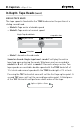
El Capistan - dTape Echo In Depth: Tape Heads The TAPE HEAD and MODE options FIXED TAPE HEAD The TIME knob varies the tape speed while the playback head is fixed in position. • Mode A: Head 1 - short delay with 1/16th note tap tempo • Mode B: Head 2 - medium delay with dotted 1/8th tap tempo • Mode C: Head 3 - long delay with 1/4 note tap tempo Fixed Head Mode: C Head 3 B Head 2 A Head 1 Record Head ction < tape dire MULTI TAPE HEAD Two of three playback heads are selected at once.
El Capistan - dTape Echo In Depth: Tape Heads (cont.) SINGLE TAPE HEAD The tape speed is fixed while the TIME knob varies the position of a sliding record head. • Mode A: Tape motor at double speed • Mode B: Tape motor at normal speed Single Tape Head Mode: playback head < tape direction record head delay time • Mode C: Sound on Sound mode Sound on Sound: Single tape head - mode C will play the entire tape loop upon entering the mode. Whatever one has recorded in mode A or B will still exist in mode C.
El Capistan - dTape Echo Rear Panel I/O and Control AUDIO INPUT SELECTOR MONO: Use with a mono input signal, such as a guitar. Output is stereo. Use OUT L for mono connection. STEREO: Use with a stereo input signal. Output is stereo. IN OUTPUTS High impedance, ultra lownoise, discrete Class A JFET preamp input. Use a TRS stereo adapter/cable for stereo input. Low impedance stereo outputs. Use OUT L for mono output.
El Capistan - dTape Echo Rear Panel I/O and Control (cont.) USB 9VDC Computer connection for MIDI control as well as for performing firmware updates. Use the included power supply or an adapter with the following rating: • 9VDC, center negative • 300mA minimum EXP / MIDI Multifunction communication jack for external control of El Capistan’s features and functions. Can be set to operate in one of the following modes. (See “Configuring the EXP/MIDI Jack” on page 18 for details.
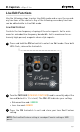
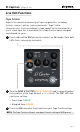
El Capistan - dTape Echo Live Edit Functions Use the following steps to enter Live Edit mode and access the secondary functions of the controls. Any of the following secondary functions can be edited while in Live Edit mode. Low End Contour Controls the low frequency shaping of the echo repeats. Set to minimum for extended low frequency bandwidth. Set to maximum for extremely high-passed, magnetic drum style repeats. 1 Press and hold the ON footswitch to enter Live Edit mode.
El Capistan - dTape Echo Live Edit Functions Tape Crinkle Adjusts the amount and severity of tape irregularities, including friction, creases, splices, and contaminants. Tape Crinkle characteristics track accordingly to tape speed. Set to minimum for a fresh, clean tape. Set to maximum for a tape that has been mangled and chewed for years. 1 Press and hold the ON footswitch to enter Live Edit mode. Once both LEDs flash, release the footswitch.
El Capistan - dTape Echo Live Edit Functions Tape Bias Adjusts the tape machine bias, from under-biased to over-biased. Higher bias levels result in reduced echo volume and limited headroom with dirty sounding repeats. Lower bias settings result in the cleanest echoes with the most headroom. 1 Press and hold the ON footswitch to enter Live Edit mode. Once both LEDs flash, release the footswitch. 2 Turn the REPEATS (TAPE BIAS) knob to adjust the bias (default is 12 o’clock).
El Capistan - dTape Echo Live Edit Functions Boost/Cut Boosts or cuts the volume by 3dB when the pedal is engaged. 1 Press and hold the ON footswitch to enter Live Edit mode. Once both LEDs flash, release the footswitch. 2 Turn the MIX (BOOST/CUT) knob to smoothly adjust the amount of output level cut or boost. Unity gain is at the 12 o’clock position (default).
El Capistan - dTape Echo Live Edit Functions MIDI Clock Sync Selects whether El Capistan’s echo repeats will sync to incoming MIDI Clock messages. 1 Press and hold the ON footswitch. Once both LEDs flash, release the footswitch. 2 Set the position of the MODE (MIDI CLOCK SYNC) switch to select whether El Capistan will sync to incoming MIDI Clock messages. Both LEDs will momentarily change color to indicate the current status as you set the switch.
El Capistan - dTape Echo Live Edit Functions Respond/Ignore MIDI Expression When set to MIDI mode, this setting determines whether El Capistan will respond to MIDI Expression CC# 100, values 0 (heel) to 127 (toe), to control the knob settings in the same manner as a TRS Expression pedal. 1 Press and hold the ON footswitch. Once both LEDs flash, release the footswitch. 2 Set the position of the TAPE HEAD (MIDI EXP) switch to select whether El Capistan will respond to MIDI Expression CC #100.
El Capistan - dTape Echo Power Up Modes Input Level Selects the input level that is routed to the effect processing. 1 Press and hold the ON footswitch while powering up El Capistan. Once both LEDs flash, release the footswitch. 2 Turn the TIME (INPUT LEVEL) knob to select the Input Level mode. The TAP LED will change color to indicate the current status as you turn the knob. • Instrument: GREEN (default) - Input headroom is set for an instrument level source, such as a guitar or a bass.
El Capistan - dTape Echo Power Up Modes Bypass Mode Setting El Capistan to Buffered Bypass mode preserves the high frequency response of your instrument’s signal through your pedal chain and long cable runs. 1 Press and hold the ON footswitch while powering up El Capistan. Once both LEDs flash, release the footswitch. 2 Turn the MIX (BYPASS MODE) knob to choose between True Bypass or Buffered Bypass modes. The ON LED will change color to indicate the current status as you turn the knob.
El Capistan - dTape Echo Power Up Modes Spillover Mode Setting El Capistan to Spillover mode allows the echo repeats of the currently selected preset to “spill” into bypass or the next loaded preset. NOTE: Because of the buffer architecture, the current preset must be active for at least 5 seconds before Spillover between presets will be operational. Spillover is available immediately when bypassing the effect. 1 Press and hold the ON footswitch while powering up El Capistan.
El Capistan - dTape Echo Power Up Modes Configuring the EXP/MIDI Jack 1 Press and hold the TAP footswitch while powering up El Capistan. Once both LEDs flash, release the footswitch. 2 Turn the MIX (EXP/MIDI JACK) knob to select the function of the rear panel’s EXP/MIDI jack. The ON LED will change color to indicate the current status as you turn the knob. • Expression Pedal mode: GREEN (default) - Allows continuous control over any of the knobs in any direction with a standard TRS expression pedal.
El Capistan - dTape Echo Configuring the EXP/MIDI Jack (cont.) 3 Press either footswitch to store the EXP/MIDI jack mode and begin using El Capistan. NOTE: The EXP/MIDI jack mode setting persists across power cycles and is not saved per preset.
El Capistan - dTape Echo External Control Expression Pedal Setup Use a TRS expression pedal to control the knobs of El Capistan . 1 Configure the EXP/MIDI jack for Expression mode. (See page 17 for configuration instructions.) RIGHT IN LEFT OUT RIGHT OUT EXP USB MIDI IN MIDI OUT 2 Connect an expression pedal to the EXP/MIDI jack of El Capistan using a TRS cable. 3 Press and hold both footswitches until both LEDs blink GREEN. 4 Rock the expression pedal to the HEEL position.
El Capistan - dTape Echo External Control Favorite Switch Setup and Compare Mode Connect a MiniSwitch or other external latching footswitch with a TRS cable to store and recall your Favorite setting. INPUT MONO IN STEREO OUT L USB OUT R OR 1 Configure the EXP/MIDI jack for Favorite mode. (See page 17 for more info.) 2 Connect an external switch with a TRS cable to the EXP/MIDI jack. 3 Dial in your desired sound.
El Capistan - dTape Echo Favorite Switch Setup and Compare Mode (cont.) COMPARE MODE With a Favorite or MIDI preset recalled, as a knob or switch is adjusted, both LEDs flash GREEN when the current knob or toggle switch position matches the setting of the preset. NOTE: Along with the knobs and toggle switches on the face of the pedal, all Live Edit settings and the bypass state of the pedal are stored with the Favorite and MIDI presets. Power Up modes are not stored with the presets.
El Capistan - dTape Echo External Control Tap Mode Connect a MiniSwitch or other external momentary footswitch with a TRS cable to tap in a delay time. INPUT MONO IN OUT L STEREO USB OUT R OR 1 Configure the EXP/MIDI jack for Tap mode. (See page 17 for more info.) 2 Connect an external switch with a TRS cable to the EXP/MIDI jack. 3 Tap in a tempo in quarter notes to set the delay time. NOTE: When in Tap mode, press and hold the external switch to engage infinite repeats.
El Capistan - dTape Echo External Control Configuring MultiSwitch Plus Configure El Capistan and MultiSwitch Plus for remote access to three additional presets. 1 Press and hold the TAP footswitch while connecting power to the pedal. Hold until both LEDs stop blinking. 2 Turn the TIME knob all the way counter-clockwise to set the MIDI channel to Channel 1. The TAP LED should be GREEN.
El Capistan - dTape Echo External Control Using MultiSwitch Plus Selecting and saving El Capistan presets using MultiSwitch Plus. Preset 1 Preset 2 Preset 3 NOTE: Footswitches A, B, and C on MultiSwitch Plus correspond to MIDI Program Changes 1, 2, and 3. 1 Step on a switch that is not illuminated to recall the corresponding preset. 2 Step on an illuminated switch to bypass El Capistan.
El Capistan - dTape Echo MIDI Functionality Configuring El Capistan to Use MIDI Using MIDI unlocks a set of tools that can be used to load any of El Capistan’s 300 preset locations using a suitable MIDI controller or interface connected to the El Capistan EXP/MIDI jack This requires a Strymon MIDI EXP cable or a MIDI controller/interface, such as Strymon Conduit, with at least one quarter-inch output. NOTE: When using a Strymon MIDI EXP Cable, the MIDI OUT mode must be set to Off. (See page 30 for details.
El Capistan - dTape Echo Configuring El Capistan to Use MIDI (cont.) STEP 1 – SET EXP/MIDI JACK TO MIDI MODE 1 Press and hold the TAP footswitch while connecting power to the pedal. Once both LEDs flash, release the footswitch. 2 Turn the MIX knob clockwise until the ON LED is BLUE to select MIDI mode.
El Capistan - dTape Echo Configuring El Capistan to Use MIDI (cont.) STEP 2 – SET MIDI CHANNEL 3 Turn the TIME knob to set the MIDI communication channel. TAP LED indicates status. Your TIME knob selections are as follows: • • • • Channel 1: GREEN (default) Channel 2: AMBER Channel 3: RED Channel 4-16: BLUE (set by next received MIDI Program Change message, requires 1⁄4” MIDI connection) Once the TAP LED turns BLUE, it will blink until the pedal receives a MIDI Program Change message.
El Capistan - dTape Echo STEP 2 – SET MIDI CHANNEL (CONT.) 4 Press either footswitch to exit and store your MIDI Channel setting and begin using El Capistan. NOTE: A simple way to check that communication is working is to send CC #102 with a value of 127 when the ON footswitch is bypassed. This will enable the ON footswitch if MIDI is properly connected and configured. NOTE: If you are only sending data to El Capistan using the Strymon MIDI EXP cable, the MIDI OUT mode must be set to OFF.
El Capistan - dTape Echo Configuring El Capistan to Use MIDI (cont.) STEP 3 – SET MIDI OUT MODE 1 Press and hold the TAP footswitch while connecting power to the pedal. Once both LEDs flash, release the footswitch. 2 Turn the TAPE AGE knob to select what kind of MIDI data is sent from El Capistan to other MIDI devices. Both LEDs will flash momentarily to indicate status. • OFF: RED (default) - No MIDI messages are sent out of El Capistan.
El Capistan - dTape Echo MIDI Functionality (cont.) Saving Presets in MIDI Mode When in MIDI mode, the currently loaded settings can be saved to any of El Capistan’s 300 preset locations at any time. 1 To enter Save mode, press and hold both footswitches. Both LEDs will blink GREEN to indicate that El Capistan is waiting to receive a MIDI Program Change message. 2 To save the current state of the pedal to the currently loaded preset location, press and hold the TAP footswitch until the LED lights BLUE.
El Capistan - dTape Echo MIDI Specifications MIDI Program Changes El Capistan contains 300 preset locations, numbered sequentially from 0-299. Because MIDI Program Change messages have a maximum number of 128 (0-127), the presets are grouped into three MIDI patch banks. MIDI BANK 0 = PRESETS 0-127 MIDI BANK 1 = PRESETS 128-255 MIDI BANK 2 = PRESETS 256-299 0 Favorite setting (accessible via MiniSwitch) See page 21 for details.
El Capistan - dTape Echo MIDI Specifications (cont.
El Capistan - dTape Echo Factory Reset Performing a Factory Reset restores the pedal to its factory default Power-up modes and secondary functions, and replaces all stored presets with their factory default locations. 1 Press and hold the ON footswitch while connecting power to the pedal. Once both LEDs flash, release the footswitch. 2 Sweep the WOW & FLUTTER knob from 0-100% and back two times.
El Capistan - dTape Echo Factory Reset (cont.
El Capistan - dTape Echo Features • Hand crafted dTape algorithms for meticulous and nuanced recreations of tape echo systems • Three tape machines in one: fixed (one fixed playback head), multi (multiple playback heads), and single (sliding record head) • Three modes on each tape machine for extremely flexible echo options • Independent Spring reverb • Selectable between True Bypass or Buffered Bypass • Sound on Sound mode with instant tape splice and bulk erase for tape-style looping • +/- 3dB adjustable
El Capistan - dTape Echo Specifications Input Impedance: Output Impedance: A/D & D/A: Max Input Level Signal/Noise Bypass Switching Dimensions 1 Meg Ohm 100 Ohm 24-bit 96kHz +10 dBu 115 dB typical True Bypass (electromechanical relay switching) 4.5" deep x 4" wide x 1.75" tall Power Adapter Requirements Use an adapter with the following rating: 9VDC, center negative, 300mA minimum. © 2022 Damage Control Engineering, LLC.
El Capistan - dTape Echo Appendix 1: Sample Settings pg 38
El Capistan - dTape Echo Sample Settings TWANGER IN THE CANYON MIDI Program Change 0 MiniSwitch Favorite MIDI Program Change 1 MultiSwitch Plus A DREAMY MOD PULSING REPEATS MIDI Program Change 2 MultiSwitch Plus B MIDI Program Change 3 MultiSwitch Plus C OLDER SIBLING LIVE EDIT FUNCTIONS El Capistan provides a way to adjust several parameters that do not have a dedicated knob or switch. These are called LIVE EDIT functions and each are described in detail starting on page 9 .
El Capistan - dTape Echo Appendix 2: Power Up Modes Quick Reference pg 40
El Capistan - dTape Echo Power Up Modes Quick Reference Global parameters and functions can be accessed via a power up procedure. All power up functions persist through power cycles. General Options 1 Press and hold the ON footswitch while powering up El Capistan. Once both LEDs flash, release the footswitch. 2 Adjust the desired functions with the knobs and buttons noted below. 3 Press either footswitch to store your changes and exit power up mode. INPUT LEVEL See page 15 for an illustrated description.
El Capistan - dTape Echo Power Up Modes Quick Reference Global parameters and functions can be accessed via a power up procedure. All power up functions persist through power cycles. MIDI & Jack Options 1 Press and hold the TAP footswitch while powering up El Capistan. Once both LEDs flash, release the footswitch. 2 Adjust the desired functions with the knobs and buttons noted below. 3 Press either footswitch to store your changes and exit power up mode.
El Capistan - dTape Echo Appendix 3: Live Edit Controls Quick Reference pg 43
El Capistan - dTape Echo Live Edit Controls Quick Reference El Capistan provides a way to adjust several secondary functions that are available on several knobs (also, see “Live Edit Functions” on page 9). Live Edit Functions are saved per preset. 1 Press and hold the ON footswitch until both LEDs blink to enter Live Edit mode. 2 Release the footswitch and use the knobs as described below. 3 Press either footswitch to exit Live Edit mode. LOW END CONTOUR See page 9 for an illustrated description.
El Capistan - dTape Echo Strymon Non-Transferable Limited Warranty Warranty Strymon warranties the product to be free from defects in material and workmanship for a period of two (2) years from the original date of purchase when bought new from an authorized dealer in the United States of America or Canada. If the product fails within the warranty period, Strymon will repair or, at our discretion, replace the product at no cost to the original purchaser.