Version 1.
ITALIANO Manuale di Istruzione NUMA Compact by Studiologic® 3 I
Informazioni di sicurezza Importanti informazioni di sicurezza Leggi attentamente il manuale. Esso contiene tutte le informazioni di cui hai bisogno per utilizzare questo strumento. Segui le istruzioni nel manuale. La garanzia verrà annullata qualora venissero effettuati interventi non autorizzati nel NUMA Compact. Possono essere utilizzati solo accessori specificati dal costruttore. Usa lo strumento solo come indicato in questo manuale. PERICOLO! Rischio di scossa elettrica. Non aprire lo chassis.
Indice Informazioni di sicurezza 4 Il tuo nuovo NUMA Compact 6 Indicazione delle funzioni nel manuale Pannello di controllo / Connessioni 7 7 Prima di usare il NUMA Compact 8 Preset / Suoni / Layer 9 9 9 9 9 9 9 9 Demo songs Richiamo dei Preset Generatore sonoro / Selezione suoni Volume Transpose Pitch Wheel Layer Balance Effetti 10 10 10 Selezione Effetti Modulation Level / Reverb Mix Free Wheel Dinamica 11 Velocity Memorizzazione 11 Memorizzazione presets Funzioni Global 12 12 12 12
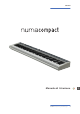
Il tuo nuovo NUMA Compact Grazie per aver scelto NUMA Compact. Ora possiedi una tastiera allo stato dell‘arte, prodotta da un rinomato produttore: Studiologic di Fatar. NUMA Compact è facile da usare ed offre un ottimo tocco alla tastiera. Ti raccomandiamo di leggere attentamente l‘intero manuale per poter usufruire dei vantaggi di tutte le funzioni del tuo nuovo strumento.
Pannello di Controllo / Connessioni Indicazione delle funzioni nel manuale Tutti i pulsanti operativi sono indicati in grassetto corsivo (es. On/Off). Per indicare la pressione di due pulsanti contemporaneamente, è usato & (es. Piano & Pad2); essi si possono premere contemporaneamente oppure premere il secondo pulsante mentre si tiene premuto il primo. Le combinazioni di tasti Function sono solitamente segnate in rosso. Si tiene premuto Function mentre si preme l‘altro pulsante (es. Function & Transpose).
Prima di usare il NUMA Compact Connessione alimentazione Utilizza l‘adattatore in dotazione con NUMA Compact per connettere lo strumento alla presa di rete (oppure connettilo alla presa USB di un computer). Accendi lo strumento con il pulsante posto vicino la connessione di alimentazione. Pedali Sustain / Expression Connetti il pedale del sustain opzionale PS-100 oppure VFP-1 nell‘ingresso con l‘etichetta Hold.
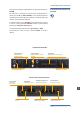
Preset / Suoni / Layer Pitch • Pitch bend, ±2 semitoni Display - Value -/+ • Richiamo Preset Volume - Balance • Livello sonoro • Livello relativo di Layer 1/2 On/Off - Demo • Generatore sonoro on/off • Esecuzione Demo-songs Function • in combinazione con Transpose Sound Bank • Accesso diretto ai 10 suoni interni Transpose • Trasposizione della tastiera Premi Demo per pochi secondi per poter suonare le demo song. Partiranno automaticamente e il display mostrerà DEM.
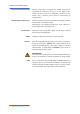
Effetti Free • Modulazione MIDI • Parametri effetto Modulation Display - Value -/+ • Visualizzazione e regolazione valori Function • in combinazione con Modulation Lev / Reverb Mix Modulation Lev - Reverb Mix • Livello effetto Modulation • Livello effetto Reverb Select • Selezione Effetti Selezione Effetti Premendo più volte il tasto Select si può selezionare un effetto di modulazione o di riverbero. L‘effetto selezionato è indicato dal LED. Se nessun LED è illuminato, nessun effetto è attivo.
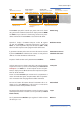
Dinamica / Memorizzazione Display - Value -/+ • Visualizzazione e regolazione valori Velocity • Impostazione Velocity curve Function • in combinazione con Velocity La velocity definisce la risposta al tocco della tastiera. Entra nel velocity mode premendo Function & Velocity. Il display indica le diverse curve con F(fixed), L(low), M(medium), H(high). Usa Value +/- per selezionare la curva desiderata.
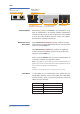
Funzioni Global On/Off • Factory restore Display - Value +/• Visualizzazione e regolazione valori Master Tune • Accorda NUMA Compact con altri strumenti Function • in combinazione con Master Tune • aggiornamento firmware Ripristino factory presets Se desideri ripristinare i preset di fabbrica, spegni NUMA Compact e riaccendilo tenendo premuto il tasto On/Off del MIDI module. Il display ora mostra RST e ripremendo il tasto On/Off il display mostra la selezione Y o N.
MIDI On/Off • Midi Module on/off Volume • Volume MIDI Display - Value -/+ • Visualizzazione e regolazione valori MIDI • Selezione parametro MIDI MIDI (Musical Instruments Digital Interface) è uno standard per la trasmissione dati tra moduli sonori, sintetizzatori, computer e software musicali. Prendi nota: il MIDI Out di una periferica viene connessa con il MIDI In di un‘altra. Connessione MIDI Il NUMA Compact invia e riceve i dati dalle porte MIDI e contemporaneamente tramite la connessione USB.
Risoluzione problemi Risoluzione problemi 14 NUMA Compact by Studiologic® Problema Possibile causa Soluzione Lo strumento non si accende. Non c‘è alimentazione. L‘ adattatore è difettoso. Assicurati che ci sia corrente. Controlla la funzionalità dell‘adattatore. Lo strumento non invia dati MIDI. MIDI Module è spento. Accendi il MIDI Module premendo On/Off. Lo strumento non può essere controllato via MIDI. I dati MIDI non sono inviati ai canali MIDI 1, 2 o 16.
Dichiarazioni Tuti i prodotti Studiologic sono costruiti attentamente, calibrati, testati, e sono soggetti a garanzia. Registra il tuo strumento per avere pieno supporto. Danni causati da trasporto non conforme, montaggio o errata manutenzione, non sono coperti da questa garanzia. Per eventuali informazioni rivolgersi al proprio negoziante e/o al distributore di zona. Garanzia FATAR srl Zona Ind.
ENGLISH Operation Manual NUMA Compact by Studiologic® 17 E
Safety Instructions Important Safety Instructions Please read the entire manual. It contains all the information you need to use this unit. Please follow the instructions in the manual. The warranty will be void if unauthorized work is carried out on the NUMA Compact. Only accessories that are specified by the manufacturer should be used with this unit. Use the unit only as specified in this manual DANGER! Risk of electric shock. Do not open the chassis. There are no user serviceable parts inside.
Index Safety Instructions 18 Your new NUMA Compact 20 How functions are shown in this manual Control panel / Connections 21 21 Before using the NUMA Compact 22 Presets / Sounds / Layer 23 23 23 23 23 23 23 23 Demo songs Preset recall Sound Engine / Sound selection Volume Transpose Pitch Wheel Layer Balance Effects 24 24 24 Effects selction Modulation Level / Reverb Mix Free Wheel Velocity 25 Velocity Store Function 25 Store Preset Global functions 26 26 26 26 Restore factory presets M
Your new NUMA Compact Thank you very much for choosing the NUMA Compact. You have obtained a state-of-the-art keyboard made by the renowned manufacturer Studiologic by Fatar. The NUMA Compact is easy to operate, and offers a perfect keyboard touch. We recommend that you read the entire manual carefully to take full advantage of all the functions of your new NUMA Compact.
Control Panel / Connections All operation buttons are marked in bold italic in this manual (example: On/Off). How functions are shown in this manual If you have to press two buttons at the same time, it is indicated by & (example: Piano & Pad 2). You can either press both buttons at the same time, or press and hold one button while pressing the other button. Key combinations with Function are always marked red in this manual.
Before using the NUMA Compact Power connection Use the power adapter supplied with the device to connect the NUMA Compact to the power socket (or use the USB connection). Switch the unit on by using the power button near to the power plug of the NUMA Compact. Sustain / Expression pedal Connect the (optional) sustain pedal PS-100 or VFP 1 at the socket which is labelled Hold. At the socket labelled Expression, you can plug in the Studiologic pedal VP 27, which is also available as an option.
Preset / Suond / Layer Pitch • Pitch bend, ±2 semitones Display - Value -/+ • Preset recall Volume - Balance • Sound Level • Relative level of Layer 1/2 On/Off - Demo • Sound engine on/off • Play Demo-songs Function • in combination with Transpose Sound Bank • Direct access to the 10 internal sounds Transpose • Transposition of the keyboard to other keys Press and hold On/Off-Demo for a few seconds to play the 10 demo songs; they will start automatically and play in sequence: use the Value -/+ button
Effects Free • MIDI modulation • Modulation efx parameters Display - Value -/+ • Display and value adjustment Function • in combination with Modulation Lev / Reverb Mix Effect selection Modulation Level Reverb Mix Modulation Lev - Reverb Mix • Modulation efx level • Reverb efx Mix Select • Effects Selection To select a Modulation or Reverb effect, step through the various algorithms by tapping the corresponding Select button. The selected effect is indicated by the related LED.
Velocity / Storage Display - Value -/+ • Display and value adjustment Velocity • Velocity curve selection Function • in combination with Velocity The velocity defines the touch sensitivity of the keyboard; you can choose from 3 different velocity curves. Enter the velocity mode by pressing Function&Velocity. The display indicates the different curves as S (soft) M (medium) H (hard) and F (fixed). Use Value -/+ to select the appropriate velocity.
Global Functions On/Off • Factory restore Display - Value +/• Display and value adjustment Master Tune • Tune the NUMA Compact to other instruments Function • in combination with Master Tune • firmware update Restore factory presets If you would like to restore the factory presets, turn off NUMA Compact and turn on it again while pressing the MIDI module-On/Off button. The display shows now RST and pressing again the On/Off button, it will show the Y o N selection.
MIDI On/Off • Midi Module on/off Volume • MIDI Volume Display - Value -/+ • Display and value adjustment MIDI • MIDI parameters selection MIDI (Musical Instruments Digital Interface) is a standard for data transmission between sound modules, synthesizers, drum computers and music software. Please note: The MIDI Out of a device is connected with the MIDI In of another device and/or vice-versa. MIDI connections The NUMA Compact sends and receive all MIDI data through the MIDI and USB ports.
Troubleshooting Troubleshooting Problem Possible cause Solution The instrument does not turn on. No power is supplied. Defective power adapter. Please make sure that power is available and switched on. Check the power adapter. The instrument does not send MIDI data MIDI Module is switched off. Switch MIDI Module on by pressing On/Off. The instrument can not be controlled via MIDI. MIDI data are not sent on MIDI channel 1, 2 or 16. Please send MIDI data only on MIDI channel 1, 2 or 16.
Declarations Every product from Studiologic by Fatar has been carefully manufactured, calibrated and tested, and carries a two year warranty. Please register your product to get full support. Damage caused by incorrect transport, mounting or handling is not covered by this warranty. For any further informations please refer exlusively to your dealer and/or local distributor.
Appendix Appendix NUMA Compact by Studiologic® 31
Appendix MIDI Implementation Chart Studiologic NUMA Compact, Version 1.00 Basic information Transmitted Recognized MIDI channels 1 - 16 1, 2, 16 (common ch.
Appendix Specifiche Tecniche Specifications Studiologic NUMA Compact Keyboard Sound Engine Number of Keys 88 Type Semi-weighted action (TP9PIANO) Velocity Curves Fixed, Low, Mid, High Polyphony 128 (max) Type Stereo Multi Samples True Sound Technology Voices / Instruments 10 Effects Processor Reverb Room, Hall, Delay Modulation Chorus, Phaser, Rotary, Tremolo Display LED 7 segment, 3 digits Connections Audio Out Left/Right, 6,3mm phone jack Headphones 6,3mm stereo phone jack MID
DEUTSCH D Bedienungsanleitung Version 1.
Sicherheitshinweise Wichtige Sicherheitshinweise Lesen Sie die Bedienungsanleitung vollständig. Sie finden dort alle Informationen, die Sie zum Einsatz des Gerätes benötigen. Bei Fremdeingriffen in das Gerät erlischt die Garantie. Betreiben Sie das Gerät nur in Übereinstimmung mit der Bedienungsanleitung. Verwenden Sie nur vom Hersteller spezifiziertes Zubehör. ACHTUNG! Gefahr durch Stromschlag! Das Gerät nicht öffnen. Im Inneren befinden sich keine vom Benutzer verwendbaren Teile.
Inhaltsverzeichnis Sicherheitshinweise 2 Ihr neues NUMA compact 4 Hinweise zur Anleitung Bedienfeld / Anschlüsse 5 Inbetriebnahme 6 Presets / Klänge 7 7 7 7 Demo Songs Presets aufrufen & abspeichern Klangerzeugung/Auswahl Transposition Layer 8 8 Layer einstellen Layer Balance Effekte 8 Effekt wählen Reverb Mix / Modulation Level Pitch Wheel Free Wheel Anschlagsdynamik Velocity 9 Einstellungen Globale Funktionen Transpose Master Tune System Software 10 MIDI 11 12 Tonhöhe/Stimmung ein
Ihr neues NUMA compact Herzlichen Glückwunsch zu Ihrem neuen NUMA compact! Damit haben Sie sich für ein erstklassiges Keyboard des renommierten Herstellers Studiologic® by Fatar entschieden. Bei der Entwicklung des NUMA compact wurde, neben der hervorragenden Tastatur, ein besonderes Augenmerk auf eine einfache und intuitive Bedienung gelegt. Wir empfehlen, diese Anleitung aufmerksam durchzulesen, damit Sie alle Funktionen des NUMA compact voll ausschöpfen können.
Bedienfeld / Anschlüsse Alle Bedienelemente werden in dieser Bedienungsanleitung fett kursiv hervorgehoben (z.B. On/Off). Hinweise zur Anleitung Sollen zwei Tasten gleichzeitig gedrückt werden, wird dies durch & gekennzeichnet (z.B. Grand Piano & Pad 2). Sie können entweder beide Tasten gleichzeitig drücken, oder eine Taste gedrückt halten während Sie die zweite Taste drücken. Tastenkombinationen mit Function werden rot hervorgehoben.
Inbetriebnahme Netzanschluß Schließen Sie Ihr NUMA compact über das mitgelieferte Netzteil an das Stromnetz an. Das Gerät selbst schalten Sie über den daneben befindlichen Druckschalter ein und aus. Audio Ausgang Verbinden Sie die beiden Audio Out Left (Links) und Right (Rechts) mit den Eingängen eines Mischpults, Verstärkers usw. Achten Sie darauf, dass Sie bein Ein- uns Ausschalten die Lautstärke des angeschlossenen Verstärkers auf Minimum stellen.
Presets / Klänge Pitch • Tonhöhenänderung um ±2 Halbtöne On/Off - Demo • Klangerzeugung An/Aus • Demo-Songs abspielen Display - Value +/• Aufrufen von Presets • Verändern von Parametern Volume • Gesamtlautstärke Sound Bank • Direktauswahl der 10 Klänge Function / Store • in Kombination mit Transpose Drücken und halten Sie Demo gedrückt, um sich die 10 Demo-Songs anzuhören. Die Demo-Songs starten automatisch und das Display zeigt DEM. Mit Value +/- wählen Sie den nächsten bzw. vorherigen Demo-Song.
Tastatur-Zonen Free Wheel Anzeige und Anpassung der Werte Balance Lautsstärkeverhältnis von Layer Lower und Upper Effekte • Modulation & Reverb Sound Bank • Klangauswahl bei Layer Layer Als Layer bezeichnet man das gleichzeitige Spielen von zwei Klängen. Möchten Sie zwei Klänge als Layer spielen, drücken Sie gleichzeitig die beiden entsprechenden Tasten (z.B. Grand Piano & Pad 2). Um wieder mit dem normalen Modus zu spielen, drücken Sie einfach einen einzelnen Klang.
Anschlagsdynamik Velocity • Einstellung der Anschlagsdynamik Die Anschlagsdynamik wird im Englischen mit Velocity bezeichnet. Sie entscheidet, wie der Anschlag einer Taste dynamisch umgesetzt wird. Beim NUMA compact können Sie aus 4 unterschiedlichen Velocity Einstellungen wählen. Rufen Sie diesen Modus mit Function & Velocity auf. Im Display werden die unterschiedlichen Kurven als F, S, M, H bezeichnet und können mit Value +/- ausgewählt werden.
Globale Funktionen Transpose Master Tune Transpose Mit Function & Transpose transponieren Sie Ihr NUMA compact in Halbtonschritten. Es sind Werte zwischen -6 und +5 Halbtöne möglich. Diese werden im Display angezeigt und wie gewohnt mit Value +/- verändert. Drücken Sie Function erneut um die Einstellung zu übernehmen und den Modus zu beenden. Die Einstellung bleibt bis zum Ausschalten des NUMA compact erhalten.
Globale Funktionen On/Off • MIDI Daten senden Ja/Nein Volume • Senden von MIDI Volume Display - Value+/• Anzeige und Anpassung der zu sendenden MIDI Daten MIDI •Auswahl der zu sendenden MIDI Daten MIDI steht für Musical Instruments Digital Interface und ist ein Standard zur Übertragung von Daten zwischen Klangerzeugern, Synthesizern, Drumcomputern und Musik-Software. Ein MIDI Out wird mit dem MIDI In eines anderen Gerätes verbunden.
MIDI Änderungen aufzeichnen Das NUMA compact sendet auf MIDI Kanal 16 alle Änderungen die Sie vornehmen. So können Sie z.B. dynamisch einen Verlauf des Rotary-Effekts in einem Sequenzer aufzeichnen. Master Tune Das NUMA compact kann die Einstellungen des Master Tune als standardisierten MIDI System Exclusive Befehl senden. Dies ist unabhängig vom gewählten MIDI Kanal. Zum Senden muss das MIDI Module eingeschaltet sein.
MIDI Sie können die Klangerzeugung des NUMA compact auch extern ansteuern. Die Verbindung kann über MIDI oder USB erfolgen. Die Klänge des NUMA compact werden mit den folgenden MIDI Program Change Befehlen aufgerufen, die dem General MIDI (GM) Standard folgen.
Fehlerbehebung Problem mögliche Ursache Lösung Das NUMA compact lässt sich nicht anschalten. Kein Strom vorhanden. Defektes Netzteil Überprüfen Sie, ob Strom vorhanden ist. Prüfen und tauschen Sie das externe Netzteil aus. Das NUMA compact sendet keine MIDI Daten. MIDI Module ist ausgeschaltet. Schalten Sie MIDI Module über On/Off ein. Das NUMA compact lässt sich nicht über MIDI steuern. MIDI Daten werden Senden Sie MDI Daten nicht auf Kanal 1 oder über MIDI Kanal 1 2 gesendet. und/oder 2.
Rechtliches Jedes Gerät von Studiologic® by Fatar wird einzeln geprüft und einer vollständigen Funktionskontrolle unterzogen. Die Verwendung ausschließlich hochwertigster Bauteile erlaubt die Gewährung von zwei Jahren Garantie. Als Garantienachweis dient der Kaufbeleg / Quittung. Schäden, die durch unsachgemäßen Einbau oder unsachgemäße Behandlung entstanden sind, unterliegen nicht der Garantie und sind daher bei Beseitigung kostenpflichtig.
Appendix Studiologic NUMA compact Keyboard Sound Engine Number of Keys 88 Type Semi-weighted action (TP9PIANO) Velocity Curves Fixed, Low, Mid, High Polyphony 128 Type Stereo Multi Samples True Sound Technology Voices / Instruments 10 Effects Processor Reverb Room, Hall, Delay Modulation Chorus, Phaser, Rotary, Tremolo Display LED 7 segment, 3 digits Connections Audio Out Left/Right, 6,3mm phone jack Headphones 6,3mm stereo phone jack MIDI In - Out USB USB to Host (MIDI) Hold
NUMA compact by Studiologic® 17
Appendix Appendix 18 NUMA compact by Studiologic®
Appendix MIDI Implementation Chart Studiologic NUMA compact, Version 1.
www.studiologic-music.com Im Vertrieb der Synthax GmbH Semmelweisstraße 8 82152 Planegg www.synthax.de heOe 05.