Version 1.
ENGLISH Operation Manual NUMA Organ by Studiologic® 3 E
Safety Instructions Important Safety Instructions Please read the entire manual. It contains all the information you need to use this unit. Please follow the instructions in the manual. The warranty will be void if unauthorized work is carried out on the NUMA Organ. Only accessories that are specified by the manufacturer should be used with this unit. Use the unit only as specified in this manual. DANGER! Risk of electric shock. Do not open the chassis. There are no user serviceable parts inside.
Table of contents Important Safety Instructions 4 Your new NUMA Organ 6 What‘s behind NUMA Organ How a tone wheel organ works The sound engine of NUMA Organ 7 7 7 Connection / Back view 8 Control panel Volume How functions are shown in this manual 9 9 9 Operation / Drawbars Drawbars Aside: How the manual and drawbars are related Extension with other manuals / keyboards 10 10 11 11 Operation Pitch Wheel Rotary / Modulation Wheel (Rotary Speaker Simulation) Chorus / Vibrato Split Split point Trans
Your new NUMA Organ Thank you very much for choosing the NUMA Organ. You have obtained a state-of-the-art instrument made by the renowned manufacturer Studiologic® by Fatar. Get inspired by the new NUMA Organ! Its Physical Modelling synthesis is the most authentic revival of the sound of an electromechanical tone wheel organ. But the NUMA Organ is much more. We recommend that you read the entire manual carefully to take full advantage of all the functions of your new NUMA Organ.
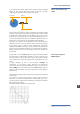
What‘s behind NUMA Organ In an original tone wheel organ, which was the model for NUMA Organ, 91 steel wheels with lobes rotate in front of a pick-up consisting of a permanent bar magnet and a spool. Tone wheel How a tone wheel organ works Magnet Spool Because of the tone wheels‘ shape and rotation, the magnetic field in the pick-up changes periodically and generates a sine wave. With 8 different tone wheel shapes and 12 different gear trains 91 sine frequencies are generated.
Connection / Back view Rotary Speaker Cabinet, Page 16 Audio out L/R Page 8 Direkt-out Page 8 Stereo audio in • Level Page 8 Hold • Expression Page 8, 11 USB 1 • Mini USB 2 Page 8, 16 Fuse Page 4, 65 Headphone out 1/2 Page 8 MIDI In•Out•Thru Page 17 Mains • Power Page 4, 8 Power connection Use the power cord supplied with the device to connect the NUMA Organ to the power socket. Switch the unit on by using the power button near to the power socket of the NUMA Organ.
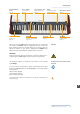
Control panel Pitch / Modulation / Rotary Page 12 Presets Recall / store Page 15 Chorus • Vibrato 2 x 3 variations Page 12 Split • Transpose •Tune Keyboard functions Page 13 Drawbars for Upper, Lower, Pedal Page 10 - 11 Effects Reverb, Drive, Click, Leakage, Page 14 Percussion Page 14 When you use the NUMA Organ for the first time, we recommend you to turn the Volume knob on the Output section to not more than half way between 0 and Full. While you are playing you can adjust the volume as you choose.
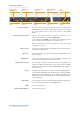
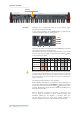
Operation / Drawbars • Drawbars Drawbars Drawbars are a characteristic trait of a tone wheel organ. Therefore we’ll explore them first. In the text the drawbars of the NUMA Organ are indicated by coloured highlighted digits as shown below. • Upper • Lower • Pedal 1 2 3 4 5 6 7 8 9 You use the drawbars to set the timbre of the NUMA Organ. A sound can comprise up to nine sine frequencies.
Operation / Drawbars • Drawbars At each push of a key all nine harmonics of this particular key are generated. The drawbars simply adjust the levels among them. Thus you can change the timbre while keys are pressed. Aside: How the manual and drawbars are related Note: Located under every single key of an original tone wheel organ were nine contacts, which were all closed at the same time by pressing the key. A bus system then regulated the volume for each contact via each of the nine drawbars.
Operation • Pitch • Rotary / Modulation • Chorus / Vibrato Pitch Wheel To vary the pitch while playing by ±2 semitones, use the Pitch wheel on the left. The wheel is self centring and will go back to its centre position after being released (i.e. no pitch applied). Rotary / Modulation Wheel (Rotary Speaker Simulation) Press the On/Off button next to the Modulation / Rotary wheel to switch the internal Rotary Speaker effect on. The On/Off button lights up.
Operation • Transpose •Tune • Split • Split point Press Split to activate this function. The Split button will light up and the manual is devided into two zones. Press Upper at the drawbar section to adjust the timbre of the upper zone. Press Lower to assign the drawbars to the lower zone. Alternatively you can assign to the lower keyboard zone the pedal manual. To do so, press Pedal to Lower. The button will light up.
Operation • Percussion • EQ / Volume • Effects Percussion To add more rhythmic elements to your performance you can switch on Percussion. This effect only retriggers when all keys were released before. Press On/Off to activate Percussion. With the 2nd/3rd button you can decide whether Percussion is generated by the second harmonic (button does not light up), or by the third harmonic (button lights up). Slow/Fast defines the decay of the Percussion.
Operation • Preset recall / store • Fatar dynamic TOUCH You can also use your NUMA Organ as a master keyboard, providing full MIDI note velocity dynamic range to other sound expanders. Press Fatar dynamic TOUCH. The button lights up. Now the MIDI notes will be sent with the full MIDI velocity range through the MIDI output and USB. In this state the internal sound engine is not active (Local off, MIDI on).
External Rotary Speaker / Update External Rotary Speaker Cabinet System Update 16 NUMA Organ by Studiologic® You can operate / amplify your NUMA Organ with an external Rotary Speaker cabinet via an 11-Pin connector. The rotor speed as well as Start/Stop (Brake) are also controllable with the Rotary wheel and the Sustain pedal. This is identical to the internal Rotary Speaker simulation (page 10).
MIDI MIDI (Musical Instruments Digital Interface) is a standard for data transmission between sound modules, sythesizers, drum computers and music software. Please note: The MIDI Out of a device is connected with the MIDI In of another device. Incoming data arriving at the MIDI In are duplicated at the MIDI Thru socket. MIDI connection The NUMA Organ sends MIDI data on the MIDI Out and at the same time via the USB port. MIDI data are received via MIDI In.
MIDI Control the NUMA Organ via MIDI You can play and control the sounds of the NUMA Organ with other MIDI devices or with your computer. The following chart shows which MIDI Control Change message remote controls which parameter of the NUMA Organ.
MIDI To use your NUMA Organ as MIDI masterkeyboard, switch on the Fatar dynamic TOUCH function as described on page 15. Please Note: If Fatar dynamic TOUCH is activated, an attached Sustain pedal sends the MIDI sustain message (MIDI CC 64). But for the internal sound engine of the NUMA Organ the Sustain pedal always controls the Rotary speed! Use the NUMA Organ as MIDI masterkyboard The NUMA Organ sends on MIDI channels 1 to 3 all parameters and adjustments you make.
Troubleshooting Troubleshooting Problem Possible cause Solution NUMA Organ does not turn on. No power is supplied. Defective power cable. Fuse is blown inside the NUMA Organ. Please make sure that power is available and switched on. Check the power cable and the internal fuse and replace if needed, with fuse as specified on page 65. NUMA Organ cannot be MIDI data are not controlled via MIDI. being sent on MIDI channel 1, 2 or 3. Please send MIDI data only on MIDI channel 1, 2 and/or 3.
Declarations Every product from Studiologic® by Fatar has been carefully manufactured, calibrated and tested, and carries a two year warranty. Please register your NUMA Organ to get full support. Damage caused by incorrect transport, mounting or handling is not covered by this warranty. Compensation amounting to more than the price of the device is excluded. This is based on general terms and condition of the local distributor / FATAR srl, Italy. Warranty FATAR srl Zona Ind.
DEUTSCH Bedienungsanleitung NUMA Organ by Studiologic® 23 D
Sicherheitshinweise Wichtige Sicherheitshinweise Lesen Sie die Bedienungsanleitung vollständig. Sie finden dort alle Informationen, die Sie zum Einsatz des Gerätes benötigen. Bei Fremdeingriffen in das Gerät erlischt die Garantie. Betreiben Sie das Gerät nur in Übereinstimmung mit der Bedienungsanleitung. Verwenden Sie nur vom Hersteller spezifiziertes Zubehör. ACHTUNG! Gefahr durch Stromschlag! Das Gerät nicht öffnen. Im Inneren befinden sich keine vom Benutzer verwendbaren Teile.
Inhaltsverzeichnis Wichtige Sicherheitshinweise 24 Ihre neue NUMA Organ 26 Was hinter der NUMA Organ steckt Die Funktionsweise einer Tone Wheel Orgel Die Klangerzeugung der NUMA Organ 27 27 27 Anschlüsse / Rückseite 28 Bedienelemente Lautstärke einstellen Hinweise zur Anleitung 29 29 29 Bedienung / Drawbars Drawbars (Zugriegel) Exkurs: Das Zusammenspiel von Tasten und Drawbars Spielen mit mehreren Manualen / Tastaturen 30 30 31 31 Bedienung Pitch Wheel Rotary / Modulation Wheel (Rotary Speaker S
Ihre neue NUMA Organ Herzlichen Glückwunsch zu Ihrer neuen NUMA Organ! Damit haben Sie sich für ein erstklassiges Instrument des renommierten Herstellers Studiologic® by Fatar entschieden. Die NUMA Organ wird Sie begeistern! Mit ihrer Physical Modeling Synthese lässt sie ihr elektromechanisches Vorbild aus den 1950er naturgetreu auferstehen. Und die NUMA Organ kann noch mehr. Lesen Sie diese Anleitung aufmerksam durch, damit Sie alle Funktionen der NUMA Organ voll ausschöpfen können.
Was hinter der NUMA Organ steckt Bei der Tone-Wheel-Orgel, die der NUMA Organ als Vorbild diente, rotieren 91 Stahlräder mit wellenförmigen Nocken - die ToneWheels - vor Tonabnehmern, die aus einem Permanentmagneten und einer Spule bestehen. Tone Wheel Die Funktionsweise einer Tone-Wheel-Orgel Magnet Spule Durch die Form der Tone-Wheels ändert sich periodisch das Magnetfeld der Tonabnehmer und erzeugt so eine Sinus-Spannung.
Anschlüsse / Rückseite Rotary Speaker Cabinet, Seite 36 Audio Ausgang L/R Seite 28 Direkt-Ausgang Seite 28 Stereo Audio In • Level Seite 28 Hold • Expression Seite 28, 31 Kopfhörer Ausgang 1/2 Seite 28 USB 1 • Mini USB 2 Seite 28, 36 Sicherung Seite 24, 65 MIDI In•Out•Thru Seite 37 Netz- Schalter • Stecker Seite 24, 28 Netzanschluß Schließen Sie Ihre NUMA Organ über das mitgelieferte Netzkabel an das Stromnetz an. Das Gerät schalten Sie über den daneben befindlichen Kippschalter ein und aus.
Bedienelemente Pitch • Modulation • Rotary Seite 32 Presets Aufrufen / Speichern Seite 35 Chorus • Vibrato 2 x 3 Einstellungen Seite 32 Split • Transpose • Tune Tastatur-Zuordnung Seite 33 Drawbars für Upper, Lower, Pedal Seite 30 - 31 Effects Reverb, Drive, Click, Leakage, Seite 34 Percussion Seite 34 Stellen Sie anfangs den Volume- Regler der Output Sektion etwa mittig zwischen den Einstellungen 0 und Full ein. Während Sie spielen kann die Lautstärke beliebig nachgeregelt werden.
Bedienung / Drawbars • Drawbars Drawbars Die Zugriegel (engl. Drawbars) sind das prägnanteste Erscheinungsmerkmal einer Tone-Wheel-Orgel. Deswegen widmen wir uns ihnen gleich zu Anfang. Im Text werden die Zugriegel der NUMA Organ mit besonders hervorgehobenen Ziffern dargestellt: • Upper (Obermanual) • Lower (Untermanual) • Pedal (Bass-Pedal) 1 2 3 4 5 6 7 8 9 Mit den Zugriegeln stellen Sie die Klangfarben der NUMA Organ ein. Ein Ton kann aus bis zu neun einzelnen SinusFrequenzen bestehen.
Bedienung / Drawbars • Drawbars Mit jedem Tastendruck werden für diese Taste immer gleichzeitig alle neun möglichen Harmonischen erzeugt. Die Zugriegel steuern deren Pegel. So können Sie auch bei gedrückten Taste(n) die Klangfarbe nach belieben über die Zugriegel ändern. Exkurs: Das Zusammenspiel von Tasten und Drawbars Anmerkung: Bei den alten Tone-Wheel-Orgeln befanden sich unter jeder Taste neun Kontakte, die beim Drücken der Taste gleichzeitig geschlossen wurden.
Bedienung • Pitch • Rotary / Modulation • Chorus / Vibrato Pitch Wheel Mit Pitch variieren Sie dynamisch die Tonhöhe während dem Spiel um ±2 Halbtöne. Das Pitch-Wheel ist selbstzentrierend und kehrt nach Loslassen in die Mittenstellung zurück (keine Tonhöhenänderung). Rotary / Modulation Wheel (Rotary Speaker Simulation) Drücken Sie den On/Off Taster neben dem Modulation / RotaryRad, um den Rotary-Speaker bzw. Leslie®Effekt einzuschalten. Der On/Off Taster leuchtet.
Bedienung • Transpose • Tune • Split • Split-Punkt Drücken Sie Split, um in den Split-Modus zu gelangen. Die SplitTaste leuchtet. Das Manual der NUMA Organ ist nun in zwei Zonen geteilt. Drücken Sie den Upper in der Drawbar-Sektion, um die Klangfarbe der oberen Zone einzustellen. Nach drücken von Lower stehen entsprechend die Zugriegel der Klangeinstellung für die untere Zone zur Verfügung. Alternativ kann der unteren Zone auch das Bass-Pedal zugeordnet werden.
Bedienung • Percussion • Effects Percussion Um der Musik mehr Rhythmik zu verleihen, können Sie einen perkussiven Anschlag einschalten. Dieser Percussion-Anschlag erklingt nicht bei jedem Tastendruck, sondern nur wenn davor alle Tasten losgelassen wurden. Drücken Sie den On/Off Taster der Percussion Sektion, um die Percussion zu aktivieren.
Bedienung / Externes Leslie® • EQ / Volume • Preset Aufrufen / Speichern • Fatar dynamic TOUCH Um den Gesamt-Klang der NUMA Organ anzupassen, können Sie sowohl tiefe als auch hohe Frequenzen über die Bass- und TrebleRegler der Equalizer-Sektion anheben oder absenken. Die Lautstärke aller Audio- und Kopfhörer-Ausgänge stellen Sie gemeinsam über den Volume-Regler ein. Beachten Sie bitte die Hinweise auf Seite 29.
Externer Rotary Speaker / Update Externes Rotary Speaker Kabinett System Update 36 NUMA Organ by Studiologic® Sie können Ihre NUMA Organ auch an einem externen RotarySpeaker Kabinet mit 11-Pin Anschluß betreiben. Die Rotor-Geschwindigkeit sowie Start/Stop (Brake) sind ebenso über das Rotary- Wheel oder dem Sustain Pedal bedienbar, wie bei der internen Rotary Speaker Simulation (Seite 30). Schließen Sie an der Rückseite der NUMA Organ das Rotary Speaker Kabinett mit einem geeigneten Kabel an.
MIDI MIDI steht für Musical Instruments Digital Interface und ist ein Standard zur Übertragung von Daten zwischen Klangerzeugern, Synthesizern, Drumcomputern und Musik-Software. Ein MIDI Out wird mit dem MIDI In eines anderen Gerätes verbunden. Über MIDI Thru werden die am MIDI In ankommenden Daten unverändert ausgegeben. MIDI Verbindung Die NUMA Organ sendet MIDI-Daten über den MIDI Out und gleichzeitig über USB 1. Der Empfang von MIDI-Daten erfolgt über MIDI.
MIDI Die NUMA Organ über MIDI ansteuern Sie können die Klangerzeugung der NUMA Organ auch extern ansteuern, z.B. von einem Sequenzer-Programm. Die Folgende Tabelle zeigt, mit welchem MIDI Control Change Befehl Sie welchen Parameter der NUMA Organ fernsteuern können.
MIDI Um die NUMA Organ als Masterkeyboard nutzen zu können, schalten Sie Fatar dynamic TOUCH ein (siehe Seite 35). Hierbei gibt es eine Besonderheit: Ein angeschlossenes Sustain-Pedal sendet bei aktiviertem Fatar dynamic TOUCH den Sustain- bzw. Haltebefehl (MIDI CC 64).
Fehlerbehebung Fehlerbehebung Problem mögliche Ursache Lösung Die NUMA Organ lässt sich nicht anschalten. Kein Strom vorhanden. Defektes Netzkabel. Interne Sicherung ist durchgebrannt. Überprüfen Sie, ob Strom vorhanden ist. Prüfen und tauschen Sie das Netzkabel bzw. lassen Sie die interne Sicherung überprüfen und ggf. austauschen (Spezfikation Seite 65). Die NUMA Organ lässt sich nicht über MIDI steuern. MIDI Daten werden nicht auf Kanal 1, 2 oder 3 gesendet.
Rechtliches Jedes Gerät von Studiologic® by Fatar wird einzeln geprüft und einer vollständigen Funktionskontrolle unterzogen. Die Verwendung ausschließlich hochwertigster Bauteile erlaubt die Gewährung von zwei Jahren Garantie. Als Garantienachweis dient der Kaufbeleg / Quittung. Schäden, die durch unsachgemäßen Einbau oder unsachgemäße Behandlung entstanden sind, unterliegen nicht der Garantie und sind daher bei Beseitigung kostenpflichtig.
ITALIANO Manuale di Istruzione NUMA Organ by Studiologic® 43 I
Informazioni di sicurezza Importanti informazioni di sicurezza Leggi attentamente il manuale. Esso contiene tutte le informazioni di cui hai bisogno per utilizzare questo strumento. Segui le istruzioni nel manuale. La garanzia verrà annullata qualora venissero effettuati interventi non autorizzati nel NUMA Organ. Possono essere utilizzati solo accessori specificati dal costruttore. Usa lo strumento solo come indicato in questo manuale. PERICOLO! Rischio di scossa elettrica. Non aprire lo chassis.
Indice Importanti informazioni di sicurezza 44 Il tuo nuovo NUMA Organ 46 Cosa c‘è dietro NUMA Organ Come funziona un organo a ruote foniche Il motore sonoro di NUMA Organ 47 47 47 Connessioni / Vista posteriore 48 Pannello di controllo Volume Indicazione delle funzioni nel manuale 49 49 49 Operatività / Drawbars Drawbars Excursus: Come sono relazionati manuale e drawbars Estensioni con altri manuali 50 50 51 51 Operatività Pitch Wheel Rotary / Modulation Wheel (Simulazione del Rotary Speaker) C
Il tuo nuovo NUMA Organ Grazie per aver scelto NUMA Organ. Hai scelto uno strumento allo stato dell‘arte, costruito da un rinomato produttore: Studiologic® by Fatar. Prendi l‘ispirazione dal nuovo Numa Organ! La sua sintesi per modelli fisici è la rivisitazione più autentica dell‘organo elettromagnetico a ruote foniche. Ma il Numa Organ è molto di più. Ti raccomandiamo di leggere attentamente l‘intero manuale per poter usufruire dei vantaggi di tutte le funzioni del tuo nuovo NUMA Organ.
Cosa c‘è dietro NUMA Organ In un organo originale a ruote foniche, il modello di riferimento per il NUMA Organ, 91 ruote d‘acciaio con lobi ruotano di fronte a dei pick-up costituiti da una barra magnetica con una bobina. Ruota fonica Come funziona un organo a ruote foniche Magnete Bobina Grazie alla sua forma e alla sua rotazione, il campo magnetico nel pick-up cambia periodicamente generando un‘onda sinuosidale.
Connessioni / Vista posteriore Rotary Speaker Cabinet, Pagina 56 Audio out L/R Pagina 48 Direct-out Pagina 48 Stereo audio in • Level Pagina 48 Hold • Expression Pagine 48, 51 Uscite Cuffie 1/2 Pagina 48 USB 1 • Mini USB 2 Pagine 48, 57 Fusibili Pagine 4, 65 MIDI In•Out•Thru Pagina 57 Interruttore • Alim. Pagine 4, 48 Connessione alimentazione Usa il cavo di alimentazione in dotazione con NUMA Organ per connettere lo strumento alla presa di corrente.
Pannello di controllo Pitch / Modulation / Rotary Pagina 52 Presets Richiamo / memoria Pagina 55 Chorus • Vibrato 2 x 3 variations Pagina 52 Split • Transpose •Tune Funzioni di tastiera Pagina 53 Drawbars per Upper, Lower, Pedal Pagina 50 - 51 Effects Reverb, Drive, Click, Leakage, Pagina 54 Percussion Pagina 54 Quando usi il NUMA Organ per la prima volta, ti raccomandiamo di impostare il cursore del Volume della sezione Output ad un valore non superiore alla metà della sua corsa.
Operatività / Drawbar • Drawbar Drawbars I Drawbar sono un tratto caratteristico degli organi a ruote foniche. Per questo andremo ad esplorarli per primi. Nel testo, i drawbar del NUMA Organ sono indicati da numeri colorati ed evidenziati come segue. • Upper • Lower • Pedal 1 2 3 4 5 6 7 8 9 Usa i drawbar per impostare il timbro del NUMA Organ. Un suono può comprendere fino a 9 onde sinusoidali.
Operatività / Drawbar • Drawbars Ad ogni pressione di un tasto vengono generati tutti e nove gli armonici. I drawbar ne regolano semplicemente il livello. Perciò puoi cambiare il timbro mentre i tasti sono premuti. Excursus: Come sono relazionati manuale e drawbars Nota: Negli organi elettromeccanici, sotto ad ogni singolo tasto erano posizionati nove contatti che si chiudevano contemporaneamente alla pressione del tasto stesso. Un sistema di circuiti regolava poi il volume di cia-scuno dei nove drawbar.
Operatività • Pitch • Rotary / Modulation • Chorus / Vibrato Pitch Wheel Per variare l‘altezza di ±2 semitoni mentre suoni, usa la ruota Pitch posta sulla sinistra. La ruota si riposiziona al centro automaticamente al suo rilascio. Rotary / Modulation Wheel (Simulazione del Rotary Speaker) Premi il bottone On/Off dopo la ruota Modulation / Rotary per attivare il simulatore del Rotary Speaker. Il bottone On/Off si accenderà. Usa la ruota Modulation / Rotary per variare la velocitò del Rotary Speaker.
Operatività • Transpose •Tune • Split • Split point Premi Split per attivare questa funzione. Il pulsante Split si illumina ed il manuale si divide in due zone. Premi Upper nella sezione drawbar per regolare il timbro della zona relativa. Premi Lower per assegnare i drawbar alla zona lower. In alternativa puoi assegnare alla zona Lower il manuale del Pedal. Per far questo, premi Pedal to Lower. Il pulsante si illuminerà. Per assegnare poi i drawbar alla zona Lower, premi Pedal nella sezione drawbar.
Operatività • Percussion • EQ / Volume • Effects Percussion Per aggiungere più elementi ritmici alla performance, puoi usare Percussion. Questo effetto ritriggera solo quando tutte le note sono state rilasciate. Premi On/Off per attivare Percussion. Con i pulsanti 2nd/3rd puoi decidere dove viene generata la Percussion: dalla seconda armonica (il pulsante non è acceso), o dalla terza armonica (il pulsante si accende). Slow/Fast definisce il decadimento della Percussione.
Operatività • Preset recall / store • Fatar dynamic TOUCH Puoi anche usare il tuo NUMA Organ come master keyvoard, controllando i suoni di expander esterni nel pieno range dinamico MIDI. Premi Fatar Dynamic Touch, il bottone si accenderà. Ora le note MIDI saranno inviate, in tutta l‘escursione dinamica, alle porte MIDI out e USB. In questo stato, il generatore sonoro interno non è attivo (Local-off, MIDI-on).
Rotary Speaker esterno / Aggiornamenti Rotary Speaker Esterno Aggiornamento di sistema 56 NUMA Organ by Studiologic® Puoi amplificare il NUMA Organ con un amplificatore Rotary Speaker esterno tramite il connettore ad 11 Pin. La velocità del rotore, così come lo Start/Stop (Brake) sono controllabili con la ruota Rotary ed il pedale Sustain. Il funzionamento è identico al simulatore Rotary Speaker interno (pagina 52).
MIDI MIDI (Musical Instruments Digital Interface) è uno standard per la trasmissione dei dati tra moduli sonori, sintetizzatori, batterie elettroniche e computer. Nota: il MIDI Out di una periferica si collega al MIDI In di un‘altra. I dati che arrivano al MIDI In vengono duplicati e trasmessi dalla porta MIDI Thru. Connessioni MIDI Il NUMA Organ invia i dati MIDI data al MIDI Out e contemporaneamente alla porta USB 1. I dati MIDI vengono ricevuti al MIDI In.
MIDI Controllare il NUMA Organ via MIDI Puoi suonare e controllare i suoni del NUMA Organ con un‘altra tastiera MIDI o con il computer. Le seguenti tabelle mostrano i messaggi Control Change MIDI che agiscono sui parametri del NUMA Organ.
MIDI Per usare il NUMA Organ come masterkeyboard MIDI, accendi il pulsante Fatar dynamic TOUCH, come descritto a pag. 55. Usare il NUMA Organ come masterkeyboard MIDI Se il Fatar dynamic TOUCH è attivo, il pedale Sustain collegato invierà il messagio MIDI di sustain (CC 64) alle porte esterne, ma al modulo interno continuerà a controllare il Rotary Speaker. Il NUMA Organ invia ai canali MIDI 1 2 e 3 tutti i parametri e le regolazioni fatte.
Risoluzione del problemi Risoluzione dei problemi Problema Possibili cause Soluzioni Il NUMA Organ non si accende. Non c‘è alimentazione. Cavo di alimentazione difettoso. Fusibile bruciato nel NUMA Organ. Assicurati che ci sia corrente. Controla il cavo di alimentazione ed il fusibile (sostituiscilo se necessario con uno dello stesso tipo cf. pagina 65) NUMA Organ non può esser controllato MIDI. I dati MIDI non sono inviati ai canali MIDI 1, 2 or 3. Invia i dati MIDI solo sui canali 1, 2 e/o 3.
Dichiarazioni Tuti i prodotti Studiologic® by Fatar sono cotruiti attentamente, calibrati, testati, e sono soggetti a garanzia di due anni. Registra il tuo NUMA Organ per avere pieno supporto. Danni causati da trasporto o montaggio non conforme o da errata manutenzione non sono coperti da questa garanzia. Rimborsi di importo superire al valore dello strumento sono esclusi. Tutto questo è basato su termini e condizioni del distributore / FATAR srl, Italy. Garanzia FATAR srl Zona Ind.
Appendix Appendix NUMA Organ by Studiologic® 63
Appendix MIDI Implementation Chart Studiologic NUMA Organ Basic information Transmitted Recognized MIDI channels 1-3 1-3 Note numbers 0 - 127 0 - 127 MIDI Mode --- multi Note-On velocity yes yes Note-Off velocity no no Aftertouch no no Pitch Bend yes yes MIDI CC Transmitted Recognized 1 Modulation yes yes 7 Volume yes yes 8 Balance yes yes 9 Undefined yes yes 11 Expression yes yes 12 Effect Control 1 yes yes 13 Effect Control 2 yes yes 14 Undefined
Appendix Studiologic NUMA Organ Keyboard Sound Engine Effects Processor Number of Keys 61 + 12 Type Waterfall Organ Action (TP8O) Velocity Curves Fixed, Fatar dynamic TOUCH Polyphony 91 tone wheel simulations Type Physical Modeling Voices / Instruments 3 (Upper, Lower , Pedal) Reverb Spring-Reverb Modulation Chorus, Vibrato, Rotary Others Drive, Key Click, Leakage EQ Low Shelf @ 180Hz, ±12dB High Shelf @ 3,5kHz, ±12dB Display no Connections Audio Out Left/Right, 6,3mm phone jack
www.studiologic-music.com Ub 05.