ENGLISH 01 ITALIANO 20 DEUTSCH 39 FRANÇAIS 58 ESPAÑOL 77
Instruction manual VMK-149plus/VMK-188plus VMK INTRODUCTION 2 CONTINUOUS CONTROLLERS 3 KEYBOARD LAYOUT PRESET CREATION: A SUMMARY 4-6 7 PROCEDURES: PRESET SELECTION AND NAMING 8-9 KEYBOARD PROGRAMMING 10-12 SLIDERS/KNOBS PROGRAMMING 13-14 BUTTON PROGRAMMING 15-16 PEDAL PROGRAMMING 17-18 LIVE EDIT 19
Instruction manual VMK-149plus/VMK-188plus VMK INTRODUCTION Welcome to the wonderful world of the Studiologic VMK series! The VMKs are multi-level programmable keyboard controllers The VMK-149plus is the world’s first keyboard with 49 full-weighted piano keys, and the VMK-188plus has an 88-note keyboard. Both have the famous FATAR key action. They are functionally identical except for the number of keys.
Instruction manual VMK-149plus/VMK-188plus CONTINOUS CONTROLLER Among the Midi messages (note that on/off is a Midi message) is a set of 128 “continuous controller ”messages (often abbreviated “CC ”). These are mainly used to send the movements of knobs, sliders, pedals, and so forth. For example, a synth’s modulation wheel is sending a CC message which will almost always be CC number 1. (See list below.
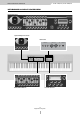
Instruction manual VMK-149plus/VMK-188plus KEYBOARD LAYOUT: OVERVIEW Full Control Panel Joystick Transport Controls Back Panel PEDAL IN 3 Knobs/Sliders/Buttons 2 MIDI OUT 1 Live Edit Controls 4 keyboard layout 9V POWER
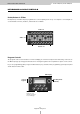
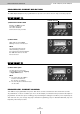
Instruction manual VMK-149plus/VMK-188plus KEYBOARD LAYOUT: DETAILS Knobs,Buttons & Sliders Knobs,buttons, and sliders may be programmed to control anything from a loop on a sampler to reverb depth on a sound module. 8 knobs, 8 buttons, and 9 sliders are available.
Instruction manual VMK-149plus/VMK-188plus KEYBOARD LAYOUT: DETAILS Back Panel The back panel contains the connective parts of the keyboard: Dual Midi outputs and 3 independent foot controller inputs. The pedal inputs can accept sustain or volume pedals, each capable of sending out a completely different controller message. Pedal inputs can be programmed to accept almost any variety of manufacturers foot pedals regardless of polarity.
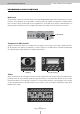
Instruction manual VMK-149plus/VMK-188plus Preset Creation: A Summary Preset creation is an easy process involving the use of the program controls shown in the KEYBOARD LAYOUT section of this manual. You start by choosing a preset number using the DE knob and hitting the ENTER button. Choose a preset number higher than 3 so as not to overwrite the software presets. You can either choose an unused number or overwrite a previously written preset.
Instruction manual VMK-149plus/VMK-188plus PROCEDURE: PRESET SELECTION The VMK-149plus/188plus has 27 programmable user presets. Let’s look into the two ways of selecting a preset. QUICK SELECT (A) CURSOR will blink 1) ROTATE DATA ENTRY KNOB Rotating the DE Knob will scroll thru the Presets. The cursor will blink. Scroll to the Preset you want PRESET NUM: NAME 1 PRESET NUM: NAME 15 2) PRESS ENTER Wait until the cursor stops blinking. Preset is now selected.
Instruction manual VMK-149plus/VMK-188plus 1) PRESS STORAGE You will save your program to a user preset. Storage and Enter buttons now function as No or Yes buttons. SCREEN CHANGE STORE PARAMETERS NO YES NOTE: If you select No you’ll be taken back to the “Press or move any Control” Page. 2) PRESS ENTER (Yes) In this example we’ll choose Yes. NOTE: If you’d like to move to a different Preset location use the DE knob.
Instruction manual VMK-149plus/VMK-188plus PROCEDURE: KEYBOARD PROGRAMMING The VMK-149plus/188plus can store 27 user programmable patches. Not only does each patch contain programming information for buttons, sliders, knobs and pedals, the KEYBOARD itself, as a controller, can be customized. Each Patch can contain MIDI Channel, Aftertouch, Transpose, Program Change and Bank Select information. 1) PRESS EDIT SCREEN CHANGE 2) PRESS KEY You may Press any key on the Keyboard.
Instruction manual VMK-149plus/VMK-188plus To adjust the Transpose value use the DE knob 6) PRESS PAGE UP Transpose can be adjusted from 0 to +24 or 0 to -24 SCREEN CHANGE KEYBOARD EDIT TRANSPOSE:+ 0 To adjust the After Touch value use the DE knob 7) PRESS PAGE UP You have the option to program After Touch on or off for each Patch. SCREEN CHANGE KEYBOARD EDIT AFTER TOUCH: ON 6) PRESS STORAGE You have the option to program After Touch on or off for each Patch.
Instruction manual VMK-149plus/VMK-188plus 9) PRESS ENTER (Yes) Wait for the keyboard to Scan Controls. You will now return to the Preset page. SCREEN CHANGE 12 keyboard PRESET NUM.
Instruction manual VMK-149plus/VMK-188plus PROCEDURE: SLIDER / KNOB PROGRAMMING We will set up a SLIDER to behave like an analog mixer fader. Fader Down>min. volume. Fader Up>Max. Vol. Programing KNOBS follows the Exact same procedure. TIP: Unlike an analog mixer you might not want your minimum volume to be 0 (no sound). You may just want a track to “sit” in the mix. Therefore you should choose a value greater than 0.
Instruction manual VMK-149plus/VMK-188plus 6) PRESS PAGE UP In this example select DN>UP When the Slider is in the DOWN position it will send a Value of O when UP a Value of 127. To adjust the Polarity value use the DE knob SCREEN CHANGE EDIT SLIDER: 51 POLARITY: DN>UP SCREEN CHANGE STORE PARAMETER NO YES 7) PRESS STORAGE You are now going to save your program to a user preset. NOTE: Storage and Enter buttons now function as No and Yes buttons.
Instruction manual VMK-149plus/VMK-188plus PROCEDURE: BUTTON PROGRAMMING We will set up a BUTTON to behave like a simple ON/OFF switch, or Latch Switch. Press the BUTTON once and the Switch will be on. Press the BUTTON again and the Switch will be off. Programming Transport BUTTONS follows the exact same procedure. TIP: This can be very useful to control the Mutes on your Audio/Sequencing program.
Instruction manual VMK-149plus/VMK-188plus 5) continued... To adjust the Key Mode use the DE knob PUSH: will send a Note on Message when pushed down. When you release the button, a Note off Message will be sent. The BUTTON will only work when you are actually Pushing it down. SCREEN CHANGE EDIT BUTTON: B1 KEY MODE: PUSH SCREEN CHANGE STORE PARAMETER NO YES 6) PRESS STORAGE You are now going to save your program to a user preset. NOTE: Storage and Enter buttons now function as No and Yes buttons.
Instruction manual VMK-149plus/VMK-188plus PROCEDURE: PEDAL PROGRAMMING We will program PEDAL INPUT 1 to transmit Sustain. For this procedure you will need a Sustain Pedal. Any polarity pedal will work. TIP: The three PEDAL INPUTS may be programed to transmit anything from Sustain to Volume to even Modulation. A PEDAL INPUT, when connected to a Volume Pedal , can transmit the same CNTRL Values as the SLIDERS or KNOBS. Remember, you have three PEDAL INPUTS to work with.
Instruction manual VMK-149plus/VMK-188plus 6) PRESS PAGE UP This is where the flexibility of the VMK comes into play. You can adjust the Polarity to the Pedal that’s being used. If there’s sustain without the Pedal being depressed just adjust the Polarity on the VMK to fit the pedal. To adjust the Polarity value use the DE knob SCREEN CHANGE EDIT PEDALS: -1POLARITY: DN>UP SCREEN CHANGE STORE PARAMETER NO YES 7) PRESS STORAGE You are now going to save your program to a user preset.
Instruction manual VMK-149plus/VMK-188plus PROCEDURE: LIVE EDIT The ability to quickly send a Program Change or Bank Select change or change the Midi Channel without altering the original Preset program. In this example you will send a quick Program Change to your sound source. Sending a Bank Change or changin the Midi Channel, follows the EXACT same procedure. Although you will select those options in step 1.
manuale di istruzione VMK-149plus/VMK-188plus INTRODUZIONE AL VMK 21 CONTROLLER CONTINUI 22 CONFIGURAZIONE DELLA TASTIERA CREAZIONE DI PRESET: DESCRIZIONE RIASSUNTIVA 23-25 26 PROCEDURE: SELEZIONE E IDENTIFICAZIONE DEI PRESET 27-28 PROGRAMMAZIONE DELLA TASTIERA 29-31 PROGRAMMAZIONE DEI CURSORI E DEI POTENZIOMETRI 32-33 PROGRAMMAZIONE DEI PULSANTI 34-35 PROGRAMMAZIONE DEL PEDALE 36-37 LIVE EDIT 38
manuale di istruzione VMK-149plus/VMK-188plus INTRODUZIONE AL VMK Benvenuti nel meraviglioso mondo della serie VMK Studiologic! I VMK sono tastiere controller programmabili a più livelli. Il VMK-149 è la prima tastiera al mondo con 49 tasti completamente pesati, e il VMK-188 ha una tastiera di 88 note. Entrambi sono dotati del famoso tasto azione FATAR. Funzionalmente, essi sono identici ad eccezione del numero dei tasti.
manuale di istruzione VMK-149plus/VMK-188plus CONTROLLER CONTINUI Tra i messaggi Midi (nota che on/off è un messaggio Midi) c’è un gruppo di 128 messaggi “Controller Continui” (spesso abbreviati “CC”). Questi sono utilizzati principalmente per inviare i movimenti ai potenziometri, ai cursori, ai pedali e così via. Per esempio, una ruota di modulazione di un sintetizzatore che stia inviando un messaggio CC sarà quasi sempre un CC numero 1. (Vedi l’elenco che segue).
Instruction manual VMK-149plus/VMK-188plus CONFIGURAZIONE DELLA TASTIERA: IN GENERALE Pannello di controllo generale Joystick Controlli di Trasporto Retro del Pannello PEDAL IN 3 Potenziometri/Cursori/Pulsanti 2 MIDI OUT 1 Controlli Live Edit 23 configurazione tastiera 9V POWER
manuale di istruzione VMK-149plus/VMK-188plus CONFIGURAZIONE DELLA TASTIERA: IN DETTAGLIO Potenziometri, Pulsanti & Cursori Potenziometri, pulsanti e cursori possono essere programmati per controllare qualsiasi cosa, da un collegamento su un campionatore fino ad amplificare la profondità di un sound module. Sono disponibili 8 potenziometri, 8 pulsanti e 9 cursori.
manuale di istruzione VMK-149plus/VMK-188plus CONFIGURAZIONE DELLA TASTIERA: IN DETTAGLIO Pannello posteriore Il pannello posteriore contiene le parti connettive della tastiera: il duplice output MIDI e 3 input a pedale indipendenti. Gli input a pedale possono accettare pedali sustain o volume, ciascuno in grado di inviare un messaggio controller completamente diverso.
manuale di istruzione VMK-149plus/VMK-188plus Creazione Preset: una sintesi La creazione preset è un procedimento semplice che comprende l’uso dei controlli programma mostrato nella sezione CONFIGURAZIONE TASTIERA di questo manuale. Si inizia scegliendo un numero preset utilizzando il potenziometro DE e premendo il pulsante ENTER. Scegliete un numero preset maggiore di 3 in modo da non sovrascrivere sui software già programmati.
manuale di istruzione VMK-149plus/VMK-188plus PROCEDURA: SELEZIONE PRESET Il VMK-149/188 ha 27 preset programmabili dall’utente. Ci sono due modi per selezionare un preset. SELEZIONE VELOCE (A) Il cursore lampeggerà 1) RUOTARE IL POTENZIOMETRO DATA ENTRY Ruotando il potenziometro DE farà scorrere l’elenco dei Preset. Il cursore lampeggerà. Far scorrere fino al Preset che desiderate. PRESET NUM: NAME 1 PRESET NUM: NAME 15 2) PREMERE ENTER Aspettare finché il cursore smette di lampeggiare.
manuale di istruzione VMK-149plus/VMK-188plus 1) PREMERE STORAGE Salverete il vostro programma per un preset dell’utente (personalizzato). I pulsanti Storage e Enter adesso funzionano come pulsanti No o Yes. CAMBIO SCHERMO STORE PARAMETERS NO YES NOTA: Se selezionate No tornerete indietro alla Pagina “Press or Move any Control”. 2) PREMERE ENTRY (Yes) In questo esempio sceglieremo Yes. NOTA: Se volete spostarvi ad una locazione diversa di Preset, usate il potenziometro DE.
manuale di istruzione VMK-149plus/VMK-188plus PROCEDURA: PROGRAMMAZIONE DELL A TASTIERA Il VMK-149/188 può memorizzare 27 patch programmabili dall’utente. Non solo ciascun patch contiene informazioni programmate per pulsanti, cursori, potenziometri e pedali, ma la stessa tastiera, in quanto controller, può essere personalizzata. Ciascun Patch può contenere informazioni relative a Canali MIDI, Aftertouch, Trasposizione, Cambiamento dei programmi e Selezione Banchi.
manuale di istruzione 6) PREMERE PAGE UP La funzione Trasposizione può essere aggiustata da 0 a +24 oppure da 0 a –24. VMK-149plus/VMK-188plus Per aggiustare il valore di Trasposizione usare il potenziometro DE CAMBIO SCHERMO KEYBOARD EDIT TRANSPOSE:+ 0 Per aggiustare il valore After Touch usare il potenziometro DE 7) PREMERE PAGE UP Avete l’opzione di programmare l’After Touch on o off (attivo o disattivo) per ogni Patch.
manuale di istruzione VMK-149plus/VMK-188plus 9) PREMERE ENTER (Yes) Attendere che la tastiera effettui i Controlli Scan. Tornerete ora alla pagina Preset. CAMBIO SCHERMO 31 tastiera PRESET NUM.
manuale di istruzione VMK-149plus/VMK-188plus PROCEDURA: Programmazione Cursore/Potenziometro Programmeremo un CURSORE in modo tale da funzionare come un fader mixer analogico. Fader in basso> volume minimo (Min.). Fader in alto> volume massimo (Max). La programmazione dei POTENZIOMETRI segue esattamente la stessa procedura. SUGGERIMENTO: Diversamente dal mixer analogico, potreste non volere che il volume minimo corrisponda a zero (nessun suono).
manuale di istruzione VMK-149plus/VMK-188plus 6) PREMERE PAGE UP Per aggiustare il valore di Polarity usare il potenziometro DE In questo esempio selezionate DN>UP Quando il cursore è nella posizione DOWN esso invierà un Valore di 0. Quando invece è UP un Valore di 127. 7) PREMERE STORAGE SCREEN CHANGE EDIT SLIDER: 51 POLARITY: DN>UP SCREEN CHANGE STORE PARAMETER NO YES State ora salvando il vostro programma per un preset personalizzato.
manuale di istruzione VMK-149plus/VMK-188plus PROCEDURA: PROGRAMMAZIONE PULSANTE Procederemo in modo che un Button (Pulsante) si comporti come un semplice interruttore ON/OFF, o interruttore a chiavistello (Latch). Premete il Pulsante una volta a l’Interruttore sarà acceso. Premete ancora il Pulsante e l’interruttore sarà spento. La programmazione dei Pulsanti Trasporto segue esattamente la stessa procedura.
manuale di istruzione VMK-149plus/VMK-188plus 5) continua... Per aggiustare Key Note usare il potenziometro DE PUSH (Spingere): invierà un Messaggio Note on (nota attiva) se spinto verso il basso. Quando rilascerete il pulsante, sarà inviato un Messaggio Note off (nota disattiva). Il PULSANTE (Button) funzionerà soltanto quando effettivamente lo spingerete in basso.
manuale di istruzione VMK-149plus/VMK-188plus PROCEDURA: PEDAL PROGRAMMING Programmeremo il PEDALE INPUT 1 per trasmettere il Sustain. Per questa procedura avrete bisogno di un Pedale Sustain. Qualsiasi pedale polarity funzionerà comunque. SUGGERIMENTO: i tre PEDALI INPUT possono essere programmati per trasmettere qualsiasi cosa dal Sustain al Volume, fino alla Modulazione. Un PEDALE INPUT, quando è connesso ad un Pedale Volume, può trasmettere gli stessi valori CNTRL dei CURSORI o dei POTENZIOMETRI.
Instruction manual VMK-149plus/VMK-188plus 6) PREMERE PAGE UP Questo è il momento in cui la flessibilità del VMK entra in gioco. Potete aggiustare la Polarity del Pedale che è in funzione. Se c’è sustain senza che il pedale sia premuto, semplicemente aggiustate la Polarity del VMK per farla andar bene col pedale.
Manuale di Istruzione VMK-149plus/VMK-188plus PROCEDURA: LIVE EDIT L’abilità di inviare velocemente un Cambio di Programma o di una Bank Select o del Canale Midi senza alterare il programma Preset originale. In questo esempio invierete un veloce Program Change alla vostra fonte sonora. Per inviare un Cambio di Banco o per cambiare il Canale Midi, seguite ESATTAMENTE la stessa procedura. Sebbene selezionerete queste opzioni nel primo passaggio (step 1).
B e d i e n h a n d b u c h VMK-149plus/VMK-188plus VMK EINLEITUNG 40 STETIGE REGLER 41 TASTATUR-LAYOUT VORNAHME DER VOREINSTELLUNGEN EINE ZUSAMMENFASSUNG 42-44 45 VERFAHREN: AUSWAHL UND BENENNUNG DER VOREINSTELLUNGEN 46-47 TASTATUR-PROGRAMMIERUNG 48-50 PROGRAMMIERUNG DER SCHIEBER/KNÖPFE 51-52 TASTEN-PROGRAMMIERUNG 53-54 PEDAL-PROGRAMMIERUNG 55-56 LIVE EDIT 57
B e d i e n h a n d b u c h VMK-149plus/VMK-188plus VMK EINLEITUNG Willkommen in der wunderbaren Welt der Studiologic VMK Serie! Die VMKs sind mehrstufig programmierbare Tastaturregler. Die VMK-149plus ist die erste Tastatur in der Welt mit 49 voll gewichteten Klaviertasten, und die VMK-188plus hat eine Tastatur mit 88 Noten. Beide verfügen über die bekannte FATAR-Tastenfunktion. Sie sind bis auf eine Reihe von Tasten funktional identisch.
Bedienhandbuch VMK-149plus/VMK-188plus STETIGE REGLER Die Midi-Mitteilungen (man beachte, dass on/off eine Midi-Mitteilung ist) bestehen aus 128 "Stetigregler"Mitteilungen (häufig mit "CC" abgekürzt). Diese werden hauptsächlich benutzt, um die Bewegungen der Knöpfe, Schieber, Pedale usw. zu versenden. Zum Beispiel sendet ein Modulationsrad des Synthesizers eine CC-Mitteilung, die fast immer die CC-Nummer 1 hat. (Siehe Liste unten.
Bedienhandbuch VMK-149plus/VMK-188plus TASTATUR-LAYOUT ÜBERSICHT Vollständige Bedientafel Joystick-Transport-Regler Rückwand PEDAL IN 3 Knöpfe/Schieber/Tasten 2 MIDI OUT 1 Live Edit-Regler 42 Ta s t a t u r - L a y o u t 9V POWER
Bedienhandbuch VMK-149plus/VMK-188plus TASTATUR-LAYOUT: DETAILS Knöpfe, Tasten und Schieber Die Knöpfe, Tasten und Schieber können so programmiert werden, dass alles von einer Schleife auf einem Sampler bis zur Halltiefe auf einem Klangmodul geregelt werden kann. Es sind 8 Knöpfe, 8 Tasten und 9 Schieber vorhanden.
B e d i e n h a n d b u c h VMK-149plus/VMK-188plus TASTATUR-LAYOUT: DETAILS Rückwand Die Rückwand enthält die Anschlussteile der Tastatur: Dual Midi-Ausgänge und 3 unabhängige Fußreglereingänge. Die Pedaleingänge können die Halte- oder Lautstärkepedale aufnehmen, wobei jeder eine vollkommen andere Reglermitteilung aussenden kann. Die Pedaleingänge können so programmiert werden, dass sie fast alle Varianten von Fußpedalen der Hersteller unabhängig von der Polarität akzeptieren.
Bedienhandbuch VMK-149plus/VMK-188plus Vornahme der Voreinstellungen: Eine Zusammenfassung Es ist einfach, die Voreinstellungen vorzunehmen, wenn man die im Abschnitt TASTATUR-LAYOUT dieses Handbuchs gezeigten Programmregler benutzt. Sie beginnen, indem Sie mit dem DE-Knopf eine Voreinstellnummer auswählen und die ENTER-Taste drücken. Wählen Sie eine Voreinstellnummer aus, die größer als 3 ist, damit Sie nicht die Software-Voreinstellungen überschreiben.
Bedienhandbuch VMK-149plus/VMK-188plus VERFAHREN: AUSWAHL DER VOREINSTELLUNGEN Die VMK-149plus/188plus hat 27 programmierbare Benutzervoreinstellungen. Wie wollen uns die beiden Möglichkeiten der Auswahl einer Voreinstellung ansehen. SCHNELLAUSWAHL (A) KURSOR blinkt 1) DREHEN SIE DEN DATENEINGABEKNOPF Durch Drehen des DE-Knopfes blättern Sie durch die Voreinstellungen. Der Kursor blinkt. Blättern Sie zur gewünschten Voreinstellung.
Bedienhandbuch VMK-149plus/VMK-188plus 1) DRÜCKEN SIE STORAGE Sie speichern Ihr Programm in eine Benutzervoreinstellung. Die Tasten Storage und Enter wirken jetzt als Ja-oder Nein-Tasten. BILDSCHIRMÄNDERUNG STORE PARAMETERS NO YES ANMERKUNG: Wenn Sie Nein wählen, kehren Sie zur Seite “Press or move any Control” zurück. 2) DRÜCKEN SIE ENTER (Ja) In diesem Beispiel wählen wir Ja. ANMERKUNG: Verwenden Sie den DE-Knopf, wenn Sie zu einem anderen Voreinstellort gelangen möchten.
Bedienhandbuch VMK-149plus/VMK-188plus VERFAHREN: TASTATUR -PROGRAMMIERUNG Die VMK-149plus/188plus kann 27 benutzerprogrammierbare Klangprogramme speichern. Jedes Klangprogramm enthält nicht nur Programminformationen für Tasten, Schieber, Knöpfe und Pedale, die TASTATUR selbst kann als Regler den Kundenwünschen angepasst werden. Jedes Klangprogramm kann MIDI Channel, Aftertouch, Transpose, Program Change und Bank Select Informationen enthalten.
Bedienhandbuch VMK-149plus/VMK-188plus Stellen Sie den Transpose-Wert mit dem DE-Knopf ein. 6) DRÜCKEN SIE PAGE UP Transpose kann von 0 bis +24 oder 0 bis –24 eingestellt werden BILDSCHIRMÄNDERUNG KEYBOARD EDIT TRANSPOSE:+ 0 Stellen Sie den After Touch-Wert mit dem DE-Knopf ein. 7) DRÜCKEN SIE PAGE UP Für jedes Klangprogramm können Sie After Touch an- oder ausschalten.
Bedienhandbuch VMK-149plus/VMK-188plus 9) DRÜCKEN SIE ENTER (Ja) Warten Sie, bis die Tastatur die Steuerungen abgesucht hat. Jetzt kehren Sie auf die Preset-Seite zurück. BILDSCHIRMÄNDERUNG 50 Ta s t a t u r - p r o g r a m m i e r u n g PRESET NUM.
Bedienhandbuch VMK-149plus/VMK-188plus VERFAHREN: SCHIEBER- / KNOPF-PROGRAMMIERUNG Wir richten einen SCHIEBER ein, der sich wie ein analoger Mixerfader verhält. Fader Down > min. Lautstärke. Fader Up > max. Lautstärke. Die Programmierung der KNÖPFE erfolgt auf genau dieselbe Weise. TIPP: Anders als beim analogen Mixer könnte es sein, dass Sie die minimale Lautstärke nicht bei 0 (kein Ton) haben wollen. Sie möchten nur eine Spur haben, um im Mix "zu sitzen".
Bedienhandbuch VMK-149plus/VMK-188plus 6) DRÜCKEN SIE PAGE UP In diesem Beispiel wählen wird DN>UP. Wenn der Schieber in der Position DOWN ist, sendet er einen Wert von 0, bei UP einen Wert von 127. Stellen Sie mit dem DE-Knopf den Polarity-Wert ein. BILDSCHIRMÄNDERUNG EDIT SLIDER: 51 POLARITY: DN>UP BILDSCHIRMÄNDERUNG STORE PARAMETER NO YES 7) DRÜCKEN SIE STORAGE Jetzt speichern Sie Ihr Programm in eine Benutzervoreinstellung.
Bedienhandbuch VMK-149plus/VMK-188plus VERFAHREN: TASTEN-PROGRAMMIERUNG Wir richten eine TASTE ein, die sich wie ein einfacher An-/Ausschalter oder Sperrschalter verhält. Drücken Sie die TASTE einmal, und der Schalter ist angeschaltet. Drücken Sie die TASTE noch einmal, und der Schalter ist ausgeschaltet. Zur Programmierung der Transport-TASTEN ist genau dasselbe Verfahren zu befolgen. TIPP: Das kann sehr nützlich sein, um die Stummschaltungen in Ihrem Audio/Sequenzer-Programm zu steuern.
Bedienhandbuch VMK-149plus/VMK-188plus 5) Fortsetzung... Stellen Sie Key Mode Sie mit dem DE-Knopf ein. PUSH: wenn gedrückt, wird eine Note on-Mitteilung verschickt. Wenn Sie die Taste loslassen, wird eine Note off-Mitteilung verschickt. Die TASTE funktioniert nur, wenn Sie sie wirklich herunterdrücken. EDIT BUTTON: B1 KEY MODE: PUSH 6) DRÜCKEN SIE STORAGE Jetzt speichern Sie Ihr Programm in eine Benutzervoreinstellung.
Bedienhandbuch VMK-149plus/VMK-188plus VERFAHREN: PEDAL-PROGRAMMIERUNG Wir programmieren den PEDALEINGANG 1, um Halten zu senden. Dazu benötigen wir ein Haltepedal. Es funktioniert jede Polarität. TIPP: Die drei PEDALEINGÄNGE können so programmiert werden, dass sie von Halten bis Lautstärke und selbst bis zu Modulation alles senden. Ein PEDALEINGANG kann dieselben CTRL-Werte wie SCHIEBER oder KNÖPFE senden, wenn er an ein Lautstärkepedal angeschlossen wird.
Bedienhandbuch VMK-149plus/VMK-188plus 6) DRÜCKEN SIE PAGE UP An dieser Stelle kommt die Flexibilität der VMK ins Spiel. Sie können die Polarität an die des benutzen Pedals anpassen. Wenn gehalten werden soll, ohne das Pedal zu drücken, passen Sie einfach die Polarität an der VMK ans Pedal an. Stellen Sie den Polarity-Wert mit dem DE-Knopf ein.
Bedienhandbuch VMK-149plus/VMK-188plus VERFAHREN: LIVE EDIT Die Möglichkeit, schnell ein Program Change oder Bank Select Change oder Midi Channel Change zu verschicken, ohne das ursprüngliche Voreinstellprogramm zu ändern. In diesem Beispiel senden Sie eine schnelle Program Change zu Ihrer Klangquelle. Das Verschicken einer Bank Change oder Midi Channel Change erfolgt auf GENAU diese Weise. Obwohl Sie diese Optionen in Schritt 1 auswählen.
Manuel d’instruction VMK-149plus/VMK-188plus INTRODUCTION AU VMK 59 CONTRÔLEURS CONTINUS 60 DISPOSITION DU CLAVIER CRÉATION DE PRESETS : BRÈVE DESCRIPTION 61-63 64 PROCÉDURES: SÉLECTION ET IDENTIFICATION DES PRESETS 65-66 PROGRAMMATION DU CLAVIER 67-69 PROGRAMMATION DES CURSEURS ET DES POTENTIOMÈTRES 70-71 PROGRAMMATION DES BOUTONS 72-73 PROGRAMMATION DE LA PÉDALE 74-75 LIVE EDIT 76
Manuel d’instruction VMK-149plus/VMK-188plus INTRODUCTION AU VMK Bienvenue dans le monde merveilleux de la série VMK Studiologic ! Les VMK sont des claviers programmables sur plusieurs niveaux. Le VMK-149plus est le premier clavier au monde avec 49 touches lestées et le VMK-188plus possède un clavier de 88 touches. Tous deux bénéficient du célèbre toucher FATAR. Ils possèdent les mêmes fonctionnalités et ne diffèrent que par le nombre de touches.
Manuel d’instruction VMK-149plus/VMK-188plus CONTRÔLEUR CONTINU Parmi les message MIDI (veuillez notez que marche/arrêt est un message MIDI) se trouve un ensemble de 128 messages « contrôleurs continus » (souvent abrégé en « CC »). Ils sont principalement utilisés pour envoyer les mouvements aux potentiomètres, aux curseurs, aux pédales, etc. Par exemple, une roue de modulation du synthétiseur envoie un message CC qui sera presque toujours le CC numéro 1 (voir la liste ci-dessous).
Manuel d’instruction VMK-149plus/VMK-188plus DISPOSITION DU CLAVIER : VUE D’ENSEMBLE Panneau de commande général Joystick et commandes de transport Panneau arrière PEDAL IN 3 potentiomètres/curseurs/boutons 2 MIDI OUT 1 Commandes Live edit 61 disposition du clavier 9V POWER
Manuel d’instruction VMK-149plus/VMK-188plus DISPOSITION DU CLAVIER : DÉTAILS Potentiomètres, boutons et curseurs Les potentiomètres, les boutons et les curseurs peuvent être programmés pour commander ce que vous voulez, d’une boucle sur un échantillonneur à la profondeur de la réverbération sur un module de son. 8 potentiomètres, 8 boutons et 9 curseurs sont disponibles.
Manuel d’instruction VMK-149plus/VMK-188plus DISPOSITION DU CLAVIER : DÉTAILS Panneau arrière Le panneau arrière regroupe la partie connexion du clavier : double sortie MIDI et 3 entrées pédale indépendantes. Les entrées pédale peuvent recevoir des pédales de soutien ou de volume, chacune capable d’envoyer un message de contrôleur complètement différent. Les entrées pédale peuvent être programmées pour recevoir les pédales de presque tous les fabricants sans tenir compte de leur polarité.
Manuel d’instruction VMK-149plus/VMK-188plus Création de presets : Brève description La création de presets est un processus facile impliquant l’utilisation des commandes de programme indiquées dans la section DISPOSITION DU CLAVIER de ce manuel. Commencez par choisir un numéro de preset en utilisant le potentiomètre ED et appuyant sur le bouton ENTER. Choisissez un numéro de preset supérieur à 3 pour ne pas réécrire les presets logiciels.
Manuel d’instruction VMK-149plus/VMK-188plus PROCÉDURE : SÉLECTION DE PRESET Les VMK-149plus/188plus possèdent 27 presets utilisateur programmables. Il existe deux manières de sélectionner un preset. SÉLECTION RAPIDE (A) Le CURSEUR clignotera 1) TOURNER LE POTENTIOMÈTRE ED La rotation du potentiomètre ED vous permet de naviguer parmi les presets. Le curseur clignotera.
Manuel d’instruction VMK-149plus/VMK-188plus 1) APPUYER SUR STORAGE Vous enregistrerez votre programmation sur un preset utilisateur. Les boutons Storage et Enter fonctionnent à présent comme boutons No ou Yes. CHANGEMENT D’ÉCRAN STORE PARAMETERS NO YES NOTE: Si vous sélectionnez No vous retournerez à la page «Press or move any Control». 2) APPUYER SUR ENTER (Yes) Dans cet exemple nous choisirons Yes. NOTE: Si vous souhaitez allez dans un emplacement de preset différent, utilisez le potentiomètre ED.
Manuel d’instruction VMK-149plus/VMK-188plus PROCÉDURE : PROGRAMMATION DU CL AVIER Les VMK-149plus/188plus peuvent enregistrer jusqu’à 27 patches utilisateur programmables. Non seulement chaque patch contient les informations de programmation pour les boutons, les curseurs, les potentiomètres et les pédales, mais le CLAVIER même peut être personnalisé, en tant que contrôleur.
Manuel d’instruction 6) APPUYER SUR PAGE HAUT La transposition peut être ajustée de 0 à +24 ou de 0 à -24 VMK-149plus/VMK-188plus Utilisez le potentiomètre ED pour ajuster la valeur de transposition CHANGEMENT D’ÉCRAN 0 Utilisez le potentiomètre ED pour ajuster la valeur d’After Touch 7) APPUYER SUR PAGE HAUT Vous pouvez programmer l’activation ou la désactivation de l’After KEYBOARD EDIT TRANSPOSE:+ CHANGEMENT D’ÉCRAN KEYBOARD EDIT AFTER TOUCH: ON 6) APPUYER SUR STORAGE Vous pouvez programmer l’
Manuel d’instruction VMK-149plus/VMK-188plus 9) APPUYER SUR ENTER (Yes) Attendez que le clavier effectue les commandes de balayage. Vous retournerez à présent à la page Preset. CHANGEMENT D’ÉCRAN 69 clavier PRESET NUM.
Manuel d’instruction VMK-149plus/VMK-188plus PROCÉDURE : PROGRAMMATION CURSEUR / POTENTIOMÈTRE Nous programmerons un CURSEUR pour qu’il se comporte comme un fader de mixage analogique. Fader en bas>volume min. Fader en haut>volume max. La programmation des POTENTIOMÈTRES suivra exactement la même procédure. ASTUCE : à la différence d’un mélangeur analogique vous pouvez choisir que le volume minimum ne soit pas 0 (aucun son). Vous pouvez juste choisir d’intégrer une piste dans le mixage.
Manuel d’instruction VMK-149plus/VMK-188plus 6) APPUYER SUR PAGE HAUT Utilisez le potentiomètre ED pour ajuster la valeur de polarité Dans cet exemple, sélectionnez DN>UP. Lorsque le curseurs est en BAS, il envoie une valeur de 0 et lorsqu’il est en HAUT, une valeur de 127. CHANGEMENT D’ÉCRAN EDIT SLIDER: 51 POLARITY: DN>UP CHANGEMENT D’ÉCRAN STORE PARAMETER NO YES 7) APPUYER SUR STORAGE Vous allez pouvoir sauvegardez votre programme dans un preset utilisateur.
Manuel d’instruction VMK-149plus/VMK-188plus PROCÉDURE : PROGRAMMATION DE BOUTON Nous programmerons un BOUTON pour qu’il se comporte comme un simple interrupteur marche/arrêt ou un interrupteur Latch (à verrouillage). Appuyez une fois sur le BOUTON et l’interrupteur sera enclenché. Appuyez à nouveau sur le BOUTON et l’interrupteur sera désenclenché. La programmation des BOUTONS de transport suit exactement la même procédure.
Manuel d’instruction VMK-149plus/VMK-188plus 5) suite... PUSH: envoie un message Note on lorsqu’il est enfoncé. Lorsque vous relâchez le bouton, un message Note off sera envoyé. Le BOUTON fonctionnera uniquement lorsque vous le tenez enfoncé. 6) APPUYER SUR STORAGE Utilisez le potentiomètre ED pour ajuster le Key Mode CHANGEMENT D’ÉCRAN EDIT BUTTON: B1 KEY MODE: PUSH CHANGEMENT D’ÉCRAN STORE PARAMETER NO YES Vous allez sauvegarder votre programme dans un preset utilisateur.
Manuel d’instruction VMK-149plus/VMK-188plus PROCÉDURE: PROGRAMMATION DE PÉDALE Nous programmerons l'ENTRÉE PÉDALE 1 pour transmettre le soutien. Pour cette procédure vous aurez besoin d’une pédale de soutien de n’importe qu’elle polarité. ASTUCE : Les trois ENTRÉES PÉDALE peuvent être programmées pour transmettre tout type de signal, du soutien au volume en passant par la modulation.
Manuel d’instruction VMK-149plus/VMK-188plus 6) APPUYER SUR PAGE HAUT C’est ici que la flexibilité du VMK entre en jeu. Vous pouvez ajuster la polarité des pédales qui sont utilisées. Si il y a du soutien sans que la pédale soit enfoncée, adaptez simplement la polarité de la pédale sur le VMK.
Manuel d’instruction VMK-149plus/VMK-188plus PROCÉDURE: LIVE EDIT La possibilité d’envoyer rapidement un message de changement de programme, de sélection de banque ou de changement de canal MIDI sans altérer le programme original du Preset. Dans cet exemple, vous enverrez un changement de programme rapide à votre source sonore. L’envoi d’un changement de banque ou le changement du canal MIDI suivent EXACTEMENT la même procédure. Mais vous choisirez ces options à l’étape 1.
Manual de instrucciones VMK-149plus/VMK-188plus INTRODUCCIÓN DE VMK 78 CONTROLADORES CONTINUOS 79 CONFIGURACIÓN DEL TECLADO 80-82 CREACIÓN DE PRESETS: RESUMEN 83 PROCEDIMIENTOS: SELECCIÓN DE PRESETS Y ASIGNACIÓN DE NOMBRES 84-85 PROGRAMACIÓN DEL TECLADO 86-88 PROGRAMACIÓN DE DESLIZADORES/RUEDECILLAS 89-90 PROGRAMACIÓN DE BOTONES 91-92 PROGRAMACIÓN DE PEDALES 93-94 LIVE EDIT 95
M a n u a l de i n s t r u c c i o n e s VMK-149plus/VMK-188plus PRESENTACIÓN DE VMK ¡Bienvenido al maravilloso mundo de la serie VMK de Studiologic! Los VMK son unos controladores para teclado programables multinivel. El VMK-149plus es el primer teclado del mundo con 49 teclas de piano contrapesadas mientras que el VMK-188plus presenta un teclado de 88 notas. Ambos presentan las famosas teclas de acción FATAR. Se trata de dos teclados completamente idénticos salvo en el número de teclas.
M a n u a l de i n s t r u c c i o n e s VMK-149plus/VMK-188plus CONTROLADOR CONTINUO Entre los mensajes Midi (observe que on/off se entiende como un mensaje Midi) hay un conjunto de 128 mensajes de "controlador continuo" (abreviado a menudo como "CC"). Normalmente se utilizan para enviar los movimientos de las ruedas, deslizadores, pedales, etc. Por ejemplo, una ruedecilla de modulación del sintetizador envía un mensaje CC que casi siempre tendrá el número CC 1 (consulte la lista más abajo).
Manual de instrucciones VMK-149plus/VMK-188plus CONFIGURACIÓN DEL TECLADO: VISTA GENERAL Panel de control completo Joystick de controles de transporte Panel posterior PEDAL IN 3 Ruedecillas, deslizadores y botones 2 MIDI OUT 1 Controles Live Edit 80 configuración del teclado 9V POWER
Manual de instrucciones VMK-149plus/VMK-188plus CONFIGURACIÓN DEL TECLADO: DETALLES Ruedecillas, botones y deslizadores Las ruedecillas, botones y deslizadores se pueden programar para controlar todas las funciones, desde un bucle en un sampler a la profundidad de reverberación en un módulo de sonido. Están disponibles ocho ruedecillas, ocho botones y nueve deslizadores.
Manual de instrucciones VMK-149plus/VMK-188plus CONFIGURACIÓN DEL TECLADO: DETALLES Panel posterior El panel posterior presenta las conexiones del teclado: dos salidas Midi y tres entradas de pedal independientes. Las entradas de pedal admiten pedales de sostenido o de volumen, cada una de ellas capaz de enviar un mensaje de control totalmente distinto.
Manual de instrucciones VMK-149plus/VMK-188plus Creación de Presets: resumen La creación de Presets es un proceso sencillo que implica el uso de controles de programa ya vistos en la sección CONFIGURACIÓN DEL TECLADO de este manual. Comenzaremos seleccionando un número de Preset con la ruedecilla DE y pulsando a continuación el botón ENTER. Elija un número de Preset mayor que 3 para no sobrescribir los Presets de software. Puede elegir un número aún no seleccionado o sobrescribir un Preset anterior.
Manual de instrucciones VMK-149plus/VMK-188plus PROCEDIMIENTO: SELECCIÓN DE PRESETS El teclado VMK-149plus/188plus dispone de 27 presets de usuario programables. Observemos las dos formas de seleccionar un preset.. SELECCIÓN RÁPIDA (A) CURSOR will blink 1) GIRE LA RUEDECILLA DATA ENTRY Al girar la ruedecilla DE pasará por los distintos presets. El cursor parpadeará. Desplácese hasta el preset que desee.
Manual de instrucciones VMK-149plus/VMK-188plus 1) PULSE STORAGE Guardará el programa en un preset de usuario. Los botones Storage y Enter funcionarán ahora como botones No y Yes. CAMBIO DE PANTALLA STORE PARAMETERS NO YES NOTA: Si selecciona No, regresará a la página “Press or move any Control”. 2) PULSE ENTER (Yes) En este ejemplo elegiremos Yes. STORE PARAMETERS NO YES NOTA: Si desea moverse a otra ubicación de preset, utilice la ruedecilla DE.
Manual de instrucciones VMK-149plus/VMK-188plus PROCEDIMIENT O: PROGRAMACIÓN DEL TECL ADO Los tecladosVMK-149plus/188plus pueden memorizar hasta 27 conexiones de usuario programables. Cada patch no sólo contiene información de programación sobre botones, deslizadores, ruedecillas y pedales, sino que el propio TECLADO, como controlador, se puede personalizar. Cada patch puede contener información relativa a canales MIDI, Aftertouch, transposiciones, cambios de programas y selección de bancos.
Manual de instrucciones VMK-149plus/VMK-188plus Para ajustar el valor de Transpose, utilice la ruedecilla DE. 6) PULSE PAGE UP Transpose se puede ajustar de 0 a +24 o de 0 a -24.
Manual de instrucciones VMK-149plus/VMK-188plus 9) PULSE ENTER (Yes) Espere a que el teclado haga un barrido de los controles. Ahora regresará a la página Preset. CAMBIO DE PANTALLA 88 teclado PRESET NUM.
Manual de instrucciones VMK-149plus/VMK-188plus PROCEDIMIENTO: PROGRAMACIÓN DE DESLIZADORES Y RUEDECILLAS Ahora configuraremos un DESLIZADOR para que se comporte como un fader de mezcla analógico. Bajada de fader > volumen mínimo. Subida de fader> volumen máximo. La programación de las RUEDECILLAS sigue el exactamente el mismo procedimiento. CONSEJO: a diferencia de los mezcladores analógicos, es posible que no desee que su volumen mínimo sea 0 (sin sonido).
Manual de instrucciones VMK-149plus/VMK-188plus 6) PULSE PAGE UP Para ajustar el valor de Polarity, utilice la ruedecilla DE. En este ejemplo, seleccione DN>UP. Cuando el deslizador está en posición DOWN enviará un valor de 0; cuando esté en posición UP, enviará un valor de 127. CAMBIO DE PANTALLA EDIT SLIDER: 51 POLARITY: DN>UP CAMBIO DE PANTALLA STORE PARAMETER NO YES 7) PULSE STORAGE Ahora guarde el programa en un preset de usuario.
Manual de instrucciones VMK-149plus/VMK-188plus PROCEDIMIENTO: PROGRAMACIÓN DE BOTONES Configuraremos un BOTÓN para que se comporte como un interruptor ON/OFF simple, o interruptor de ciere (latch switch). Pulse el BOTÓN una vez y el interruptor se activará. Vuelva a hacerlo y se desactivará. Los BOTONES de transporte siguen el mismo patrón. CONSEJO: esto puede resultar muy útil para controlar los silencios (Mute) del programa de audio/secuenciación.
Manual de instrucciones VMK-149plus/VMK-188plus 5) continuación... MOMENTÁNEO: al mantener el botón presionado se enviará un mensaje Note on. Al soltar el botón, se enviará un mensaje Note off. El BOTÓN sólo funcionará mientras se mantenga presionado. 6) PULSE STORAGE Para ajustar Key Mode, utilice la ruedecilla DE. CAMBIO DE PANTALLA EDIT BUTTON: B1 KEY MODE: PUSH CAMBIO DE PANTALLA STORE PARAMETER NO YES Ahora debe guardar el programa en un preset de usuario.
Manual de instrucciones VMK-149plus/VMK-188plus PROCEDIMIENTO: PROGRAMACIÓN DE PEDALES Programaremos la ENTRADA DE PEDAL 1 para transmitir el mensaje Sustain. Para ello, necesitaremos un pedal de sostenido. Cualquier pedal con polaridad servirá a nuestro propósito. CONSEJO: las tres ENTRADAS DE PEDAL se pueden programar para transmitir cualquier mensaje, desde Sustain a Volume, o incluso Modulation.
Manual de instrucciones VMK-149plus/VMK-188plus 6) PULSE PAGE UP Aquí es donde se demuestra la flexibilidad del VMK. Puede ajustar la polaridad del pedal en uso. Si hay un sostenido sin que se presione el pedal, sólo tiene que ajustar la polaridad del VMK para ajustarse al pedal. Para ajustar el valor de Polarity, utilice la ruedecilla DE.
Manual de instrucciones VMK-149plus/VMK-188plus PROCEDIMIENTO: LIVE EDIT La capacidad de enviar rápidamente mensajes Program Change o Bank Select o de cambiar el Midi Channel sin alterar el programa original del preset. En este ejemplo enviaremos un comando Program Change rápido a la fuente de sonido. Para enviar un cambio de banco o cambiar el canal Midi se sigue EXACTAMENTE el mismo procedimeinto. Aunque deberá seleccionar las opciones correspondientes en el paso 1.