VMK88 plus MANUAL TABLE OF CONTENTS VMK-88plus INTRODUCTION...........................................1 CONTINUOUS CONTROLLERS.......................................2 KEYBOARD LAYOUT................................................ 3-5 PRESET CREATION: A SUMMARY...................................6 PROCEDURES PRESET SELECTION AND NAMING............................... 7-8 KEYBOARD PROGRAMMING.....................................9-11 SLIDERS/KNOBS PROGRAMMING............................
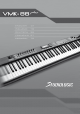
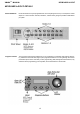
VMK88 plus MANUAL INTRODUCTION Welcome to the wonderful world of the VMK-88 plus. The VMK-88 plus is a multi-level programmable keyboard controller with 88 semi-weighted piano contoured keys. It features pitch bend, aftertouch, “on the fly” live edits, assignable knobs, buttons and sliders, and 4 independent fully programmable pedal inputs. It’s a piano player’s dream come true – a controller with 3pedal control: Sustain; Damper; and Sustenuto! At only 14 pounds, the VMK-88 plus is a working man’s axe.
VMK88 plus MANUAL CONTROLLERS Controllers Among the Midi messages (note that on/off is a Midi message) is a set of 128 “continuous controller ”messages (often abbreviated “CC ”). These are mainly used to send the movements of knobs, sliders, pedals, and so forth. For example, a synth’s modulation wheel is sending a CC message which will almost always be CC number 1. (See list below.
VMK88 plus MANUAL KEYBOARD LAYOUT 3
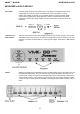
VMK88 plus MANUAL KEYBOARD LAYOUT KEYBOARD LAYOUT: DETAILS Knobs & Buttons Knobs and buttons may be programmed to control anything from a loop on a sampler to reverb depth on a sound module. 8 knobs, 8 Buttons, 2 banks each giving 32 possible combinations per patch.
VMK88 plus MANUAL KEYBOARD LAYOUT KEYBOARD LAYOUT: DETAILS Back Panel The back panel contains the connective parts of the keyboard: Dual Midi outputs and 4 independent foot controller inputs. The pedal inputs can accept sustain or volume pedals, each capable of sending out a completely different controller message. Pedal inputs can be programmed to accept almost any variety of manufacturers foot pedals regardless of polarity. The power adapter input and power switch are also located in the rear panel.
VMK88 plus MANUAL PRESET CREATION SUMMARY Preset Creation: A Summary Preset creation is an easy process involving the use of the program controls shown in the KEYBOARD LAYOUT section of this manual. You start by choosing a preset number using the DE dial and hitting the ENTER button. Choose a preset number higher than 3 so as not to overwrite the software presets. You can either choose an unused number or overwrite a previously written preset.
VMK88 plus MANUAL PRESETS PROCEDURE: PRESET SELECTION The VMK-88 plus has 27 programmable user presets. Let’s look into the two ways of selecting a preset. 1) ROTATE DATA ENTRY DIAL Rotating the DE Dial will scroll thru the Presets. The cursor will blink. Scroll to the Preset you want. 2)PRESS ENTER NOTE: You can preview the Presets without making a selection . If you don’t Press the Enter Button. the VMK88 will return to the last Preset Selected. Wait until the cursor stops blinking.
VMK88 plus MANUAL PRESETS 1)PRESS STORAGE You will save your program to a user preset. Storage and Enter buttons now function as No or Yes buttons. NOTE: If you select No you’ll be taken back to the “Press or move any Control” Page. 2)PRESS ENTER(Yes) In this example we’ll choose Yes. NOTE: If you’d like to move to a different Preset location use the DE dial.
VMK88 plus MANUAL KEYBOARD PROCEDURE: KEYBOARD PROGRAMMING The VMK-88 plus can store 27 user programmable patches. Not only does each patch contain programming information for buttons, sliders, knobs and pedals, the KEYBOARD itself, as a controller, can be customized. Each Patch can contain MIDI Channel, Aftertouch, Transpose, Program Change and Bank Select information. 1)PRESS EDIT 2)PRESS KEY You may Press any key on the Keyboard.
VMK88 plus MANUAL KEYBOARD 6)PRESS PAGE UP Transpose can be adjusted from 0 to +24 or 0 to -24 7)PRESS PAGE UP You have the option to program After Touch on or off for each Patch. 6)PRESS STORAGE You are now going to save your Keyboard Assignments to a user preset. NOTE: Storage and Enter buttons now function as No or Yes buttons. 7)PRESS ENTER(Yes) In this example we’ll choose Yes. 8)PRESS STORAGE The blinking cursor indicates preset number selection.
VMK88 plus MANUAL KEYBOARD 9)PRESS ENTER(Yes) Wait for the keyboard to Scan Controls. You will now return to the Preset page.
VMK88 plus MANUAL SLIDERS / KNOBS PROCEDURE: SLIDER / KNOB PROGRAMMING We will set up a SLIDER to behave like an analog mixer fader. Fader Down>min. volume. Fader Up>Max. Vol. Programing KNOBS follows the Exact same procedure. TIP: Unlike an analog mixer you might not want your minimum volume to be 0 (no sound). You may just want a track to “sit” in the mix. Therefore you should choose a value greater than 0.
VMK88 plus MANUAL SLIDERS / KNOBS 6)PRESS PAGE UP In this example select DN>UP When the Slider is in the DOWN position it will send a Value of O. when UP a Value of 127. 7)PRESS STORAGE You are now going to save your program to a user preset. NOTE: Storage and Enter buttons now function as No or Yes buttons 8)PRESS ENTER(Yes) In this example we’ll choose Yes. 9)PRESS STORAGE The blinking cursor indicates preset number selection. 10)PRESS ENTER(Yes) You will now return to the Preset page.
VMK88 plus MANUAL BUTTONS PROCEDURE: BUTTON PROGRAMMING We will set up a BUTTON to behave like a simple ON/OFF switch, or Latch Switch. Press the BUTTON once and the Switch will be on. Press the BUTTON again and the Switch will be off. Programing Transport BUTTONS follows the exact same procedure. TIP: This can be very useful to control the Mutes on your Audio/Sequencing program.
VMK88 plus MANUAL BUTTONS 5) continued... PUSH: will send a Note on Message when pushed down. When you release the button, a Note off Message will be sent. The BUTTON will only work when you are actually Pushing it down. 6)PRESS STORAGE You are now going to save your program to a user preset NOTE: Storage and Enter buttons now function as No or Yes button’s 7)PRESS ENTER(Yes) In this example we’ll choose Yes. 8)PRESS STORAGE The blinking cursor indicates preset number selection.
VMK88 plus MANUAL PEDALS PROCEDURE: PEDAL PROGRAMMING We will program PEDAL INPUT 1 to transmit Sustain. For this procedure you will need a Sustain Pedal. Any polarity pedal will work. TIP: The four PEDAL INPUTS may be programed to transmit anything from Sustain to Volume to even Modulation. A PEDAL INPUT, when connected to a Volume Pedal , can transmit the same CNTRL Values as the SLIDERS or KNOBS. Remember, you have four PEDAL INPUTS to work with.
VMK88 plus MANUAL PEDALS 6)PRESS PAGE UP This is where the flexibility of the VMK comes into play. You can adjust the Polarity to the Pedal that’s being used. If there’s sustain without the Pedal being depressed just adjust the Polarity on the VMK to fit the pedal. 7)PRESS STORAGE You are now going to save your program to a user preset NOTE: Storage and Enter buttons now function as No or Yes buttons. 8)PRESS ENTER(Yes) In this example we’ll choose Yes.
VMK88 plus MANUAL LIVE EDIT PROCEDURE: LIVE EDIT The ability to quickly send a Program Change or Bank Select change or change the Midi channel without altering the original Preset program. In this example you will send a quick Program Change to your sound source. Sending a Bank Change or changing the Midi Channel, follows the EXACT same procedure.
MANUALE VMK88 plus INDICE INTRODUZIONE............................................................20 CONTINUOUS CONTROLLER.............................................21 LAYOUT DELLA TASTIERA............................................22-24 COME CREARE UN PRESET..............................................25 PROCEDURE SELEZIONE DI UN PRESET E ASSEGNAZIONE DI UN NOME.....26-27 PROGRAMMAZIONE DELLA TASTIERA.............................28-30 PROGRAMMAZIONE DI SLIDER E POTENZIOMETRI..............
INTRODUZIONE MANUALE VMK88 plus Benvenuti nel magnifico mondo della VMK-88 plus. La VMK-88 plus è una master keyboard multilivello programmabile con 88 tasti a dimensione pianoforte e azione semipesata. È dotata delle funzioni di pitch bend, aftertouch, live edit, potenziometri, pulsanti e slider assegnabili e 4 ingressi pedale totalmente programmabili. Il sogno di un pianista che diventa realtà. Un controller con un controllo a 3 pedali: sustain, damper e sostenuto.
CONTINOUS CONTROLLER MANUALE VMK88 plus Controller Tra i messaggi MIDI (anche il messaggio on/off è un messaggio MIDI) sono compresi 128 messaggi “continuous controller” (spesso abbreviato con “CC”). Questi messaggi vengono utilizzati principalmente per trasmettere i movimenti dei potenziometri, degli slider, dei pedali e così via. Ad esempio, la modulation wheel del sintetizzatore invia un messaggio CC che quasi sempre corrisponde a un CC numero 1 (vedi elenco sottostante).
LAYOUT DELLA TASTIERA MANUALE VMK88 plus LAYOUT DELLA TASTIERA GENERALE Potenziometri e pulsanti Controlli dei programmi Controlli trasposizione/Live Edit 22
LAYOUT DELLA TASTIERA MANUALE VMK88 plus KEYBOARD LAYOUT: DETAILS Potenziometri e pulsanti I potenziometri e i pulsanti possono essere programmati per controllare funzioni diverse, da un loop su un campionatore alla reverb depth in un modulo di suoni. 8 potenziometri, 8 pulsanti, 2 banchi ognuno, per un totale di 32 possibili combinazioni per ogni patch. Potenziometri 1-8 Pulsanti 1-8 NOTA: i banchi si illuminano quando sono selezionati.
LAYOUT DELLA TASTIERA MANUALE VMK88 plus KEYBOARD LAYOUT: DETTAGLI Back Panel Il pannello posteriore contiene gli elementi di connessione della tastiera: 2 uscite MIDI e 4 ingressi indipendenti per i pedali. Gli ingressi per i pedali possono accettare pedali di sustain o di volume, che inviano messaggi controller completamente diversi. Gli ingressi per i pedali possono essere programmati per accettare pedali di quasi tutti i marchi produttori, indipendentemente dalla loro polarità.
COME CREARE UN PRESET MANUALE VMK88 plus Come creare un preset La creazione dei preset è un processo molto semplice che prevede l’uso dei controlli per la programmazione descritti nella sezione LAYOUT DELLA TASTIERA del presente manuale. Innanzitutto, scegliere un numero di preset utilizzando il controllo DE, quindi premere ENTER. Per non sovrascrivere i 3 preset del software scegliere un numero di preset superiore a 3.
MANUALE VMK88 plus SELEZIONE DI UN PRESET E ASSEGNAZIONE DI UN NOME PROCEDURA: SELEZIONE DI UN PRESET La VMK-88 plus dispone di 27 preset programmabili dall’utente. Di seguito vengono descritti i due modi in cui è possibile selezionare un preset. SELEZIONE RAPIDA (A) 1) RUOTARE IL CONTROLLO DATA ENTRY Ruotando il controllo DE, si scorrono i diversi Preset. Il cursore inizia a lampeggiare. Scorrere fino al preset desiderato.
MANUALE VMK88 plus SELEZIONE DI UN PRESET E ASSEGNAZIONE DI UN NOME 1) PREMERE STORAGE Il programma verrà salvato in un preset utente. CAMBIO SCHERMO In questa fase i pulsanti Storage e Enter funzionano come pulsanti No o Yes. NOTA: se si seleziona No, si ritorna alla pagina “Press or move any Control”. 2) PREMERE ENTER(Yes) In questo esempio viene scelto Yes. NOTA: per passare a una memoria CAMBIO SCHERMO di preset diversa utilizzare il controllo DE.
PROGRAMMAZIONE DELLA TASTIERA MANUALE VMK88 plus PROCEDURA: PROGRAMMAZIONE DELLA TASTIERA La VMK-88 plus può memorizzare fino a 27 patch programmabili dall’utente. Ogni patch non contiene soltanto le informazioni sulla programmazione dei pulsanti, degli slider, dei potenziometri e dei pedali; infatti, anche la TASTIERA stessa, come controller, può essere personalizzata. Ogni patch può contenere inoltre le informazioni su canale MIDI, aftertouch, trasposizione, Program Change e Bank Select.
PROGRAMMAZIONE DELLA TASTIERA MANUALE VMK88 plus 6)PREMERE PAGE UP La trasposizione (traspose) può essere regolata da 0 a +24 o da 0 a -24. 7)PREMERE PAGE UP Per ogni patch è possibile programmare After Touch su on o off. 6)PREMERE STORAGE Le impostazioni della tastiera verranno salvate in un preset utente.
PROGRAMMAZIONE DELLA TASTIERA MANUALE VMK88 plus 9)PREMERE ENTER(Yes) Attendere che la tastiera abbia completato la scansione dei controlli. Il display torna alla pagina del Preset.
SLIDER E POTENZIOMETRI MANUALE VMK88 plus PROCEDURA: PROGRAMMAZIONE DI SLIDER E POTENZIOMETRI Di seguito viene descritto come configurare uno SLIDER in modo tale che funzioni come fader di un mixer analogico. Fader giù > volume minimo. Fader su > volume massimo. La programmazione dei POTENZIOMETRI segue la stessa identica procedura.
SLIDER E POTENZIOMETRI MANUALE VMK88 plus Utilizzare il controllo DE per regolare il valore per Polarity 6)PREMERE PAGE UP CAMBIO Per questo esempio SCHERMO selezionare DN>UP. Quando lo slider è in posizione GIÙ invia un valore 0. Quando invece è SU invia un valore 127. 7)PREMERE STORAGE Il programma verrà salvato in un preset utente. CAMBIO SCHERMO NOTA: In questa fase i pulsanti Storage e Enter funzionano come pulsanti No o Yes. 8)PREMERE ENTER(Yes) In questo esempio viene scelto Yes.
PROGRAMMAZIONE DEI PULSANTI MANUALE VMK88 plus PROCEDURA: PROGRAMMAZIONE DEI PULSANTI In questa procedura viene descritto come configurare un PULSANTE in modo che funzioni come un semplice interruttore ON/OFF o un interruttore bistabile. Premendo il PULSANTE una volta l’interruttore sarà ON. Premendo il PULSANTE una seconda volta l’interruttore sarà OFF. La programmazione dei pulsanti per la TRASPOSIZIONE segue la stessa identica procedura.
PROGRAMMAZIONE DEI PULSANTI MANUALE VMK88 plus 5) continua... PUSH: (Impulso): se premuto invia un messaggio Note on. Quando invece il pulsante è allo stato rilasciato, viene trasmesso un messaggio Note off. Il PULSANTE è attivo soltanto allo stato premuto. Utilizzare il controllo DE per regolare il valore per Polarity 6)PREMERE STORAGE CAMBIO Il programma verrà salvato SCHERMO in un preset utente. NOTA: In questa fase i pulsanti Storage e Enter funzionano come pulsanti No o Yes.
PROGRAMMAZIONE DEI PEDALI MANUALE VMK88 plus PROCEDURA: PROGRAMMAZIONE DEI PEDALI In questo esempio l’INGRESSO PEDALE 1 verrà programmato per permettere una funzione sustain. Per questa procedura è quindi necessario disporre di un pedale di sustain. Si possono utilizzare pedali di qualsiasi polarità. SUGGERIMENTO: i 4 INGRESSI PEDALI possono essere programmati per trasmettere qualsiasi funzione, dal sustain, al volume, alla modulazione.
PROGRAMMAZIONE DEI PEDALI MANUALE VMK88 plus 6)PREMERE PAGE UP Questa funzione dimostra la flessibilità della VMK. La VMK consente infatti di regolare la polarità del pedale utilizzato. Se si verifica un effetto di sustain senza premere il pedale, adattare la polarità della VMK al pedale. 7)PREMERE STORAGE Il programma verrà salvato in un preset utente. NOTA: In questa fase i pulsanti Storage e Enter funzionano come pulsanti No o Yes.
LIVE EDIT MANUALE VMK88 plus PROCEDURA: LIVE EDIT Per Live Edit si intende la capacità di inviare rapidamente un Program Change o un cambiamento Bank Select o di cambiare il canale MIDI senza modificare il programma preset originale. In questo esempio verrà inviato un rapido Program Change alla fonte di suono. Per inviare un cambio di banco o del canale MIDI è sufficiente seguire la stessa IDENTICA procedura, scegliendo però l’opzione pertinente nella fase 1.
HANDBUCH VMK88 plus INHALT EINLEITUNG.............................................................................. 39 KONTINUIERLICHE STEUERUNGEN................................................... 40 LAYOUT DES KEYBOARDS.......................................................... 41-43 ERSTELLUNG DER VOREINSTELLUNGEN: ÜBERSICHT............................ 44 VORGEHENSWEISEN AUSWAHL EINER VOREINSTELLUNG UND NAMENSZUTEILUNG............. 45-46 PROGRAMMIERUNG DES KEYBOARDS.....................................
EINLEITUNG HANDBUCH VMK88 plus Willkommen in der großartigen Welt des VMK-88 plus. Das VMK-88 plus ist ein programmierbares MultiLevel-Keyboard-Steuergerät mit 88 halbgewichteten Tasten in Klavierformat. Es ist ausgestattet mit den Funktionen Tonlagenbeugung, After Touch, Live Edits während des Spiels, bestimmbaren Drehreglern, Drucktasten und Schiebereglern und 4 vollständig programmierbaren Pedaleingängen.
STEUERUNGEN HANDBUCH VMK88 plus Steuerungen Unter den MIDI-Meldungen (auch die Meldung an/aus ist eine MIDI-Meldung) befinden sich 128 „Kontinuerliche Steuerungs“-Meldungen (oft mit „CC“ für continuous controller abgekürzt). Diese Meldungen werden hauptsächlich für die Übertragung der Bewegungen der Drehregler, der Schieberegler, der Pedale usw. verwendet.
LAYOUT DES KEYBOARDS HANDBUCH VMK88 plus LAYOUT DES KEYBOARDS ALLGEMEIN Drehregler und Druckknöpfe Rückwärtige Schalttafel PEDAL-EINGÄNGE Transport/Live Edit-Steuerungen Schieberegler 41 Programmsteuerungen MIDI-AUSGÄNGE 9V NETZSCHALTER
LAYOUT DES KEYBOARDS HANDBUCH VMK88 plus LAYOUT DES KEYBOARDS DETAILS Drehregler und Drucktasten Die Drehregler und die Drucktasten können zur Steuerung verschiedener Funktionen programmiert werden, von einem Loop auf einem Modell bis zur Nachhalltiefe in einem Klangmodul. 8 Drehregler, 8 Drucktasten, jeweils 2 Schaltbänke, insgesamt 32 mögliche Kombinationen für jedes Einsatzstück.
LAYOUT DES KEYBOARDS HANDBUCH VMK88 plus LAYOUT DES KEYBOARDS DETAILS Die rückwärtige Schalttafel enthält die Verbindungselemente des Keyboards: 2 MIDI-Ausgänge und 4 unabhängige Pedaleingänge. An die Pedaleingänge können Verstärkungs- oder Lautstärkepedale angeschlossen werden, die vollkommen unterschiedliche Steuersignale übertragen. Die Pedaleingänge können für den Anschluss fast aller Herstellermarken programmiert werden, unabhängig von ihrer Polarität.
HANDBUCH VMK88 plus ERSTELLUNG DER VOREINSTELLUNGEN: ÜBERSICHT Erstellung der Voreinstellung Die Erstellung der Voreinstellungen ist ein sehr einfacher Vorgang, der die Verwendung der in dem Abschnitt LAYOUT DES KEYBOARDS des vorliegenden Handbuchs beschriebenen Bedienelemente vorsieht. Zunächst ist mit Hilfe des DE-Wählers eine Zahl für die Voreinstellung zu wählen und mit der ENTER-Taste einzugeben. Um die 3 Voreinstellungen der Software nicht zu überschreiben, ist eine Zahl höher als 3 zu wählen.
VOREINSTELLUNGEN HANDBUCH VMK88 plus vorgehensweise: AUSWAHL EINER VOREINSTELLUNG Das VMK-88 plus verfügt über 27 vom Benutzer programmierbare Voreinstellungen (presets). In der Folge werden die beiden bestehenden Möglichkeiten der Voreinstellungsauswahl beschrieben. SCHNELLAUSWAHL (A) 1) DIE SCHEIBE DER DATENEINGABEN DREHEN Durch Drehen der DE-Scheibe durchläuft man die verschiedenen Voreinstellungen. Der KURSOR beginnt zu blinken. Bis zur gewünschten Voreinstellung gelangen.
VOREINSTELLUNGEN HANDBUCH VMK88 plus 5) STORAGE-TASTE BETÄTIGEN Das Programm und der diesem zugeteilte Namen wird gespeichert. BILDSCHIRMWECHSEL In dieser Phase funktionieren die Tasten Storage und Enter als Tasten No oder Yes. ANMERKUNG: Wird No gewählt, kehrt man zur Seite „Press or move any Control“ zurück. 2)ENTER(Yes) BETÄTIGEN In diesem Beispiel wird Yes gewählt.
KEYBOARD HANDBUCH VMK88 plus VORGEHENSWEISE: PROGRAMMIERUNG DES KEYBOARDS Das VMK-88 plus kann bis zu 27 vom Benutzer zu programmierende Einfügestellen speichern. Jede Einfügestelle enthält nicht nur die Informationen über die Programmierung der Drucktasten, der Schieberegler, der Drehregler und der Pedale; tatsächlich kann auch das KEYBOARD selbst, als Steuergerät, individualisiert werden.
HANDBUCH VMK88 plus KEYBOARD Die DE-Wählscheibe verwenden, um den Wert für Transpose einzustellen. 6) PAGE rauf BETÄTIGEN Die Transposition (transpose) kann von 0 bis +24 oder von 0 bis -24 eingestellt werden. BILDSCHIRMWECHSEL Die DE-Wählscheibe verwenden, um den Wert für After Touch einzustellen. 7) PAGE rauf BETÄTIGEN Für jede Einfügestelle kann After Touch auf on (an) oder off (aus) programmiert werden.
VMK88 plus MANUAL KEYBOARD 9) ENTER(Yes) BETÄTIGEN Abwarten, bis das Keyboard die Abfrage der Steuerelemente beendet hat. Die Anzeige kehrt zur Seite Voreinstellungen zurück.
SCHIEBEREGLER/DREHREGLER HANDBUCH VMK88 plus VORGEHENSWEIvorgehensweise: PROGRAMMIERUNG DER SCHIEBEREGLER UND DER DREHKNÖPFE In der Folge wird beschrieben, wie ein SCHIEBEREGLER so konfiguriert werden kann, dass er als Blendregler eines analogen Mischpults funktioniert. Blendregler nach unten > kleinste Lautstärke. Blendregler nach oben > höchste Lautstärke. Die Programmierung der DREHREGLER erfolgt auf die gleiche Weise.
SCHIEBEREGLER/DREHREGLER HANDBUCH VMK88 plus 6) PAGE rauf BETÄTIGEN In diesem Beispiel DN>UP wählen. Befindet sich der Schieberegler in der Stellung DN (unten), sendet er einen Wert gleich 0. Befindet er sich dagegen in der Stellung UP (oben), sendet er einen Wert von 127. Die DE-Wählscheibe verwenden, um den Wert für Polarity einzustellen BILDSCHIRMWECHSEL 7) STORAGE-TASTE BETÄTIGEN BILDSCHIRMWECHSEL Das Programm wird in eine Benutzer-Voreinstellung gespeichert.
DRUCKTASTEN HANDBUCH VMK88 plus VORGEHENSWEISE: PROGRAMMIERUNG DER DRUCKTASTEN Wir legen eine Drucktaste als einen schlichten AN/AUS-Schalter oder Federschalter an. Wird die Taste ein Mal gedrückt, ist sie in AN-Stellung. Ein nochmaliges Drücken der TASTE bewirkt das AUS. Dier Programmierung der Drucktasten für den TRANSPORT erfolgt auf die gleiche Weise. EMPFEHLUNG: Diese Funktion ist für die Steuerung der „Mute“-Funktionen des Audio/Sequencing-Programms sehr nützlich.
VMK88 plus MANUAL BUTTONS 5) (Fortsetzung) PUSH (Impuls): Solange die Taste gedrückt wird, sendet sie die Meldung Note ON. In Ruhestellung wird dagegen die Meldung Note OFF übertragen. Die DRUCKTASTE ist nur in gedrücktem Zustand aktiv. Die DE-Wählscheibe verwenden, um den Wert für Key Mode einzustellen 6) STORAGE-TASTE BETÄTIGEN BILDSCHIRMWECHSEL Das Programm wird in eine Benutzer-Voreinstellung gespeichert.
PEDALE HANDBUCH VMK88 plus VORGEHENSWEISE: PROGRAMMIERUNG DER PEDALE In diesem Beispiel wird der PEDALEINGANG 1 für die Funktion Verstärkung (sustain) programmiert. Für diese Prozedur muss man daher über ein Verstärkungspedal verfügen. Es können Pedale gleich welcher Polarität verwendet werden. EMPFEHLUNG: Die 4 PEDALEINGÄNGE können für die Übertragung jeder beliebigen Funktion programmiert werden, von der Verstärkung, zur Lautstärke bis zur Modulation.
PEDALE HANDBUCH VMK88 plus 6) PAGE rauf BETÄTIGEN Diese Funktion ist ein weiterer Beweis für die Flexibilität des VMK88 plus. BILDSCHIRMWECHSEL DasVMK88 plus ermöglicht nämlich die Einstellung (Änderung) der Polaritätdes verwendeten Pedals. Sollte ein Verstärkungseffekt auftreten, ohne dass das Pedal gedrückt ist, einfach die Polarität des VMK dem Pedal anpassen. Die DE-Wählscheibe verwenden, um den Wert für Polarity einzustellen.
LIVE EDIT HANDBUCH VMK88 plus VORGEHENSWEISE: LIVE EDIT Live Edit bezeichnet die Fähigkeit, schnell eine Program Change-Meldung zu übertragen oder einen Bank Select- oder MIDI-Kanal-Wechsel vorzunehmen, ohne das ursprüngliche Voreinstellungsprogramm abzuändern. In diesel Beispiel wird der Klanquelle eine schnelle Program Change-Meldung übertragen.
INTRODUCTION MODE D’EMPLOI VMK88 plus -/$% $ %-0,/) 6-+ plus ????????????????????????????????? 4!",% $%3 -!4)%2%3 6-+ plus ).42/$5#4)/. 58 VMK-88 #/.42/,%523 59 /2'!.)3!4)/. $5 #,!6)%2 60 62 #2%!4)/. $% 02%3%4 %. 2%35-% 64 02/#%$52%3 3%,%#4)/. %4 #(/)8 $5 .
INTRODUCTION MODE D’EMPLOI VMK88 plus -/$% $ %-0,/) 6-+ plus ???????????????????).42/$5#4)/. %LHQYHQXH GDQV OH PRQGH PHUYHLOOHX[ GX 90. plus /H 90.
CONTROLEURS MODE D’EMPLOI VMK88 plus -/$% $ %-0,/) 6-+ plus ?????????????????? #/.
ORGANISATION DU CLAVIER MODE D’EMPLOI VMK88 plus -/$% $ %-0,/) 6-+ plus ??????? /2'!.)3!4)/. $5 #,!6)%2 /2'!.)3!4)/.
ORGANISATION DU CLAVIER MODE D’EMPLOI VMK88 plus -/$% $ %-0,/) 6-+ plus ??????? /2'!.)3!4)/. $5 #,!6)%2 /2'!.)3!4)/. $5 #,!6)%2 $%4!),3 0OTENTIOMáTRES BOUTONS ,ES POTENTIOMáTRES ET BOUTONS PEUVENT äTRE PROGRAMM£S POUR TOUT CONTR¹LER DE LA BOUCLE D UN £CHANTILLONNEUR Ü L INTENSIT£ DE REVERB D UN MODULE DE SONS BOUTONS POTENTIOMáTRES BANQUES POUR COMBINAISONS POSSIBLES PAR PATCH 0OTENTIOMáTRES -OLETTE DE HAUTEUR 0ITCH "ANQUES ! " "OUTONS .
ORGANISATION DU CLAVIER MODE D’EMPLOI VMK88 plus -/$% $ %-0,/) 6-+ plus ??????? /2'!.)3!4)/. $5 #,!6)%2 /2'!.)3!4)/.
CREATION DE PRESET: RESUME MODE D’EMPLOI VMK88 plus -/$% $ %-0,/) 6-+ plus ??? #2%!4)/.
PRESETS MODE D’EMPLOI VMK88 plus -/$% $ %-0,/) 6-+ plus ???????????????????????? 02%3%43 02/#%$52% 3%,%#4)/. $% 02%3%4 ,E 6-+ plus A 0RESETS PROGRAMMABLES PAR L UTILISATEUR 6OYONS LES DEUX FAÀONS DE S£LECTIONNER UN 0RESET 3%,%#4)/. 2!0)$% ! 4/52.%: ,! -/,%44% $% ,E #523%52 CLIGNOTERA 4OURNER LA MOLETTE $% FERA D£FILER LES 0RESETS ,E CURSEUR CLIGNOTERA &AITES D£FILER JUSQU AU 0RESET VOULU 0RESET .UM .AME %DIT 3TORAGE %NTER 02%33%: %.
PRESETS MODE D’EMPLOI VMK88 plus -/$% $ %-0,/) 6-+ ???????????????????????? 02%3%43 02%33%: 34/2!'% 6OUS ENREGISTREREZ VOTRE PROGRAMME DANS UN 0RESET UTILISATEUR ,@%#2!. #(!.'% 3TORE 0ARAMETERS .O %DIT ,ES BOUTONS 3TORAGE ET %NTER DEVIENNENT DES BOUTONS .O ET 9ES 3TORAGE %NTER 3TORE 0ARAMETERS .O ./4% 3I VOUS S£LECTIONNEZ .O VOUS 9ES 9ES REVIENDREZ Ü LA PAGE h0RESS OR MOVE ANY #ONTROLv 3TORAGE 02%33%: %.4%2 9ES )CI NOUS CHOISIRONS 9ES .
INTRODUCTION MODE D’EMPLOI VMK88 plus -/$% $ %-0,/) 6-+ ???????????????????????? #,!6)%2 02/#%$52% 02/'2!--!4)/.
CLAVIER MODE D’EMPLOI VMK88 plus -/$% $ %-0,/) 6-+ ???????????????????????? #,!6)%2 2£GLEZ LA VALEUR 4RANSPOSE AVEC LA MOLETTE $% 02%33%: 0!'% 4RANSPOSE TRANSPOSITION PEUT SE R£GLER DE Ü OU Ü ,@%#2!. #(!.'% +EYBOARD %DIT 4RANSPOSE %DIT 02%33%: 0!'% 6OUS AVEZ L OPTION DE PROGRAMMER LA PRESSION OU h!FTER 4OUCHv SUR ON OU SUR OFF POUR CHAQUE 0ATCH 3TORAGE %NTER 2£GLEZ LA VALEUR !FTER 4OUCH AVEC LA MOLETTE $% ,@%#2!. #(!.'% +EYBOARD %DIT !FTER 4OUCH %DIT 3TORAGE /.
CLAVIER MODE D’EMPLOI VMK88 plus -/$% $ %-0,/) 6-+ ???????????????????????? #,!6)%2 02%33%: %.4%2 9ES !TTENDEZ QUE LE CLAVIER PASSE EN REVUE LES COMMANDES 6OUS RETOURNEREZ ALORS Ü LA PAGE 0RESET ,@%#2!. #(!.'% 0RESET .UM .
CURSEURS/POTENTIOMETRES MODE D’EMPLOI VMK88 plus -/$% $ %-0,/) 6-+ ????? #523%523 0/4%.4)/-%42%3 02/#%$52% 02/'2!--!4)/. $%3 #523%523 0/4%.4)/-%42%3 .OUS PROGRAMMERONS UN CURSEUR 3,)$%2 POUR QU IL SE COMPORTE EN FADER DE MIXER ANALOGIQUE &ADER BAISS£ 6OL MIN &ADER MONT£ 6OL MAX ,A PROC£DURE DE PROGRAMMATION DES POTENTIOMáTRES +.
CURSEURS/POTENTIOMETRES MODE D’EMPLOI VMK88 plus -/$% $ %-0,/) 6-+ ????? #523%523 0/4%.4)/-%42%3 2£GLEZ LA VALEUR 0OLARITY POLARIT£ AVEC LA MOLETTE $% 02%33%: 0!'% $ANS CET EXEMPLE OPTEZ POUR $. 50 BASSE HAUTE 1UAND LE CURSEUR EST EN POSITION "ASSE IL ENVOIE UNE VALEUR EN POSITION HAUTE UNE VALEUR ,@%#2!. #(!.'% %DIT 3LIDER 0OLARITY %DIT 3 $. 50 3TORAGE %NTER 02%33%: 34/2!'% 6OUS ALLEZ ENREGISTRER VOTRE PROGRAMME DANS UN 0RESET UTILISATEUR ,@%#2!. #(!.
BOUTONS MODE D’EMPLOI VMK88 plus -/$% $ %-0,/) 6-+ ??????????????????????? "/54/.3 02/#%$52% 02/'2!--!4)/. $%3 "/54/.3 .OUS ALLONS PROGRAMMER UN "/54/. POUR QU IL SE COMPORTE COMME UN SIMPLE COMMUTATEUR /. /&& OU INTERRUPTEUR Ü VERROUILLAGE 0RESSEZ UNE FOIS LE "/54/. ET LE COMMUTATEUR SERA SUR /N 0RESSEZ ENCORE LE "/54/. ET IL SERA SUR OFF ,A PROGRAMMATION DES "/54/.
INTRODUCTION MODE D’EMPLOI VMK88 plus -/$% $ %-0,/) 6-+ ??????????????????????? "/54/.3 SUITE 2£GLEZ LA VALEUR +EY -ODE AVEC LA MOLETTE $% 053( 5N MESSAGE .OTE ON EST ENVOY£ Ü L ENFONCEMENT !U REL½CHEMENT DU BOUTON UN MESSAGE .OTE OFF -ESSAGE EST ENVOY£ ,E "/54/. N AGIT QUE QUAND VOUS LE PRESSEZ %DIT "UTTON +EY -ODE %DIT 3TORAGE " 053( %NTER 02%33%: 34/2!'% 6OUS ALLEZ ENREGISTRER VOTRE PROGRAMME DANS UN 0RESET UTILISATEUR ,@%#2!. #(!.'% 3TORE 0ARAMETERS .
PEDALES MODE D’EMPLOI VMK88 plus -/$% $ %-0,/) 6-+ ???????????????????????? 0%$!,%3 02/#%$52% 02/'2!--!4)/. $%3 0%$!,%3 .OUS PROGRAMMERONS L ENTR£E DE P£DALE 0%$!, ).054 POUR TRANSMETTRE LE 3USTAIN 0OUR CELA IL VOUS FAUDRA UNE P£DALE DE SUSTAIN . IMPORTE QUELLE P£DALE FERA L AFFAIRE 425# /HV TXDWUH ENTR£ES 0%$!, PEUVENT äTRE PROGRAMM£ES POUR TOUT TRANSMETTRE DU 3USTAIN AU 6OLUME EN PASSANT PAR LA -ODULATION 5NE ENTR£E 0%$!, ).
PEDALES MODE D’EMPLOI VMK88 plus -/$% $ %-0,/) 6-+ ???????????????????????? 0%$!,%3 2£GLEZ LA VALEUR 0OLARITY POLARIT£ AVEC LA MOLETTE $% 02%33%: 0!'% ,g%#2!. #(!.'% #gEST ICI QUgENTRE EN JEU LA FLEXIBILIT£ DU 6-+ 6OUS POUVEZ R£GLER LA POLARIT£ 0OLARITY DE LA P£DALE UTILIS£E 3I VOUS NOTEZ DU SUSTAIN ALORS QUE LA P£DALE NgEST PAS ENFONC£E CHANGEZ LE R£GLAGE 0OLARITY DU 6-+ EN FONCTION %DIT 0EDALS 0OLARITY %DIT $.
EDITION EN DIRECT MODE D’EMPLOI VMK88 plus -/$% $ %-0,/) 6-+ ??????????????? %$)4)/. %. $)2%#4 02/#%$52% %$)4)/. %.
INTRODUCTION MANUAL VMK88 plus ÍNDICE INTRODUCCIÓN .................................................................. 77 CONTINUOUS CONTROLLER ................................................... 78 LAYOUT DEL TECLADO ...................................................... 79-81 CÓMO CREAR UN PRESET ...................................................... 82 PROCEDIMIENTO SELECCIÓN DE UN PRESET Y ASIGNACIÓN DE UN NOMBRE ......... 83-84 PROGRAMACIÓN DEL TECLADO...........................................
INTRODUCTION MANUAL VMK88 plus Bienvenidos al magnífico mundo de VMK-88 plus. VMK-88 plus es un master keyboard multinivel, programable, con 88 teclas con dimensión de piano y ación semipesada. Dispone de unciones de pitch bend, aftertouch, live edit, potenciómetro, pulsadores y slider asignables, y 4 entradas de pedal totalmente programables. El sueño de un pianista que se torna realidad. Un controller con un control a 3 pedales: sustain, damper y sostenido. Con sólo 6 Kg.
CONTROLLER MANUAL VMK88 plus Controller Entre los mensajes MIDI (también el mensaje on/off es un mensaje MIDI), se incluyen 128 mensajes “continuous controller” (a menudo abreviado como “CC”). Dichos mensajes se utilizan principalmente para transmitir los movimientos de los potenciómetros, de los sliders, de los pedales, etc. Por ejemplo, la modulation wheel del sintetizador envía un mensaje CC que casi siempre corresponde a un CC número 1 (ver lista inferior).
LAYOUT DEL TECLADO MANUAL VMK88 plus LAYOUT DEL TECLADO GENERAL Potenciómetros y pulsadores Controles de programas Panel posterior Controles transposición/Live Edit 79
LAYOUT DEL TECLADO MANUAL VMK88 plus LAYOUT DEL TECLADO DETALLES Potenciómetros y pulsadores Los potenciómetros y los pulsadores pueden programarse para controlar funciones diferentes, desde un loop sobre un sampler hasta la reverb depth en un módulo de sonidos. 8 potenciómetros, 8 pulsadores, 2 bancos cada uno, un total de 32 combinaciones posibles para cada patch. Knobs 1-8 Pulsadores 1-8 NOTA: los bancos se iluminan al seleccionarlos.
LAYOUT DEL TECLADO MANUAL VMK88 plus LAYOUT DEL TECLADO DETALLES Panel posterior El panel posterior contiene los elementos de conexión del teclado: 2 salidas MIDI y 4 entradas independientes para los pedales. Las entradas para los pedales admiten pedales sustain o de volumen, que envían mensajes controller completamente diferentes. Las entradas para los pedales pueden programarse para aceptar pedales de casi todas las marcas de productores, independientemente de la polaridad de los mismos.
CÓMO CREAR UN PRESET MANUAL VMK88 plus Cómo crear un preset La creación de los presets es un proceso muy simple que prevé el uso de los controles para la programación descritos en la sección LAYOUT DEL TECLADO de este manual. En primer lugar, elegir un número de preset mediante el control DE, luego pulsar ENTER. Para no sobreescribir los 3 presets del software, escoger un número de presets superior a 3. Es posible elegir un número aún no utilizado o sobreescribir un preset ya existente.
PRESET MANUAL VMK88 plus PROCEDIMIENTO: SELECCIÓN DE UN PRESET VMK-88 plus dispone de 27 preset programables por el usuario. A continuación se describen dos maneras posibles para seleccionar un preset. SELECCIÓN RÁPIDA (A) 1) ROTAL EL DATA ENTRY DIAL Il CURSORE inizia a lampeggiare Rotando el control DE, se deslizan diferentes Preset. El cursor comienza a titilar. Deslizar hasta el preset deseado. 2)PULSAR ENTER Esperar que el cursor deje de titilar.
PRESETS MANUAL VMK88 plus 1)PULSAR STORAGE El programa será guardado en un preset usuario. CAMBIO PANTALLA En esta fase los pulsadores Storage y Enter funcionan como pulsadores NO y YES. NOTA: si se selección No, se regresa a la página “Press or move any Control” 2)PULSAR ENTER(Yes) En este ejemplo se elige YES NOTA: para pasar a una memoria CAMBIO PANTALLA de preset diferente, utilizar el control DE. TODOS LOS DATOS DEL PROGRAMA SE GUARDARÁN EN LA NUEVA MEMORIA DE PRESET.
TECLADO MANUAL VMK88 plus PROCEDIMIENTO: PROGRAMACIÓN DEL TECLADO VMK-88 plus puede memorizar hasta 27 patch programables por el usuario. Cada patch contiene información sobre la programación de los pulsadores, de los sliders, de los potenciómetros y de los pedales y también el TECLADO mismo, como controller, puede personalizarse. Cada patch puede contener además la información sobre el canal MIDI, aftertouch, transposición, Program Change y Bank Select.
TECLADO MANUAL VMK88 plus 6)PULSAR PAGE UP La transposición (traspose) puede regularse de 0 a +24 o de 0 a -24. 7)PULSAR PAGE UP Para cada patch es posible programar After Touch en on o en off. 6)PULSAR STORAGE Las configuraciones del teclado se guardarán en un preset usuario. CAMBIO PANTALLA Utilizar el control DE para regular el valor para After Touch CAMBIO PANTALLA CAMBIO PANTALLA NOTA: En esta fase los pulsadores Storage y Enter funcionan como pulsadores NO y YES.
TECLADO MANUAL VMK88 plus 9)PULSAR ENTER(Yes) Esperar a que el teclado haya completado el scan de los controles.El display vuelve a la página del Preset.
SLIDER / POTENCIÓMETROS MANUAL VMK88 plus PROCEDIMIENTO: PROGRAMACIÓN DE SLIDERS Y POTENCIÓMETROS A continuación se describe como configurar un SLIDER para que funcione como fader de un mixer analógico. Fader abajo > volumen mínimo. Fader arriba > volumen máximo.La programación de los POTENCIÓMETROS es un procedimiento idéntico.
SLIDER / POTENCIÓMETROS MANUAL VMK88 plus 6)PULSAR PAGE UP Para este ejemplo, seleccionar DN>UP. Cuando el slider se encuentra en posición GIÙ envía un valor 0. Cuando en cambio es ARRIBA, envía un valor 127. 7)PULSAR STORAGE El programa será guardado en un preset usuario. Utilizar el control DE para regular el valor para Polarity CAMBIO PANTALLA CAMBIO PANTALLA NOTA: En esta fase los pulsadores Storage y Enter funcionan como pulsadores NO y YES. 8)PULSAR ENTER(Yes) En este ejemplo se elige YES.
PULASDORES MANUAL VMK88 plus PROCEDIMIENTO: PROGRAMACIÓN DE PULSADORES En este procedimiento se describe cómo configurar un PULSADOR para que funciona como un simple interruptor ON/OFF o un interruptor biestable. Pulsando el PULSADOR una vez, el interruptor estará en ON. Pulsando el PULSADOR una vez, el interruptor estará en ON. La programación de los pulsadores para la TRANSPOSICIÓN es un procedimiento idéntico.
INTRODUCTION MANUAL VMK88 plus 5) continua... PUSH (Impulso): si se lo pulsa, envía un mensaje Note on. Cuando en cambio el pulsador es en estado no presionado, se transmite un mensaje Note off. El PULSADOR se encuentra activo en el estado presionado. 6)PULSAR STORAGE El programa será guardado en un preset usuario. Utilizar el control DE para regular el valor para Key Mode CAMBIO PANTALLA NOTA: En esta fase los pulsadores Storage y Enter funcionan como pulsadores NO y YES.
PEDALES MANUAL VMK88 plus PROCEDIMIENTO: PROGRAMACIÓN DE PEDALES En este ejemplo, la ENTRADA PEDAL 1 será programada para permitir una función sustain. Para realizar este procedimiento es entonces necesario disponer de un pedal de sustain. Es posible utilizar pedales de cualquier polaridad. SUGERENCIA: las 4 ENTRADAS PEDALES pueden programarse para transmitir cualquier función, desde el sustain, al volumen y la modulación.
PEDALES MANUAL VMK88 plus 6)PULSAR PAGE UP Esta función demuestra la flexibilidad del VMK. VMK permite, en efecto, regular la polaridad del pedal utilizado. Si se verifica un efecto de sustain sin presionar el pedal, adaptar la polaridad del VMK al pedal. 7)PULSAR STORAGE El programa será guardado en un preset usuario Utilizar el control DE para regular el valor para Polarity CAMBIO PANTALLA CAMBIO PANTALLA NOTA: En esta fase los pulsadores Storage y Enter funcionan como pulsadores NO y YES.
LIVE EDIT MANUAL VMK88 plus PROCEDIMIENTO: LIVE EDIT Por Live Edit se entiende la capacidad de enviar rápidamente un Program Change o un cambio Bank Select o de cambiar el canal MIDI sin modificar el programa preset original.En este ejemplo se enviará un rápido Program Change a la fuente de sonido. Para enviar un cambio de banco o del canal MIDI, es suficiente seguir un procedimiento IDÉNTICO, escogiendo la opción correspondiente en la fase 1.
INTRODUCTION MODE D’EMPLOI VMK88 plus Warranty Every Fatar Studiologic product has been carefully manufactured, calibrated and tested. All this enables a warranty of two years. Damages due to incorrect transport, mounting or handling are not covered by this warranty. Warranty All this is based on general terms and condition of the local distributor / FATAR srl, Italy. Compensation of more than the price of the device is excluded. FATAR srl Zona Ind.