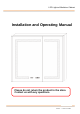
LED Lighted Medicine Cabinet Installation and Operating Manual Please do not return the product to the store. Contact us with any questions.
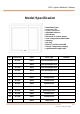
LED Lighted Medicine Cabinet Model Specification • Aluminum Frame • Integrated LED • Double Side Mirror • Adjustable Shelves • Quiet Hinge • Recessed or surface mount • Color Temperature:3000-6000K • Dimming • Anti Fog • Built-in 2 sockets and USB • Clock & Temperature Display • Light-Sensitive Night Light No.
LED Lighted Medicine Cabinet Note For easy and safe installation, please refer to the following: Read all instructions thoroughly before installing the enclosed product. Read and take note of all Safety Precautions, care and maintenance information. PLEASE KEEP THIS INSTRUCTION MANUAL FOR FUTURE REFERENCE DURING PRODUCT OPERATION AND MAINTENANCE.
LED Lighted Medicine Cabinet WARNING AND SAFETY INSTRUCTIONS Before installing your LED Medicine Cabinet, please make sure that you carefully read through this instruction sheet, refer back to them during installation to ensure your product is fitted safely and correctly. Keep the instruction for future use. WARNING Risk of Fire and Electric Shock ●All fittings must be installed in accordance with current IEE wiring regulations. If in doubt, please consult a qualified electrician.
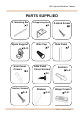
LED Lighted Medicine Cabinet PARTS SUPPLIED Z- Mounting Bar Z-Supporting Hook ×1 ×1 Spare Support ×4~8 Wire Cap ×3 Side Panel Covers ×4 Side Panel Cover Screws Z-Hook Screw ×2 Side Panel ×2 Anchors ×5~9 ×10 Anchor Screws ×5~9 Shelves ×2~6 Hinge Covers ×2~8 H ot l i ne : + 1 3 0 2 3 36 8 1 8 0
LED Lighted Medicine Cabinet TOOLS REQUIRED Drill Pencil Level Tape Gloves Safety Glasses Phillip Screw Driver Drill Bit 10mm(3/8”) Hammer H ot l i ne : + 1 3 0 2 3 36 8 1 8 0
LED Lighted Medicine Cabinet Installation Instruction The medicine cabinet supports two installation methods: 1.Surface Installation and 2.Embedded Installation. Please choose the installation way as needed. Some cabinet doors will be separated from the cabinet to reduce packaging volume. Please install the cabinet door after completing the cabinet installation according to the instruction. The installation instructions for the cabinet door is at the end of the installation instructions.
LED Lighted Medicine Cabinet Before installing the medicine cabinet, please remove the cabinet doors first. This will make the installation easier and more convenient. 1. First, disconnect the wires from the cabinet doors. 2. Then, press the end of the hinges and detach the cabinet door.
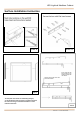
LED Lighted Medicine Cabinet Surface Installation Instruction Verify minimum clearances STEP 1 H is the total height of the mirror cabinet, and W is the total width of the mirror cabinet STEP 2 H ot l i n e : + 1 3 0 2 3 3 6 8 1 8 0
LED Lighted Medicine Cabinet Surface Installation Instruction Secure the bar with Flat head screws STEP 3 STEP 4 Press down the side panels until they are clamped tightly with the cabinet. Align the slots inside of the side panels and cabinet. STEP 5 The side panels and cabinets are individually packaged , you need follow the STEP 5 to STEP 6 to install the side panels for surface mounting, for embedded installation no need install the side boards.
LED Lighted Medicine Cabinet Surface Installation Instruction White wire(Neutral) Ground wire(Green) Black wire(Hot) 3-Wire caps STEP 7 STEP 8 Place the support angle on the bottom of the cabinet and mark hole location on the wall. Drill hole and insert anchor where needed. Fix the support angle by screw. Always look for wood studs behind the drywall for stronger installation, they are 16" apart.
LED Lighted Medicine Cabinet Surface Installation Instruction Insert the glass shelves between the layer board clips.
LED Lighted Medicine Cabinet Step12:Cabinet Door Installation 1.Insert the hinges to the base ,then connect the doors with the cabinet 2.If necessary , adjust corresponding screws on the hinge to align the doors, ensure that gaps are even and the doors open and close smoothly Adjust gap between door and cabinet 3.
LED Lighted Medicine Cabinet Embedded Installation Instruction Before installing, it is necessary to determine the opening size, which can be referred to in the table below. Embedded Installation Dimension No.
LED Lighted Medicine Cabinet Embedded Installation Instruction Determine the size of the opening White wire(Neutral) Ground wire(Green) Black wire(Hot) 3-Wire caps STEP 1 STEP 2 STEP 3 STEP STEP 4 4 *All diagrams are for reference only.All model dimensions and proportion position will vary.
LED Lighted Medicine Cabinet Step5:Cabinet Door Installation 1.Insert the hinges to the base ,then connect the doors with the cabinet 2.If necessary , adjust corresponding screws on the hinge to align the doors, ensure that gaps are even and the doors open and close smoothly Adjust gap between door and cabinet 3.
LED Lighted Medicine Cabinet Operating Manual UL Socket with USB The buttons turn blue when connected to the main power supply and turn white after a brief touch. Briefly touch the button to turn the mirror on or off. Press and hold the button to change the color temperature when the mirror is on. Optional to be wired to wall switch by ON/OFF memory function. Briefly touch the button to turn the mirror on or off. Press and hold the button to adjust the brightness.
LED Lighted Medicine Cabinet Setting the clock - Please turn off the light before setting the clock. - Press and hold the Button 1 for seconds, the “Hour” will flash, then briefly touch button1 or 2 to set Hour. - Wait for seconds after setting up the Hour then it will automatically switch to the Minute adjustment mode. - Briefly touch Button 1 or 2 to set up the Minute. - Wait seconds after you finish the time setting, the time will be saved automatically.
LED Lighted Medicine Cabinet Light-Sensitive Night Light The top view of cabinet door Light Sensor The bottom-up view of cabinet door Temperature Sensor LED Rocker Switch - When the ambient brightness decreases, the night light will turn on. - The rocker switch allows you to toggle the night light function on or off. - Don’t cover the sensor.