welcoming • sophisticated • inspiring VANITY WITH VESSEL SINK AND FAUCET MODEL #1211VA-48-242 ATTACH YOUR RECEIPT HERE Serial Number Purchase Date Questions, problems, missing parts? Before returning to your retailer, call our customer service department at 1-866-439-9800, 8 a.m. - 8 p.m., EST, Monday - Sunday.
TABLE OF CONTENTS Package Contents...........................................................................................................................3 Hardware Contents..........................................................................................................................3 Safety Information. .........................................................................................................................3 Preparation .........................................................
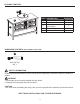
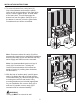
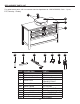
PACKAGE CONTENTS E D B PART DESCRIPTION A Vanity B Top Drawer (preassembled C to Vanity(A)) D Sink E Faucet and Drain Kit C C A QUANTITY 1 1 2 1 1 HARDWARE CONTENTS (NOT SHOWN ACTUAL SIZE) AA Touch-Up Pen Qty. 1 SAFETY INFORMATION Please read and understand this entire manual before attempting to assemble, operate or install this product. WARNING • Some steps are more easily handled with two adults. • Assembly and unpacking requires two adults.
PREPARATION Before beginning assembly of product, make sure all parts are present. Compare parts with package contents list and hardware contents list. If any part is missing or damaged, do not attempt to assemble the product. Estimated Installation Time: 20-30 minutes (24 hours for silicone caulk to dry).
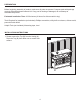
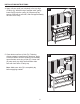
INSTALLATION INSTRUCTIONS 2. To remove drawers from vanity base (A), fully extend drawers and locate the plastic levers on left and right sides of the metal glide tracks. Push the plastic levers, on both sides, at the same time, This will disengage the drawer box from the glides. Gently lift up on the drawer to remove it from the glide tracks. Set aside as these will be re-installed.
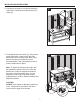
INSTALLATION INSTRUCTIONS 4. Apply silicone caulk (not included) to the top edge of vanity (A). With the help of another adult, gently lower top (B) onto the vanity (A). Wipe away any excess caulk with a soft cloth, and wait approximately 24 hours for it to dry. 4 1 B 2 2 A 5. Clean bottom surface of sink (D). Following silicone sealant’s manufacturer directions, apply a uniform bead of silicone sealant (not included) around bottom outer ring of sink (D). Lower sink (D) onto vanity top.
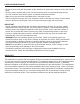
INSTALLATION INSTRUCTIONS 6. Following manufacturer’s enclosed assembly instructions, install faucet and drain kit (E) to vanity (A). 6 E D B A 7. To reinstall drawer into vanity (A), fully extend metal glide tracks. Gently lower and slide drawer box into rear glide catch. Next, lower drawer box down to completely rest on extended glides. Then, push plastic levers to lock the drawer box in place.
CARE AND MAINTENANCE • Do not clean the sink with detergents, acids, abrasives or other harsh cleaners as they will dull the finish. • Dust the vanity regularly with a soft, non-lint producing cloth or household dusting product. • You can clean the vanity with a gentle, non-abrasive household cleaner. • Make sure to dry the wood immediately with a soft cloth or towel. • Tips for using touch-up pen (AA): For scratches, stroke in direction of scratch; for worn areas, stroke in direction of wood grain.
REPLACEMENT PARTS LIST For replacement parts, call our customer service department at 1-866-439-9800, 8 a.m. - 8 p.m., EST, Monday - Sunday.