ITEM #2538092 48-IN VANITY WITH TOP AND MIRROR STYLE SELECTIONS and logo design are trademarks or registered trademarks of LF, LLC. All rights reserved. MODEL #1544VM-48-290 Español p. p. 13 XX Español ATTACH YOUR RECEIPT HERE Serial Number Purchase Date Questions, problems, missing parts? Before returning to your retailer, call our customer service department at 1-877-888-8225, 8 a.m. - 8 p.m., EST, Monday - Sunday. You may also contact us anytime at www.lowes.
TABLE OF CONTENTS Package Contents...........................................................................................................................3 Hardware Contents..........................................................................................................................3 Safety Information............................................................................................................................3 Preparation.........................................................
PACKAGE CONTENTS G PART DESCRIPTION QUANTITY A Vanity 1 Top B 1 (preassembled to Vanity (A)) H C E C F B G E H A J F K 1 Drawer (preassembled to Vanity (A)) 1 Mirror Mounting Hanger (preassembled to Mirror (G)) 1 4 Left Door (preassembled to Vanity (A)) 1 J Right Door (preassembled to Vanity (A)) 1 K Shelf 4 K K 1 I I K Backsplash Tip-out Door (preassembled to Vanity (A)) HARDWARE CONTENTS AA BB CC DD GG Touch-Up Pen Qty. 1 Anchor Qty. 2 Screw Qty.
PREPARATION Before beginning assembly of product, make sure all parts are present. Compare parts with package contents list and hardware contents list. If any part is missing or damaged, do not attempt to assemble the product.
VANITY INSTALLATION INSTRUCTIONS Note: Clean area where the vanity (A) will be permanently located prior to beginning installation, ensuring the vanity (A) will not interfere with any water supply and drain lines once mounted. 2 2. With two people, carefully place vanity (A) against the wall in its final location. While holding the vanity base firmly against the wall, use the pre-assembled levelers on the bottom of each leg of the vanity (A) to level the item.
VANITY INSTALLATION INSTRUCTIONS 4. To remove drawer preassembled in vanity (A), fully extend drawers. Locate plastic levers on metal glide tracks at left and right sides of drawer box. To disengage drawer box from glides, push on plastic levers. Then, gently lift drawer up to remove it from vanity (A). 4 A F 2 1 5. To reinstall drawer into vanity (A), fully extend metal glide tracks. Gently lower and slide drawer box into rear glide catch.
VANITY INSTALLATION INSTRUCTIONS 6. Gently open the top tip-out door and remove the plastic tray by lifting/sliding up (per the diagram). 6 Select your desired hardware finish, and attach the hardware to the drawer(s)/door(s), as illustrated in the diagram. 2 1 3 7. Re-hang the plastic tray back inside of the top tip-out door. If this door needs to be adjusted, please refer to the hinge adjustment steps below.
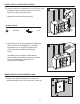
VANITY INSTALLATION INSTRUCTIONS 8. If you need to adjust the tip-out door, do so in the following manner. To adjust tip-out door left or right, loosen screws (a) on both hinges, adjust tip-out door, and retighten screws. To adjust tip-out door up or down, turn screws (b) on both hinges, in or out. To adjust tip-out door in or out, loosen screws (c) on both hinges, adjust tip-out door, and retighten screws. 8 2 2 2 2 2 2 1 1 a a 1 1 b C 3 3 C 9.
VANITY INSTALLATION INSTRUCTIONS 10 1 10. From the front of the assembly, insert shelf pins (GG) at desired height, ensuring they are level. Place shelf (K) on top of shelf pins (GG). Repeat for the remaining shelves (K). GG Hardware Used 2 GG Shelf Pin x 16 11. Apply silicone caulk (not included) to unpolished side and bottom of backsplash (C). Position backsplash (C) on top (B) and against wall. Clean any excess caulk before allowing to dry. 11 1 2 C 2 Assembly is now complete.
MIRROR INSTALLATION INSTRUCTIONS 2. Measure and mark location for mounting hardware on the wall using the measurement from Step 1. Make sure the marks are level and located at the desired height. 2 Note: Make sure to allow height clearance along the bottom of the mirror for your faucet if necessary. 2 2 BB BB Anchor x2 CC Screw x2 4. With the assistance of another adult, lift mirror (G) to the wall and hang mounting hangers (H) on screws (CC). CC BB CC CC BB Hardware Used 1 3 1 3.
CARE AND MAINTENANCE • • • • Dust the vanity regularly with a soft, non-lint producing cloth or household dusting product. You can clean the vanity with a gentle, non-abrasive household cleaner. Make sure to dry the wood immediately with a soft cloth or towel. The stone top can be cleaned using standard marble cleaning agents available at your local supplier. • Tips for using touch-up pen (AA): For scratches, stroke in direction of scratch. Rub off excess colorant promptly with a soft cloth.
REPLACEMENT PARTS LIST For replacement parts, call our customer service department at 1-877-888-8225, 8 a.m. - 8 p.m., EST, Monday - Sunday.
ARTÍCULO #2538092 TOCADOR CON CUBIERTA Y ESPEJO DE 121,9 CM STYLE SELECTIONS y el diseño del logo son marcas comerciales o marcas registradas de LF, LLC. Todos los derechos reservados. MODELO #1544VM-48-290 ADJUNTE SU RECIBO AQUÍ Número de serie Fecha de compra ¿Preguntas, problemas, piezas faltantes? Antes de volver a la tienda, llame a nuestro Departamento de Servicio al Cliente al 1-877-888-8225, de lunes a domingo de 8 a.m. a 8 p.m., hora estándar del Este.
ÍNDICE Contenido del paquete..................................................................................................................15 Aditamentos........................................................................................................................15 Información de seguridad..............................................................................................................15 Preparación.....................................................................................
CONTENIDO DEL PAQUETE G PIEZA DESCRIPCIÓN CANTIDAD A Tocador 1 Cubierta (preensamblada B 1 al tocador (A)) H C C E B F E G A J F H I K K I K K J K Protector contra salpicaduras 1 Puerta basculante (preensamblada al tocador (A)) Gaveta (preensamblada al tocador (A)) Espejo Gancho de montaje (preensamblada al espejo (G)) 1 1 1 4 Puerta izquierda (preensamblada al tocador (A)) Puerta derecha (preensamblada al tocador (A)) Estante 1 1 4 ADITAMENTOS AA BB CC DD GG Aplicador de retoq
PREPARACIÓN Antes de comenzar a ensamblar el producto, asegúrese de tener todas las piezas. Compare las piezas con la lista del contenido del paquete y la lista de aditamentos. No intente ensamblar el producto si falta alguna pieza o si estas están dañadas. Tiempo de instalación estimado: de 20 a 30 minutos (24 horas para que seque la masilla de calafateo de silicona).
INSTRUCCIONES DE INSTALACIÓN DEL TOCADOR Nota: limpie el área donde se colocará el tocador (A) antes de comenzar con la instalación permanente y asegúrese de que el tocador (A) no interfiera con ningún suministro de agua ni desagües una vez montado. 2 2. Con la ayuda de dos personas, coloque cuidadosamente el tocador (A) contra la pared en su ubicación definitiva.
INSTRUCCIONES DE INSTALACIÓN DEL TOCADOR 4. Para retirar las gaveta preensamblada al tocador (A), extiéndalas completamente. Coloque las palancas de plástico en los rieles de deslizamiento metálicos a los costados izquierdo y derecho de la caja de la gaveta. Para desconectar la caja de la gaveta de los deslizadores, presione las palancas de plástico. Luego, levante la gaveta suavemente para retirarla del tocador (A). 4 A F 2 1 5.
INSTRUCCIONES DE INSTALACIÓN DEL TOCADOR 6. Abra suavemente la puerta basculante superior y retire la bandeja de plástico levantándola/deslizándola hacia arriba (según el diagrama). 6 Seleccione el acabado de aditamentos que desee y coloque los aditamentos en las gavetas/puertas, como se ilustra en el diagrama. 2 1 3 7. Vuelva a colgar la bandeja de plástico dentro de la puerta basculante superior. Si es necesario ajustar esta puerta, consulte los pasos de ajuste de las bisagras a continuación.
INSTRUCCIONES DE INSTALACIÓN DEL TOCADOR 8. Si necesita ajustar la puerta basculante, hágalo de la siguiente manera. Para ajustar la puerta basculante hacia la izquierda o hacia la derecha, afloje los tornillos (a) de ambas bisagras, ajuste la puerta basculante y vuelva a apretar los tornillos. Para ajustar la puerta basculante hacia arriba o hacia abajo, gire los tornillos (b) en ambas bisagras hacia dentro o hacia afuera.
INSTRUCCIONES DE INSTALACIÓN DEL TOCADOR 10 1 10. Desde la parte delantera del ensamblaje, coloque los soportes para estante (GG) a la altura deseada y asegúrese de que queden nivelados. Coloque el estante (K) en la parte superior de los soportes para estante (GG). GG Repita el procedimiento con la estante (K) restante. Aditamentos utilizados 2 GG Pasador de repisa x 16 11. Coloque masilla de calafateo de silicona (no se incluye) en el lado inferior y sin pulir del protector contra salpicaduras (C).
INSTRUCCIONES DE INSTALACIÓN DEL ESPEJO 2. Mida y marque la ubicación para los aditamentos de montaje en la pared con la medida del Paso 1. Asegúrese de que las marcas estén niveladas y ubicadas a la altura deseada. 2 Nota: asegúrese de dejar el espacio necesario a lo largo de la parte inferior del espejo para el grifo, si fuese necesario. Aditamentos utilizados BB CC Ancla de expansión Tornillo 2 1 3 1 BB 2 3.
CUIDADO Y MANTENIMIENTO • Limpie el tocador regularmente con un paño suave que no deje pelusas o con un producto de limpieza doméstico. • Puede limpiar el tocador con un limpiador doméstico suave no abrasivo. • Asegúrese de secar la madera inmediatamente con un paño o una toalla suave. • La cubierta de piedra se puede limpiar con limpiadores para mármol estándar disponibles en su tienda local. • Consejos para usar el aplicador de retoque (AA): para rayones, aplique en la dirección del rayón.
LISTA DE PIEZAS DE REPUESTO Para obtener piezas de repuesto, llame a nuestro Departamento de Servicio al Cliente al 1-877-888-8225, de lunes a domingo de 8 a.m. a 8 p.m., hora estándar del Este.