
Use and Care Guide


AA
x 2
Hardware Used
Junction
Box Screws
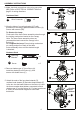
1. Install the mounting bracket (CC) to the junction box
(not included) with junction box screws (AA).
Mounting
Bracket
CC
x 1
3
ASSEMBLY INSTRUCTIONS
1
AA
CC
PREPARATION
Before beginning assembly of product, make sure all parts are present. Compare parts with
package contents list and diagram above. If any part is missing or damaged, do not attempt to
assemble the product. Contact customer service.
Estimated Assembly Time: 30~60 minutes
Tools Required for Assembly (not included): Ladder, Phillips Screwdriver, Flathead
Screwdriver, Wire Cutter, Pliers, Electrical Tape
Helpful Tools (not included): Wire Stripper
SAFETY INFORMATION
WARNING
If you feel you have insufficient electrical experience, have the fixture installed by a qualified
licensed electrician.
ff the circuit breaker or by
removing the fuse at the fuse box. Turning the power off at the light switch is not sufficient to
prevent electrical shock.
CAUTION
To ensure the success of the installation, be sure to read these instructions and review the
diagrams thoroughly before beginning.
All electrical connections must be in accordance with local codes, ordinance or the National
Electrical Code.
These fixtures are intended to be mounted to an outlet junction box. The box must be directly
supported by the building structure.
wattage. DO NOT EXCEED RECOMMENDED WATTAGE.
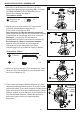
Required Supply Circuit: 120V, 60Hz. Cut excess fixture cord,
leaving six inches for
electrical connections. Split the cord into two separate wire leads, ensuring
there is no damage to the cord insulation. Connect the cord marked N to the white
wire of the supply circuit. Connect the half marked L to the black
wire of the supply circuit. Connect the bare copper grounding wire from the fixture, to the green
screw on the mounting bracket and the grounding conductor of the supply circuit. Use U.L./CSA
Listed wire connectors suitable for the size, type and number of conductors. No loose strands or
loose connections should be present. Secure wire connectors with U.L./CSA Listed electrical tape.
This unit is suitable for indoor use only.
To avoid risk of electric shock or fire, do not modify this lamp; if any modification is made
,
it may
render the product unsafe.
Do not attempt to change the light bulbs while the unit is turned on.
ELECTRICAL CONNECTIONS
relamping
Please read and understand this entire manual before attempting to assemble, operate or install
the product.