
Installation Guide


5
5.
5
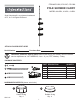
ASSEMBLY INSTRUCTIONS
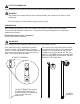
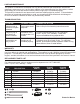
Insert narrow end of the 2-piece tube (B)
into top tube (A).
Note: Part A and Part B should not fit
snug. Part A contains a spring inside
which keeps tension to the ceiling.
Therefore, Part B will not fit all of the way
into Part A. The pole was designed like
this and is not defective.
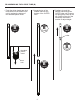
4. Insert narrow end of bottom tube (D) into
assembled pole to complete assembly.
6.
D
B
B
Hold
Here
Twist
Here
4
6
To install the assembly, push the top of the
pole against the ceiling until it is vertical
with the floor; adjust height as needed.
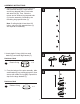
To adjust the height of assembly, hold the
end of tube with twist lock (B) with the
larger diameter. Then, twist the other end
counterclockwise to loosen the tension.
Raise or lower the pole assembly to desired
height, then twist the tube with twist lock (B)
clockwise to re-secure.
Note: The minimum ceiling height required
for installation is 65 inches. The maximum
ceiling height required for installation is 113
inches.
B
A