
Installation Guide

1
ITEM/ARTICLE/ARTÍCULO #0889751
MODEL/MODÈLE/MODELO #CF01N12-SS
BASE HUTCH
ÉTAGÈRE DE BASE
ESTANTE BASE
ATTACH YOUR RECEIPT HERE
JOIGNEZ VOTRE REÇU ICI
ADJUNTE SU RECIBO AQUÍ
Serial Number/Numéro de série/Número de serie
Purchase Date/Date d’achat/Fecha de compra
Call our customer service department at 1-877-888-8225
8 a.m. – 8 p.m., EST, Monday – Friday.
Appelez notre service à la clientèle au 1 877 888-8225
Entre 8 h et 20 h (HNE), du lundi au vendredi.
Llame a nuestro departamento de servicio al cliente al
1-877-888-8225 De lunes a viernes de 8 a.m. a 8 p.m.,
hora estándar del Este.
Questions?/Des questions?/¿Preguntas?
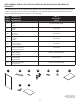
BB
Short Screw
Vis courte
Tornillo corto
x 2
A B C D E
Hardware Drill Template
Modèle de forage de materiel
Plantilla de taladro de hardwar e
Cut out the template on the thin solid lines.
The pull is 3 inches center to center.
Découpez le gabarit sur les fines lignes pleines.
La traction est de 3 pouces centre à cent re
Recorta la plantilla en las líneas finas y sólida s.
El tirón es de 3 pulgadas de centro a centro.
For off-center hardware placement:
Pour le placement de matériel décentré:
Para ubicación de hardwa re fuera del centro:
• Fold the template on the dotted lines.
• Pliez le gabarit sur les lignes pointillées.
• Dobla la plantilla en las líneas punteadas.
• Align and tape the template to the corner of the door.
• Alignez et collez le gabarit sur le coin de la porte.
• Alinea y pega la plantilla a la esquina de la puerta.
• Punch through the dots to mark the holes to be drilled.
• Percez les points pour marquer les trous à percer.
• Perfore los puntos para marcar los aguj eros que se perforarán.
For centered hardware placement:
Pour les emplacements de matériel centrés:
Para ubicaciones de hardware centradas:
• Note the center of the door with a pencil or a piece of tape.
• Notez le centre de la porte avec un crayon ou un morceau
de ruban adhésif.
• Tenga en cuenta el centro de la puerta con un lápiz o
un pedazo de cinta.
• Align the thick solid line on the template to the center of
the door and tape the template to the door.
• Alignez la ligne épaisse vendue sur le gabarit au centre
de la porte et fixez le gabarit à la porte.
• Alinee la gruesa línea vendida en la plantilla con el centro
de la puerta y pegue la plantilla con cinta adhesiva a la puert a.
• Punch through the dots to mark the holes to be drilled.
• Percez les points pour marquer les trous à percer.
• Perfore los puntos para marcar los aguj eros que se perforarán.
CUT
COUPER
CORTAR
FOLD HEREFOLD HERE/PLIER ICI/DOBLAR AQUÍ FOLD HEREFOLD HERE/PLIER ICI/DOBLAR AQUÍ
CUT HERE/COUPER ICI/CORTA AQUÍ
CUT HERE/COUPER ICI/CORTA AQUÍ
CENTER LINE
ALIGN TO/ALIGNER A/ALINEAR HACIA
DOOR CORNER/COIN DE LA PORTE/ESQUINA DE PUERTA
ALIGN TO/ALIGNER A/ALINEAR HACIA
DOOR CORNER/COIN DE LA PORTE/ESQUINA DE PUERTA
FOLD HERE/PLIER ICI/DOBLAR AQUÍ
Centered Placement / Placement centré / Colocación centrada
DOOR
DOOR
DOOR
DOOR
U180606
Off-Centered Plac ement / Placement hor s centre / Ubicación fu era del centro
CUT HERE/COUPER ICI/CORTA AQUÍ
CUT HERE/COUPER ICI/CORTA AQUÍ
CUT
COUPER
CORTAR
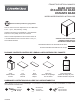
x 1 x 1 x 1 x 2 x 1
Vanity
Meuble-lavabo
Tocador
Top
Comptoir
Cubierta
Shelf
Tablette
Repisa
Filler Strip
Bande de remplissage
Tira de relleno
Door Drill Template
Modèle de forage de porte
Plantilla de taladro de puerta
PACKAGE CONTENTS/CONTENU DE L’EMBALLAGE/CONTENIDO DEL PAQUETE
HARDWARE CONTENTS/QUINCAILLERIE INCLUSE/ADITAMENTOS
Note: Hardware not shown to size./Remarque : La quincaillerie n’est pas illustrée en grandeur réelle./Nota: Los aditamentos
no se muestran en tamaño real.
U180605
AA
Handle
Poignée
Manija
x 1
CC
Shelf Clips
Clips de tablette
Clips de tablette
x 4