
Installation Guide


Basic Rules for All Installations
IMPORTANT — Do not open immediately.
Before opening the packaging, conform planks for 48 hours by laying each box
horizontally and individually in the center of the room in which they are to be installed.
Packages should be installed on the same day as opened. Check every plank for defects
before installing. No refunds can be given or claims accepted for visually obvious defects
after the planks are installed.
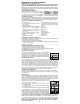
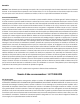
Room Conditions for Installation
Installation should take place at room temperature
of at least 64° F. The accompanying climactic
conditions in the room must be ensured before,
during and for at least three days after installation:
Check Doorway Clearance
Check to see if there is enough space between the floor and the bottom of all doors
(minimum 3/8 inch) so that the doors can be opened and closed after the underlayment
and laminate flooring have been installed. If necessary, trim the bottom of the door.
Tools and Accessories Needed for Installation
Suitable Sub-Floors for 5G Laminate Floors
Any plywood or OSB single or double layer sub-floor underlayment combinations as
well as existing floor surfaces, including:
Hardwood lumber or engineered wood flooring
Linoleum, PVC or resilient vinyl flooring (existing floor surfaces must be permanently
attached to the sub-floor)
Concrete/cement floors
Sub-Floors Not Suitable for 5G Laminate Flooring:
Any sub-floor in a wet room (shower room, sauna)
Carpeting (carpet and carpet pad must be removed)
Wood flooring installed over concrete sub-floor (wood must be removed)
Composition cement (residual moisture too high)
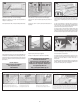
Preparation of the Sub-Floor
Only install on sub-floors that are level, clean, dry and solid. Areas
that are not level (vary by more than 1/8 inch over 40 inches or
low spots in excess of 3/16 inch must be leveled with portland
cement-based or acrylic filler with all ridges smoothed. Be sure to
allow the filler to dry completely before proceeding with installation.
Installing the Vapor Barrier
Concrete sub-floors must always be covered with a 6 mil vapor barrier even if
linoleum, PVC or resilient vinyl is firmly attached to the concrete. The 6 mil film is
laid in strips running in the same direction as the laminate flooring planks. The
strips must be overlapped by 8 inch and joined together by moisture resistant
tape. The film should be run up the walls 4 to 6 inches and later folded or cut
back after the planks are installed to fit behind the base moulding. For installation
over a concrete sub-floor, a calcium chloride moisture test kit is recommended.
Without a documented measurement of residual moisture content, an expansion
claim against the manufacturer for damages cannot be considered.
Installing the Underlayment Pad
Always use underlayment padding above the vapor barrier and below the
laminate flooring planks. If a pad is pre-attached, no additional underlayment
should be used.
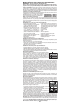
Expansion Space
Since laminate flooring is a natural wood material, it expands and contracts on all sides
with natural and frequent changes in the indoor environment. Therefore, an expansion
space of 1/16 inch for every 40 inches of installed planks (minimum of 3/8 inch)
should always be left between the laminate floor and all walls, electrical conduits, pipes,
doorways, etc. The wall spacers are used to create the required
expansion space between the walls and flooring and must be
removed after the floor is installed.
An expansion gap T-strip is required when length of planks
measures 40 ft max.
An expansion gap T-strip is required when width of planks
measures 25 ft max.
This also applies to all doorways, hallways and hallway corners.
The expansion space between the laminate flooring and the
walls is covered by a quarter round moulding. The transition
to other types of flooring at doorways is handled with reducer
mouldings or T-moulding. It is critical that the laminate flooring
is given room to “float” under these mouldings. After installation, attach
baseboard and quarter round mouldings to the wall only; never to the floor.
Attach expansion mouldings (T-moulding and/or reducer mouldings) to the floor,
never to the planks. There must be a minimum 3/8 inch space between the
planks and the moulding attachment system. At no time and in no place may the
inter-connected flooring planks be prevented from moving or “floating” or
fastened to the sub-floor.
Moisture test kit
6 mil polyethylene film (when installed
over concrete)
Underlayment pad
Laminate glue (if installed in a bathroom,
within 5 ft of a sink, dishwasher,
refrigerator, entrance from a pool or
mud room where snow may still be on
your boots)
100% mildew resistant silicone sealant
Hammer and tapping block
Spacers
Door jam/undercut saw
Saw (fine-tooth jigsaw or high tooth
count circular saw) a carbide fiber tip
blade is recommended to reduce dust
and heat.
Pull bar
Sharp chisel
Tape measure
Pencil
Carpenter level
Felt floor protectors
Safety glasses
Dust mask
Filler repair putty
Max
3
/16 inch
40 ft
25 ft
Floor Surface min. 59° F
Room Temperature min. 64° F
Room Humidity max. 75%