
Installation Guide


11
GLUE-DOWN INSTALLATION INSTRUCTIONS
1
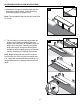
Starting wall
Expansion
space
60 min. of adhesive60 min. of adhesive
Expansion
space
Expansion
space
1. Measure out from the wall the appropriate
expansion space (see chart on page 5). Start
the installation along an exterior wall as it's
more likely to be straight and square with the
room. Mark an area that can be covered in 60
minutes (see adhesive information on page 10).
Note: Use clean white towels to clean as you go
along with mineral spirits. Adhesive that has cured
on the surface of the ooring can be difcult to
remove.
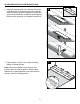
2. Using the recommended trowel (not included),
spread a sufcient amount of adhesive in marked
area.
Note: Use wedges (or 1/4 in. scrap) along the wall
to help hold planks in place while allowing for the
required expansion space
Note: If necessary, nail a sacricial row with 1 in.
nails on the dry side of your line to help hold the rst
row in place.
2
Glue area
Wood
Wedge
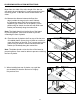
3. Place the rst plank with the tongue side facing
the wall, ensuring there is 100% contact between
the plank and adhesive by pressing down rmly on
plank. For random and alternate width products,
use the widest plank for the rst row.
Note: Often walls are not structurally square. Planks
in rst row may need to be scribed and cut to contour
with the wall (the rst row). It is important that
planks follow wall. Mark plank with a scribing tool
(follow the shape of wall) then cut it lengthwise to
follow the line.
Note: The rst row must be aligned and seated in the
adhesive, as all additional rows will be pushed back to
this original row. If necessary, remove tongue on rst
row to allow for expansion space.
3
Tongue