
Installation Guide

3
Please read and understand this entire manual before attempting to assemble, operate or install
the product.
WARNING
• Sawing, sanding and machining wood products can produce dust. Airborne wood dust can cause
respiratory, eye and skin irritation. The International Agency for Research on Cancer (IARC) has
classied wood dust as a nasal carcinogen in humans.
• If power tools are used, they should be equipped with a dust collector. If high dust levels are
encountered, use an appropriate NIOSH-designated dust mask. Avoid dust contact with eyes and
skin.
• In case of irritation, ush eyes or skin with water for at least 15 minutes.
CAUTION
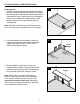
• Locking hardwood ooring can be installed using a oating oor installation. A 1/2 in. expansion
zone must be maintained at all vertical obstructions including doorways and transition strips. The
ooring cannot be t tight against any vertical surface such as stairways, walls or pipes. DO NOT
attach or pinch the ooring to the suboor at any point in the installation when using a oating
installation, including gluing, nailing or by any other methods. DO NOT restrict horizontal motion of
the oor by wedging planks under other surfaces, such as door jambs, base moulding or existing
transition strips.
KEEP THESE INSTRUCTIONS FOR FUTURE REFERENCE.
• Install only at room temperature above 60˚F and 35-55% humidity conditions.
• In rooms with under-oor (radiant) heating, the surface temperature of the suboor may not, under
any circumstances, exceed 85˚F. Increasing heat should be done in 5-degree increments. Ascertain
the suboor is properly engineered or controlled for the ooring being installed. Suboors designed
for materials with higher resistance to heat transfer, such as carpet, WILL damage the ooring.
Installations that include multiple oor covering products on a single heating circuit must be adjusted
for the ooring product with the highest heat transfer or lowest temperature requirement.
PREPARATION
SAFETY INFORMATION
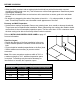
Before beginning installation of product, make sure all parts are present. Compare parts with package
content list. If any part is missing or damaged, DO NOT attempt to install the product.
Estimated Installation Time: 45 minutes (Note: Time may vary depending on room size and layout,
amount of preparation needed, and skill level)
Tools Required for Installation (not included): Broom, pencil, safety glasses, matching ller,
moisture meter (wood, concrete or both), transition and wall mouldings as needed, hand saw, table
saw, circular saw or band saw, tape measure, Carpenter’s square, hammer or rubber mallet, vinyl/
plastic tapping block, pull-bar, utility knife, dust mask, wood glue, painter’s tape and hardwood
ooring cleaner. For glue-down installations add adhesive and adhesive remover, 1/4 in. x 1/2 in. x
3/16 in. V-notch trowel, and hardwood ooring moisture retardant system on concrete (if needed).
Use with urethane adhesive only.