
Installation Guide

5
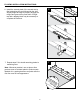
• When possible, preselect and set aside planks that blend best with all horizontally mounted
mouldings (reducer/stair nose etc.) This will assure a uniform nal appearance. Install these planks
adjoining the mouldings.
• Floor should be installed from several cartons at the same time to ensure good color and shade
mixture.
• Be attentive to staggering the ends of the planks at least 4 in. – 6 in. when possible, in adjacent
rows. This will help ensure a more favorable overall appearance of the oor.
Doorway and Wall Preparation
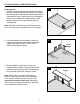
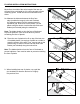
• Undercut door casings and jambs. Remove any existing base, shoe mould or doorway thresholds.
These items can be replaced after installation. When undercutting door casings the installer should
conrm there is the recommended expansion space. The oor must have 1/16 in. clearance under
the door casing to be able to oat freely without vertical restriction.
Refer to INSTALLING UNDER A DOOR JAMB on page 15
for more information.
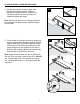
Plan Your Layout
• Decide the direction of the oor installation in the room.
• Planks installed parallel to windows accent the oor the
best.
• Floors should be installed perpendicular to the oor joists.
• Stiffen suboors as necessary to prevent vertical
movement.
Note: If the room exceeds a maximum width of 30 ft. or
a maximum length of 30 ft., additional expansion space
is required. T-mouldings may be used at doorways or
intersections to increase the expansion space.
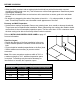
Expansion Space Requirements
Room Width Room Length Expansion Space Required
30 ft. 30 ft. 1/2 in.
40 ft. 40 ft. 3/4 in.
50 ft. 50 ft. 1 in.
60 ft. 60 ft. 1-1/4 in.
BEFORE YOU BEGIN
1/16 in.