
Installation Guide

7
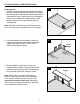
4. Overlap the end joint of second plank onto
the board previously installed. Continue
placing succeeding planks to complete row.
Cut the last plank to correct size (allow for
expansion space) and install.
Note: Ensure that this rst row is straight using the
wood wedges to maintain proper expansion space
from the wall.
FLOATING INSTALLATION INSTRUCTIONS
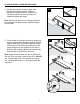
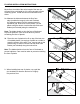
5. For rst plank of second row, place by angling up
slightly, pushing forward and interlocking the side
tongue. Slide plank to the left to align the edges
of the end joint. Carefully push plank down until
tongue and groove lock together on the side. A
slight tap with a tapping block (not included) may
be necessary to complete the interlock.
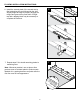
Note: Begin the second row with the cut piece from
rst row. If the cut piece is shorter than 8 in., DO NOT
use. Instead, begin with a new plank that exceeds
8 in. in length and allows 6 in. spacing between the
end joints.
2
2
1
4
5
4