
Installation Guide


CARE AND MAINTENANCE
8
>6"
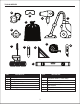
INSTALLATION INSTRUCTIONS
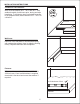
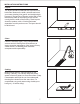
Installation:
Remove the release paper (into trash bag), and
carefully position the flooring. Be sure to follow the
starting line precisely before pressing it down. Install
one piece at a time, keeping seams snug (without
pressure fitting). Complete the row including the end
cuts, leaving a 1/32-inch gap around perimeter.
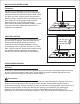
Slowly roll firmly, using a wall or laminating
three-section roller with extendable handle (~ 9-inch
wide) and your body weight and repeat until the
installation is completed.
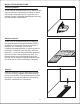
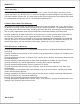
GROUTING OPTION
This is acceptable, providing the flooring has a micro
beveled edge. If required, grout the joints using a
flexible grout specifically made for vinyl floor
covering. During the flooring installation, leave a
constant gap, either 1/16-inch, 1/8-inch or 3/16-inch
wide, using tile spacers. Remove them before rolling
and follow the written application and cleaning
process instructions from the grout manufacturer.
Cleaning:
Dust mop or vacuum the floor (without a beater bar) to remove loose dirt and grit. Mop the flooring
as often as required using a damp, clean, flat microfiber mop with a suitable (diluted) vinyl floor
cleaning solution (neutral pH). Prohibit foot traffic until dry.
Precautions:
Do not damp mop for 72-hours after installation. Remove metal objects before wetting the flooring.
Do not use dust mops treated with oils or silicones, acetone, strong alkaline cleaning agents,
multi-surface cleaners, vinegar, ammonia or citrus oil solutions, scouring powder, strong solvents, or
abrasive cleaning pads, as these can damage the flooring. Avoid trafficking any carpet dyes,
fertilizers, coal, tar, driveway sealers, oil or other such contaminates onto the flooring. The
application of a floor finish is not usually required, if used, they will affect the maintenance protocol.
>6"
1/16-inch gap
1/8-inch gap
3/16-inch gap
Page 8