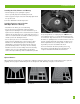
INSTALLATION GUIDE INSTALLATION GUIDE In your hands, you’re holding everything you need to begin building with Style Selections™ decking. This step-by-step guide will show you how to create a beautiful outdoor living space that fits perfectly into your lifestyle. These installation instructions and warranty only apply to the Natural Brown and Natural Grey colors of Style Selections decking. From time to time, Style Selections revises its installation instructions.
INSTALLATION GUIDE TABLE OF CONTENTS SECTION ONE: General Information General Tips 3 Job Site Storage 3 Safety 4 Tools 4 Care and Cleaning 5 SECTION TWO: Planning Ahead Installing Hot Tubs, Planters and Seating 6 Special Patterns 6 SECTION THREE: Decking Decking Specifications and Profiles 7 Trex Hideaway® Hidden Fastening System* 7 Approved Fasteners, Joist Spans and Conditional Considerations 8 Framing and Fastening Tips 9 Rooftop and Sleeper
GENERAL INFORMATION GENERAL TIPS ° Most colored chalk lines are permanent. Use baby powder or Irwin Strait-Line®* Dust-Off Marking Chalk. ° We DO NOT recommend sanding. Sanding will change the appearance of the surface of Style Selections™ material and will void the warranty with respect to any condition caused by such sanding. ° When drilling large or deep holes, periodically lift the bit out of the hole to remove the shavings.
GENERAL INFORMATION SAFETY When working on any construction project, you should wear protective clothing and safety equipment. Wear safety glasses, gloves, a dust mask and long sleeves, particularly when cutting in confined spaces. Style Selections™ decking is heavier and more flexible than wood. DO NOT try to lift the same quantity of Style Selections boards as you would traditional lumber. TOOLS You can create intricate shapes, profiles and patterns with Style Selections.
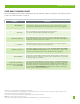
GENERAL INFORMATION CARE AND CLEANING GUIDE All exterior building materials require cleaning. Generally, soap and water is all that is required to clean Style Selections™ products. For further information, see below. Problem Dirt and Debris Chalk Lines Tannins Due to Debris Ice and Snow Oil, Grease and Food Mold and Mildew Using a Pressure Washer (Concrete, Stucco or Ground-in Construction Dirt) Solution The affected area should be sprayed off with a hose to remove surface debris.
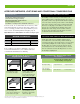
PLANNING AHEAD Installing Hot Tubs, Planters and Seating: ° Plan ahead proper joist spanning if required (this is especially important if installing a hot tub). °R efer to page 8 for Style Selections™ Decking Span Chart for specific loads. Call 1-800-289-8739 for detailed questions. Installing Fireplaces and/or Fire Pits With Style Selections Decking: ° Determine if fire will be gas or wood burning. ° For gas, the fire pit is installed by cutting around the Style Selections decking.
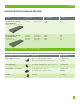
DECKING DECKING SPECIFICATIONS AND PROFILES DECKING DESCRIPTION ITEM NUMBER COLORS 1 in x 6 in (2.5 cm x 15.2 cm) Square Edge Board 8 ft (2.44 m) Style Selections™ 473863 546897 NB NG 12 ft (3.66 m) 16 ft (4.88 m) Style Selections Style Selections 473866 473868 NB NB 12 ft (3.66 m) 16 ft (4.88 m) Style Selections Style Selections 546898 546899 NG NG Actual Dimensions: 1 in x 5.5 in (2.5 cm x 14 cm) 1 in x 6 in (2.5 cm x 15.2 cm) Grooved Edge Board Actual Dimensions: 1 in x 5.5 in (2.
DECKING APPROVED FASTENERS, JOIST SPANS AND CONDITIONAL CONSIDERATIONS ST YLE SELECTIONS™ STYLE SELECTIONS AND STATIC ELECTRICITY Trex Hideaway® Hidden Fastening System (Universal Fastener and Connector Clip) The buildup of static electricity on a flat surface can affect walking surfaces. This phenomenon can occur in dry climates, where hot, dry winds and dust-born particles can create static electricity on the surface of the decking.
DECKING FRAMING AND FASTENING TIPS FRAMING AND FASTENING TIPS HIDDEN FASTENER TIPS Composite decking is a great alternative to traditional wood decking. When building your deck, it is recommended that code-approved structural material be used as the framing and joists. One option is using Trex Elevations® steel deck framing. Refer to www.trex.com for more information on Trex Elevations. Check your local building codes for restrictions. Style Selections™ decking cannot be used for structural applications.
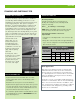
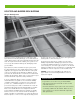
DECKING ROOFTOP AND SLEEPER DECK SYSTEMS Sleeper Deck Systems A sleeper system is a buffer between a solid surface and Style Selections™ decking. Drainage, access and airflow are critical. Water must be able to flow through and away from the deck. For repairs and removal of debris, joist system access is necessary. Good airflow will keep the decking dry and in good condition.
DECKING GAPPING You must gap Style Selections™ decking, both end-to-end and width-to-width. Gapping is necessary for drainage and the slight thermal expansion and contraction of Style Selections decking boards. Gapping also allows for the shrinkage of the wood joist system. 1/4 in – 3/8 in (0.6 cm – 1 cm) ° Always follow Style Selections-recommended gapping guidelines. ° Maximum allowable perpendicular overhang for Style Selections is 4 in (10.2 cm) for non-walking surfaces only.
DECKING STAIRS Stairway Detail 11 in (27.9 cm) min. depth ° Stair treads built with Style Selections™ meet requirements by the major national building codes. Consult your local municipality for specific requirements. Stair Tread Stringer ° Fasten stair treads continuously across at least five stringers. ° See chart (at right) for center-to-center spacing of profiles. ° Dress the sides of the stringers and risers with Style Selections fascia or trim for a finished look.
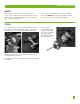
HOW TO INSTALL DECKING TIPS FOR INSTALLING TREX HIDEAWAY® HIDDEN FASTENING SYSTEM Installing Angled Deck Boards in Corners D AR G BO N KI EC D Shift 1/2 in (1.3 cm) For Universal and Stainless Steel (Universal shown here) ALWAYS start in corner with a small triangular piece of decking at 45° and work outwards. Install Trex Hideaway fasteners 1/2 in (1.3 cm) off center to keep fastener screws in middle of joists.
HOW TO INSTALL DECKING HOW TO INSTALL TREX HIDEAWAY® STAINLESS STEEL FASTENERS PARTS Bump stop tab Start clip Installing Second Board Connector clip 5 TOOLS NEEDED NOTE: Maximum spacing of deck boards using the Hideaway system is 16 in (40.6 cm) on center. Fasteners provide 1/4 in (0.6 cm) gap when installed correctly. 2 1 4. Center connector clip on joist and secure with screw (provided) at 45° angle while standing on board and applying pressure to clip. Install one connector clip on each joist.
HOW TO INSTALL DECKING HOW TO INSTALL TREX HIDEAWAY® UNIVERSAL HIDDEN FASTENERS Installing Second Board PARTS 5 Start clip Universal fastener TOOLS NEEDED 1/4 in (0.6 cm) NOTE: Maximum spacing of deck boards using the Hideaway system is 16 in (40.6 cm) on center. Fasteners provide 1/4 in (0.6 cm) gap when installed correctly. Installing Start Clips and First Board Complete Installation 6 6. T ighten screws on fasteners in first row.
HOW TO INSTALL DECKING HOW TO REPLACE STYLE SELECTIONS™ BOARDS INSTALLED WITH STAINLESS STEEL FASTENERS Stainless Steel Fasteners 1 2 3 4 3 2 4 1 1 2 3 1. M ark the board to be replaced in thirds. Cut each side of middle section and remove it. Remove remaining two sections. 2. H ammer down the exposed side of the connector clips. Place the new board into position using a pry bar to maneuver it into place.
HOW TO INSTALL DECKING HOW TO INSTALL STAIR TREADS Installation Options NOTE: For best results use square edge decking and manually route sides that will be used to attach hidden fasteners. Option 1: Face Screw Option 2: Using 2 in x 4 in (5.1 cm x 10.2 cm) Wood Support Blocks 1. I nstall start clips against riser on each step. 1. I nstall start clips against riser on each stair tread. 2. I nstall first board. Follow steps on page 15. 2. I nstall first board. Follow steps on page 15. 3.
WARRANTY LIMITED RESIDENTIAL WARRANTY Manufacturer (hereinafter “Manufacturer”) warrants to the original residential purchaser (“Purchaser”) that, for a period of twenty-five (25) years, Style Selections™ products produced by the Manufacturer (the “Product”) will meet the following warranties: General Warranty: The Product shall be free from material defects in workmanship and materials, and shall not split, splinter, rot or suffer structural damage from termites or fungal decay.