
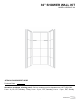
Installation Guide

5
transolid.com
ASSEMBLY INSTRUCTIONS
4
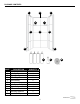
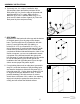
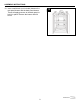
4. Cut twenty two 4-in. strips of installation tape
(M) and place them around the perimeter of the
back panel (A) 2 in. from the edge of the panel and
approximately 6 to 7 in. apart. Apply silicone
adhesive (K) in 3/4 in. diameter dots every 6-7 in.
apart over the back surface of panel (A). Place the
back panel in place and press rmly.
A
KM
I
M
K
C
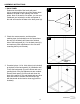
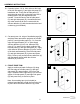
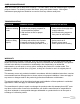
5. SIDE PANEL
Measure from the back wall at the top and the bottom
of the back panel (A) to the edge of the shower
base. The front edge trim (E) extends the left side
panel (C) and right side panel (D) width by a
minimum of 1/2 in. to a maximum of 1-1/2 in., so
the left side panel (C) and right side panel (D) width
needs to be cut a minimum of 1/2 in. shorter than
your desired nished side wall dimension. Note: If the
wall is not square, you can use cardboard to create
a template of the wall and transfer the data to the
left side panel (C) and right side panel (D). Be certain
to use left side panel (C) on the left side of the
installation site and right side panel (D) on the right
side to ensure proper tile pattern layout.
5
C
D
6
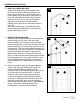
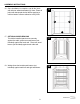
6. If no plumbing holes exist on side panel, proceed to
step 10. Locate the locations of the plumbing holes
and transfer the data to either left side panel (C) or
right side panel (D). Cut the holes a minimum of 1/4
in. larger than the pipe diameters. Note: To avoid
possible breakage, all inside corners of cutouts
should have a minimum 1/4 in. radius. Use masking
tape (not included) to protect the area where the
cutting tool will contact the nished surface.
C
D