
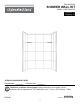
Installation Guide

7
Lowes.com
ASSEMBLY INSTRUCTIONS
C
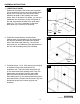
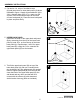
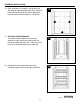
10. If needed, place 1/16 in. thick shims at the base
of the left side panel (C) and right side panel (D)
installation site. Trial t the left side panel (C)
and right side panel (D) on the shims and use a
sanding block if any ne adjustments are
needed. Clean the back of the left side panel
(C) and right side panel (D), the wall board and
any other area that will be in contact with the
silicone adhesive (K) with denatured alcohol and
a clean rag (not included).
10
C
D
C
11
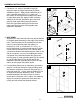
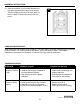
11. Cut twenty-two 4-in. strips of installation tape (M)
and place them around the perimeter of left side
panel (C) and right side panel (D), 2 in. from the
edge and approximately 6-7 in. apart. Apply
silicone adhesive (K) in 3/4 in. diameter dots
every 6-7 in. apart over the back surface of the
left side panel (C) and right side panel (D). Apply
a thin bead of silicone adhesive (K) in the corner
of the back wall assembly. Place left side panel
(C) and right side panel (D) in place and press
rmly. Clean up any excess silicone adhesive (K)
with denatured alcohol while the silicone
adhesive (K) is still wet.
K
D
K
M
C
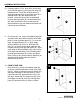
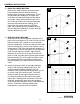
12. FRONT EDGE TRIM
Place three 4 in. pieces of installation tape (M)
at the top, middle and bottom of each front edge
trim (E). Apply a continuous bead of silicone (K)
along the front edge of left side panel (C) and
right side panel (D), approximately 1/4 in. from
the edge. Attach the front edge trims (E) to the
front edges of left side panel (C) and right side
panel (D) and press rmly to secure in place.
12
C
E
D
K