
Installation Guide

8
Lowes.com
ASSEMBLY INSTRUCTIONS
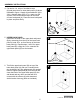
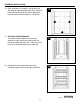
15. Install left shampoo shelf (H) and right shampoo
shelf (I) with mounting adhesive (M). Note: The
recommended installation height for the left
shampoo shelf (H) and right shampoo shelf (I) is 54
in. from the top of the shower base. Trial t left
shampoo shelf (H) and right shampoo shelf (I)
to ensure both sides are at against the panels;
adjust with a sanding block as needed. Clean the
mounting area and the back of the left shampoo
shelf (H) and right shampoo shelf (I), with denatured
alcohol. Follow the mounting adhesive (M)
manufacturer’s instructions for installation.
15
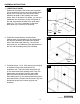
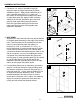
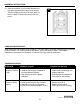
13. BACK BULLNOSE MOLDING
Measure the width at the top of the back wall
panel assembly and cut the back bullnose
molding (G) to match the measurement. Trial t
the back bullnose molding (G) on upper face
of the back wall panel (B) assembly and adjust
as needed. Apply silicone adhesive (K) to the
face of the top of the back wall panel assembly
and place the back bullnose molding (G) on
upper face of the back wall panel (B) rmly.
Note: Use masking tape (not included) to hold
the back bullnose molding (G) in place while the
silicone adhesive (K) cures.
13
G
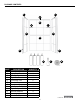
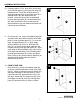
14. SIDE BULLNOSE MOLDING
Measure from the back wall panel assembly to the
back of the front edge trim (E). Note: One end of side
bullnose molding (F) is coped to t over the back
bullnose molding (G). Cut from the at end of the side
bullnose molding (F) to achieve the desired, correct
measurement. Trial t the side bullnose moldings (F)
on upper face of the left side panel (C) and right side
panel (D) and adjust as needed. Apply silicone
adhesive (K) to the face of the top of the left side
panel (C) and right side panel (D) and place the side
bullnose molding (F) on the upper face rmly. Note:
Use masking tape (not included) to hold the side
bullnose molding (F) in place while the silicone (K)
cures.
14
G
F
C
E
D
F
C
B
E
H I