
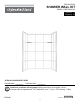
Installation Guide

4
Lowes.com
ASSEMBLY INSTRUCTIONS
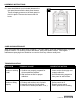
3
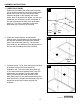
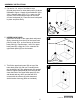
3. If needed, place 1/16 in. thick shims (not included)
at the base of the lower back panel’s (A)
installation site. Trial t the lower back panel (A)
on the shims and use a sanding block if any ne
adjustments are needed. Remove lower back
panel (A) from wall and clean the back of the
lower back panel (A), the wall board and any other
area that will be in contact with the silicone (K) with
denatured alcohol and a clean rag (both not
included).
A
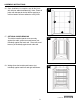
2
2. Check the measurements, and then place
masking tape (not included) over the area where
the saw (not included) will contact the nished
side of the lower back panel (A). Cut the lower
back panel (A), and make any nal adjustments to
the cuts with a sanding block (not included).
A
Masking
Tape
1
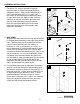
1. LOWER BACK PANEL
Determine the width of the lower back wall panel
(A) by measuring from the top of the shower base
and up 36 in. from the top of the shower base.
Measure the width of the opening from these
points. Note: If the wall is not square, you can use
cardboard (not included) to create a template of
the wall and transfer the data to the lower back
panel (A). The 1/4 in. extension on the lower
back panel (A) is at the top of the panel.
A
Top
Glue
Side
Finish
Side
Measure
36 in.