
Use and Care Manual

14
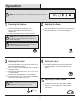
Operation
Operation
3 4
Adjusting the heater
Press the heater button on the control panel to turn on/off
(00) and adjust the heater setting.
The “+ / - ” buttons on the remote will increase / decrease
temperature setting.
The thermostat setting range is 62°F - 82°F ( 17°C - 27°C)
or continuously ON.
The thermostat is adjustable by 2°F or 1°C increments.
To change between °F and °C, press and hold the HEATER
button on the control panel for 3 seconds.
NOTE:
To change between °F and °C press and hold the
HEATER button on the control panel for 3 seconds.
Push the Power button to supply power to all
functions of the replace and put the insert in a
standby mode.
Push the Power button again to turn off all functions.
1 2
Powering the replace
NOTE:
Holding the Power button on the control panel for
10 seconds will disable the heater function.
NOTE:
All previous settings are held in memory, so the
next time you power up the replace, the unit will turn on
with the same settings.
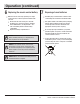
Adjusting the ame
There are 5 brightness levels that can be selected and OFF
(00) setting. Settings F5 - F1 decrease in brightness.
Pressing the Timer button will cycle through the timer
settings; 30 minutes, 1 Hour, 2H, 3H, 4H, 5H, 6H, and
off (00).
Setting the timer
NOTE:
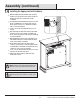
The control panel can be accessed at the upper-right corner of the insert.
/
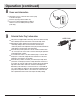
Each ame color option has speed options available.
Setting S1 is slowest ranging up to setting S5 which
is the fastest.
5
Adjusting the ame speed