
Installation Guide

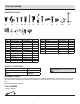

10
9
10
8
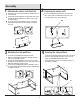
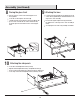
Assembly (continued)
Locate the Base (A) and align the pre-drilled holes in the
center of Base (A) with the pre-installed hardware on the
edges of the center assembly.
Insert Screws (FF) through the Base (A) and into the
pre-drilled holes on the edges of the center assembly as
shown.
Securely tighten all screws using a Phillips screwdriver.
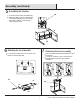
Locate the Left and Right Side Panels (F and H).
Align the Left and Right Side Panels (F and H) with the Base (A).
Insert Screws (FF) through the Base (A) and into the pre-drilled holes
on the edges of the Left and Right Side Panels (F and H) as shown.
Turn the unit over so that Control Panel Support is now
facing upward.
Locate the electric replace Glass Panel (N).
Carefully insert the electric replace Glass Panel (N) into the
grooves of the surround rails as shown. Slide all the way
in until the glass meets the bottom of the Control Support
Panel.
Attaching the base
Attaching the side panels
Placing the glass front
FF
FF
N
F
H
A
A