Item # 1006773541 Model # B6768C-2 USE AND CARE GUIDE Beckridge Counter Stool Questions, problems, missing parts? Before returning to the store, call StyleWell Customer Service 8 a.m. – 7 p.m., EST, Monday-Friday, 9 a.m. – 6 p.m., EST, Saturday 1-877-527-0313 HOMEDEPOT.COM THANK YOU We appreciate the trust and confidence you have placed in StyleWell through the purchase of this Beckridge Counter Stool. We strive to continually create quality products designed to enhance your home.
Table of Contents Hardware Included ................................................................... 3 Package Contents .................................................................... 4 Assembly ....................................................................... 5 Table of Contents ..........................................................2 Safety Information.........................................................2 Warranty.......................................................................
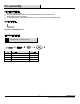
Pre-assembly PLANNING ASSEMBLY Remove all packaging materials. Refer to the parts and hardware lists, and ensure all parts and hardware are present before assembly. Contact customer service for missing parts. Place all wooden parts on a clean, flat and soft surface (e.g. carpet or rug) to prevent scratch and damage to parts. ASSEMBLY TOOL INCLUDED IN HARDWARE PACK HARDWARE INCLUDED NOTE: Hardware not shown to actual size.
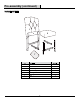
Pre-assembly (continued) PACKAGE CONTENTS 1 2 5 5 6 7 Part 1 2 3 4 5 6 7 4 3 Description Back rest Seat Left-Front leg Right-Front leg Side rung Front rung Cover Quantity 1 1 1 1 2 1 1 4
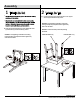
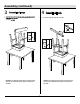
Assembly □ 1 2 Fastening the Seat Fastening the Legs Fasten the front legs (3)(4) into the seat with screws (A) and washers (C) and lock washers (D) to 60%. □ WARNING!! Over tightening could lead to issue during leveling assembly step and product wobble. Tighten only until secure and stable . Fasten the seat (2) with backrest (1) in the middle with screws (A) and washers (C) and lock washers (D) to 60%. WARNING !!It will cause wobby if assembly front legs backwards.
Assembly (continued) 3 4 Connecting all rungs Connect all rungs into legs with screws (B). Connect all rungs into legs with screws (B) Connecting all rungs . E B 100% 6 4 E B 3 100% 1 4 2 1 WARNING!! Over tightening could lead to issue during leveling assembly step and product wobble. Tighten only until secure and stable. 6 5 5 3 2 WARNING!! Over tightening could lead to issue during leveling assembly step and product wobble. Tighten only until secure and stable.
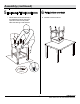
Assembly (continued) 5 6 Putting bottom cover back Tightening up all screws □ Put bottom cover back on the seat. Place the chair on a level surface and keep 4 legs straight down on the floor, then tighten up all screws to 100%. Turn the pin at the bottom of the front legs to make chair level. 7 A C D E 100% 7 HOMEDEPOT.COM Please contact 1-877-527-0313 for further assistance.
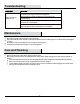
Troubleshooting According to the parts label on the Instruction Runner, check whether the wooden legs or rung are installed in the wrong direction. Rung not fit into the leg / wobbly/not level. If they are wrong, re-assemble according to the correct part label on the Instruction Runner. For dining chair, lock the screws to 60% first, then tighten the screws to 100% after put on a level platform.
Questions, problems, missing parts? Before returning to the store, call StyleWell Customer Service 8 a.m. – 7 p.m., EST, Monday-Friday, 9 a.m. – 6 p.m., EST, Saturday 1-877-527-0313 HOMEDEPOT.COM Retain this manual for future use.