
Quick Start Manual


L Series Oven Installation 11
wolfappliance.com/specs
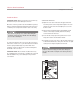
OVEN DOOR REMOVAL
1) Open the oven door. Remove both upper and lower
mounting screws of the hinge retainer plate. The oven
gasket may have to be moved slightly to access the
bottom screw.
2) Move the hinge retainer plate forward slightly. It will
remain on the hinge assembly after the mounting
screws have been removed.
3) Insert the door hinge pins through the hole in each
hinge arm. Refer to the illustration below.
4) Carefully close the oven door to about a 60° angle from
horizontal and lift the door away from the oven. A slight
rocking motion may be required for removal.
Install the Oven
IMPORTANT NOTE: B
efore moving the oven, protect any
finished flooring to avoid damage to the floor.
Move the oven into position near the installation opening.
Remove and discard packing materials. Remove the box
containing oven components found in each oven cavity.
To reduce the weight of the oven, it may be necessary to
remove the oven door. If so, pins will need to be inserted
into the spring-loaded hinges to prevent them from
snapping closed. The hinge pins can be found taped to
the inside of the oven door.
IMPORTANT NOTE: Door removal should be done only
by a qualified service technician or installer. Door removal
and reinstallation may cause damage to the porcelain
oven interior.
The oven is very heavy—use caution when lifting. Do
not lift the oven by the door handle. This will damage
the oven door and hinges.
Failure to insert the hinge pins will cause damage to
the oven. Do not lift or carry the oven door by the door
handle.
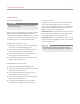
HINGE
RETAINER
PLATE
UPPER
MOUNTING
SCREW
HINGE PIN
Oven door hinge.