MODELS 315I AND 315IP ICE MAKER I NSTALLATION & O PERATION
CONTENTS Models 315I and 315IP Installation 4 Installation Checklist 13 Models 315I and 315IP Features 14 Models 315I and 315IP Operation 15 Troubleshooting Guide 20 Service Information 22 Sub-Zero Warranty 23 Features and specifications indicated herein and on the website are subject to change at any time without notice. Check our website, subzero.com, for the most up-to-date specifications. As you follow these instructions, you will notice WARNING and CAUTION symbols.
S U B - Z E R O M O D E L S 3 1 5 I A N D 3 1 5 I P I N S TA L L AT I O N A N D O P E R AT I O N T H A N K YO U Congratulations on the purchase of your Sub-Zero Model 315I ice maker (Model 315IP with drain pump). This restaurant-type ice maker is designed for home use. It produces the same high quality clear ice that you would expect from Sub-Zero. The importance of the installation of the Model 315I(P) ice maker cannot be overemphasized. Installation should be done by a qualified installer.
S U B - Z E R O M O D E L S 3 1 5 I A N D 3 1 5 I P I N S TA L L AT I O N ICE MAKER R E Q U I R E M E N T S To properly make and store ice, the Model 315I(P) requires access to air, potable water, 115 V AC electrical supply and a drain. The ice maker must be installed indoors, in a controlled environment. A I R S U P P LY The ice maker uses a fan to take in room air at the front of the ice maker through the right side of the kickplate/grille.
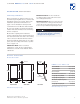
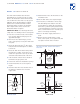
S U B - Z E R O M O D E L S 3 1 5 I A N D 3 1 5 I P I N S TA L L AT I O N I N S TA L L AT I O N S P E C I F I C A T I O N S AREA REQUIREMENTS Before moving the ice maker in place, be sure the finished opening dimensions, electrical and plumbing locations are accurate. Refer to the Installation Specifications illustrations on pages 7–8. The illustrations below provide overall dimensions for Models 315I and 315IP.
S U B - Z E R O M O D E L S 3 1 5 I A N D 3 1 5 I P I N S TA L L AT I O N I M P O R TA N T N OT E You must follow all National Electrical Code regulations. In addition, be aware of local codes and ordinances when installing your services. ELECTRICAL R E Q U I R E M E N T S PLUMBING R E Q U I R E M E N T S A 115 V AC, 60 Hz, 15 amp circuit breaker and electrical supply are required. A separate circuit is required for each unit. Rough in the water supply line.
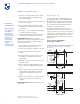
S U B - Z E R O M O D E L S 3 1 5 I A N D 3 1 5 I P I N S TA L L AT I O N MODEL 315I G R AV I T Y D R A I N The drain and inlet water tubes must be plumbed before connecting to the ice maker. Refer to the illustrations below. All horizontal runs of drain lines must have a 1/4" (6) per 12" (305) fall. An air gap will likely be required between the ice maker drain tube and the drain/waste water receptacle. A stand pipe with a trap below it can be used for the drain/waste water receptacle.
S U B - Z E R O M O D E L S 3 1 5 I A N D 3 1 5 I P I N S TA L L AT I O N MODEL 315IP D R A I N P U M P 1) Place the ice maker in front of the installation opening. Adjust leveling legs to the approximate height. OPTIONAL COMPONENTS Optional installation components are available through your Sub-Zero dealer. You can also visit our website at subzero.com. For installation questions, call Sub-Zero Customer Service at 800-222-7820. 2) Remove the control knob, control panel and control access panel.
S U B - Z E R O M O D E L S 3 1 5 I A N D 3 1 5 I P I N S TA L L AT I O N I N S TA L L AT I O N IMPORTANT NOTE: Turn on the water supply and check all fittings for leaks. Make sure the electrical harness is attached to the solenoid. Let your customer know that the ice maker will not fill with water immediately and that the first batch of ice produced should be discarded. Allow 24 to 36 hours for proper ice production.
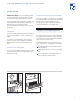
S U B - Z E R O M O D E L S 3 1 5 I A N D 3 1 5 I P I N S TA L L AT I O N I N S TA L L AT I O N S I D E PA N E L S 1) Remove the hinge cover. With Model 315I(P), you must securely fasten the side panels to the adjacent cabinets and floor. 2) Remove the door by removing the four screws that secure the door to the door hinges. Panels should be fastened to the floor and walls using ’L’ brackets (hardware not provided).
S U B - Z E R O M O D E L S 3 1 5 I A N D 3 1 5 I P I N S TA L L AT I O N I N S TA L L AT I O N D O O R PA N E L I N S TA L L AT I O N You should be sure of the door panel size and placement before proceeding with the installation. If you have questions, contact your Sub-Zero dealer or cabinet supplier. Instructions regarding sizing of the door panel are provided in the Sub-Zero Design Guide. For door handle hardware, a D-style pull centered on the edge opposite the door hinge side is recommended.
S U B - Z E R O M O D E L S 3 1 5 I A N D 3 1 5 I P I N S TA L L AT I O N I N S TA L L AT I O N 9 0 - D E G R E E D O O R S TO P Exercise caution when drilling holes for mounting hardware. This is especially critical with inset panels. Model 315I(P) has a 90-degree door stop. Follow these steps for installation: 1) Open the door approximately 80 degrees. Install the door panel by engaging the tabbed bracket to the door first and then sliding the hinge side hardware over the positioning screws.
S U B - Z E R O M O D E L S 3 1 5 I A N D 3 1 5 I P I N S TA L L AT I O N I N S TA L L AT I O N C H E C K L I S T IMPORTANT NOTE: To ensure a safe and proper installation, the following checklist should be completed by the installer to ensure that no part of the installation has been overlooked. Any questions or problems about the installation should be directed to your Sub-Zero dealer or Sub-Zero Customer Service at 800-222-7820. You can also visit our website at subzero.com.
S U B - Z E R O M O D E L S 3 1 5 I A N D 3 1 5 I P F E AT U R E S M O D E L S 3 1 5 I A N D 3 1 5 I P F E AT U R E S Undercounter ice maker Model 315I has a gravity drain, while Model 315IP has a built-in pump to allow water to drain into adjacent sink WA R R A N T Y Sub-Zero products are covered by a two, five and twelve year residential warranty (exclusions apply). See warranty details at the end of this guide.
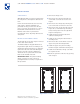
S U B - Z E R O M O D E L S 3 1 5 I A N D 3 1 5 I P O P E R AT I O N I C E M A K E R O P E R AT I O N I N I T I A L S TA R T- U P ICE CUBES 1) Remove the control box cover. The ice cubes are tapered cylinders about 11/4" (32) in diameter at the widest end; taper down to 1" (25) wide at the top; and are 11/8" (29) high. When the ice maker is adjusted properly, there should be a 1/4" (6) indent in the base of the cube.
S U B - Z E R O M O D E L S 3 1 5 I A N D 3 1 5 I P O P E R AT I O N ICE P RO D U C T I O N Ice production has two distinct cycles: freeze and harvest. One freeze cycle and one harvest cycle will yield a batch of eight ice cubes. The freeze cycle occurs when water is sprayed against the freezing surface. The harvest cycle occurs when the ice is released and water enters the ice maker. A complete cycle takes about 30 minutes.
S U B - Z E R O M O D E L S 3 1 5 I A N D 3 1 5 I P O P E R AT I O N CLEANING Make sure that the outside of the unit and door, ice storage bin, condenser, ice making system and ice scoop are kept clean. Never allow the ice maker to operate without regular cleaning. The ice maker will last longer if it is kept clean. Regular cleaning should be done at least once per year, and preferably twice.
S U B - Z E R O M O D E L S 3 1 5 I A N D 3 1 5 I P O P E R AT I O N ICE MAKER CLEANER Sub-Zero ice maker cleaner (8 oz. bottle) is available from your Sub-Zero dealer. Ask for part #19034306. I C E M A K E R CLEANING I C E M A K E R MAINTENANCE CLEANING THE ICE MAKING SYSTEM WINTERIZING 1) Open the door and turn the ice maker control knob to OFF. Refer to the illustration on page 19 for location of the control knob. 1) Clean the ice making system.
S U B - Z E R O M O D E L S 3 1 5 I A N D 3 1 5 I P O P E R AT I O N 1) Open the door and remove the control box cover. 2) Locate the cube size adjustment screw shown in the illustration below. To make fuller cubes, turn the screw clockwise about 1/4 turn. This will make the freezing cycle longer. 3) To shorten the freezing cycle and make cubes that are not as full, turn the adjustment screw 1/4 turn counterclockwise.
S U B - Z E R O T R O U B L E S H O OT I N G G U I D E T R O U B L E S H O OT I N G G U I D E P RO B L E M POSSIBLE CAUSE POSSIBLE SOLUTION Ice maker does not operate Ice maker is unplugged Plug ice maker in Breaker tripped or fuse is blown Reset breaker or replace fuse – if it happens again, call a Sub-Zero authorized service center Ice maker control turned to OFF Turn ice maker control to ON Storage bin thermostat open, keeping ice maker off Ice on sensor tube – it is normal for ice maker to
S U B - Z E R O T R O U B L E S H O OT I N G G U I D E T R O U B L E S H O OT I N G G U I D E P RO B L E M POSSIBLE CAUSE POSSIBLE SOLUTION Unit operates but no ice falling in storage bin Ice may be stuck in the evaporator and the unit is ”frozen up” Check water supply – filter may be restricted Check inlet water valve – inlet screen may be restricted or valve does not operate Hot gas valve may not operate – check and repair or replace Harvest time set too short – timer needs adjustment (see page 19)
S E RV I C E I N F O R M A T I O N S E RV I C E I N F O R M A T I O N C O N TA C T I N F O R M AT I O N Sub-Zero Customer Service: 800-222-7820 Website: subzero.com If you do need service, be sure to have the model and serial number of your unit when you call. You’ll find these numbers on the model and serial number plate located on the left sidewall of the reservoir. For warranty purposes, you will also need the date of installation and the name of your Sub-Zero dealer.
S U B - Z E R O F R E E Z E R C O M PA N Y P R O D U C T S LIMITED WARRANTY RESIDENTIAL USE ONLY FULL FIVE YEAR SEALED SYSTEM WARRANTY LIMITED SIXTH THROUGH TWELFTH YEAR WARRANTY ON THE SEALED SYSTEM FULL TWO YEAR WARRANTY ON TOTAL PRODUCT* FULL FIVE YEAR SEALED SYSTEM WARRANTY For five years from the date of original installation, your Sub-Zero warranty covers all parts and labor to repair or replace any components that prove to be defective in materials or workmanship in the sealed system.
S U B - Z E R O F R E E Z E R C O M PA N Y, I N C . 17307901 8 / 2005 P. O . B O X 4 4 1 3 0 MADISON, WI 53744-4130 800-222-7820 S U B Z E RO.