
Installation Instructions


Mounting Instructions 4
Mounting Instructions
1) Determine location and mounting method of custom
door handle if one will be used. Decide the best way to
modify the cleat for the handle if necessary (cut cleat
completely or notch to t). Also, determine the best
sequence for installing handle and cleat. Panel will
need to overhang the work surface if handle is installed
before cleating.
2) Provide surface protection and lay decorative panel on
a at work surface with nished side down.
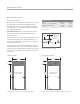
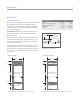
3) Locate the page of these instructions that applies to
your specic built-in model and installation (single or
dual). Circle the panel illustration for your application
(overlay or ush inset) for better reference as you
proceed.
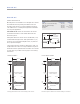
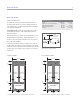
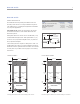
4) Check dimensions of the decorative panels against the
panel illustration to be sure they are exactly the right
size.
5) Cut mounting cleats to length according to the chart.
Measure and cut longest cleats rst. Horizontal cleats
for panel bottoms should be cut to include as many
holes as possible. Use a general purpose blade in any
type of carpentry saw.
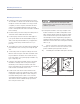
6) Using the offset gages provided, reference the panel
illustration to arrange cleats on the panel. Keep in
mind that you are working on the back side of the
panel. Horizontal cleats should extend to the outside of
vertical cleats for maximum screw count.
7) Double check cleat offset locations. Attach cleats
initially with screws in the slotted holes of the cleats.
Using quick clamps helps with accurate cleat place-
ment while driving screws. Start on one end of the
cleat and work along the length as you install screws.
This makes it easier to maintain the proper offset if
there is any bow in the cleat.
OFFSET GAGE
BACK SIDE
OF PANEL
HORIZONTAL
CLEAT
Offset gage.
Panel mounting.
DOOR TRIM
DOOR
PANEL
HORIZONTAL
CLEAT
8) Install panel assemblies on door(s) and grille of the
built-in unit. Refer to the built-in refrigeration instal-
lation guide for this procedure. Note any ne adjust-
ments needed. Remove panel assemblies from the
unit and adjust cleats as required for proper panel
alignment. Attach remainder of screws in round holes.
Add extra screws in the bottom cleat if panel is thicker
than
3
/4" (19).
9) If there is ex in the center of the panel, install
short pieces of leftover cleat stock to the back of the
panel to maintain spacing from the unit door.
10) Reinstall panel assemblies and replace door trim.
Make sure the built-in unit is secured in place with
anti-tip brackets to prevent tipover when panel weight
is added to open doors.